Sunday, May 23, 2010

Scrumptious Sunday- Easy Chocolate Frosting

As I mentioned, this past week was my son's birthday. I really like to make birthday cakes. Even though they are far from perfect, I think they are extra special, super fun, and taste Divine. My son is big into motor sports so this year he requested a dirt-bike cake. This is what I can up with.


Pretty cute don't ya think?

I used two devil's food cake mixes and made one sheet cake and an extra one in a 8 x 8 pan. I used the small cake to make the two hills. I frosted everything in my Mom's yummy chocolate frosting. The grass is shredded coconut died with green food coloring and I made the track more dirt like by sprinkling it with crushed cookies. My son loved the cake but especially loved the new dirt bike toy he got from the top!

Mom's Super Yummy (and easy) Chocolate Frosting

1 stick butter
1/3 cup milk
3 heaping tbs Cocoa Powder
1 tsp vanilla
Powder Sugar

In a sauce pan melt the butter, milk, and cocoa till bubbly. Remove from heat. Beat in powder sugar till desired consistency is reached. (about 1/2 bag) When almost done, beat in vanilla.

EDIT: Mom caught a typo! I had listed 1/2 cup milk but the recipe actually calls for 1/3 cup. So sorry!

Friday, May 21, 2010

Bead-utiful Stemware

Sometimes when I make something that I'm really proud of I just love myself. But actually I love Kate over at Centsational Girl. Seriously, this girl is amazing! Her blog was the first "design" blog I started following and was the inspiration for starting this little blog. I hope to one day be half as cool as her!

Anyway, the other day Kate made the most amazing jeweled stemware. She found the inspiration at a local winery. They were $75 a glass and she recreated them for about $40 for a set of four. Amazing! So I decided to try my hand and make a few myself. Wanna see them?


Didn't they turn out great! I just love them! I got the glasses at TJ Maxx for 5.99 for the set and spent about $15 on beads (with a ton left over) and $5 for the silicone. So I made my set of four for only $26. I'm going to make four more since I have plenty of beads and silicone left and I might even try my hand on some hurricane glass.

You can see Kate's full tutorial HERE.

EDIT: The question has been asked, "How do you wash them?" Because they are glued on with silicone (same stuff used for aquariums) they are completely waterproof. Still, I would recommend hand washing and be gentle around the beads. Since I only use fancy glasses like this on special occasions anyway, hand washing is just fine with me.

Linking up at:
Under The Table and Dreaming
A Soft Place to Land
Creations by Kara
Someday Crafts
Women Who Do It All

Thursday, May 20, 2010

Birthday T-Shirt

Every year I make my kids a special t-shirt for their birthday. Since my son's birthday was yesterday (Happy Birthday Ezra!) I thought I'd show you what I came up with this year.

Remember the shirts I made for my kids HERE? Well I used that same technique. I cut out a stencil with freezer paper and used bleach to change the color. Unfortunately the words were kinda small and the shirt took FOREVER to change. So by the time I got the stencil off, the bleach had spread and the words were hard to read. So I decided to outline it with embroidery floss. I also accented it with a few extra squirts of bleach. Overall I think the combined look is pretty cute!


And the best part, the little man loved it!

Sunday, May 16, 2010

I won, I won!

I cannot tell you how many blog giveaways I have entered but never win. But still I enter, thinking "you really won't win if you don't enter." So when Tatertots and Jello announced the winner of a giveaway and I saw MY name, I almost fell over! (Good thing I was already sitting.) Wanna see what I won?


Isn't it SO cute! I want to give a big THANK YOU to Aimee with Palm Trees and Chocolate. I LOVE it!

If anyone wants some wrist candy like mine, be sure to check out her website. She has some seriously cute things!

Scrumptious Sunday- Cowboy Caviar

For today's scrumptious Sunday I'm going to share one of my absolute favorite recipes. If we are ever going to a BBQ or potluck, this is what I bring. It is SO good!

Cowboy Caviar


5T red wine vinegar
up to 4T hot sauce (depends on how spicy you like things.)
1T olive oil
1-2 cloves garlic, minced
1/8 tsp black pepper
2 (large) avocados, chopped
1 (15oz) can black eyed peas
1 (11oz) can corn
2/3 cup green onion, chopped
1/2 cup cilantro, chopped
1/2 lb Roma tomatoes, chopped

Mix all ingredients together and salt to taste. Serve with tortilla chips and try not to eat the entire bowl!

Saturday, May 15, 2010

Sniff Sniff

I lost the rate your space contest. (sob, sob) No not really, I am super pleased to have made it into the top 3 and it was fun showing it off and reading all the sweet comments. Here is the room that beat me out.


Isn't it super cute?!?! I love how bright and happy it feels. She did a great job! Thanks to everyone who voted for me, I appreciate your support. Love ya all!

Friday, May 14, 2010

All Season Blocks (Part 2)

If you want to see my first attempt at these blocks, you can see them HERE.


Wooden blocks are super cute and trendy right now and I love how they look mix into seasonal decor. The problem is that you have to have a set for every season or holiday, and then you have to store them somewhere when they are out of season. So when I came upon this fabulous idea HERE , I knew I wanted to make me some! All you do is make 10 blocks, each with 6 letters, and than you can spell out over 80 words! (The original post had four letters per block and could make about sixty words, so I'm proud to have discovered the extra letters to make some really great words, including Give Thanks, Be Mine, Christmas, and Let It Snow.)

Want to make your own? Here's how! (Sorry for the lack of pictures, I only stop for the camera a couple of times.)

Step 1: Get wooden blocks. I was shockingly surprised at how expensive blocks were at the craft store. So I went to Lowes were I found 3x3 posts. I (with the help of my hubby) was able to cut 13 blocks out of one post. I than sanded the cut edges "somewhat" smooth.

Step 2: Paint your blocks. I used acrylic craft paint and did a couple coats. You can use any color to match your decor. My one suggestion would be to keep them neutral enough that you can mix them with your other holiday decorations.

Step 3: Sand your blocks. I wanted a distressed look so I lightly sanded the surface and really went at it at on the edges. I actually used a palm sanded and it made my life a lot easier.

Step 4: Stain. I used a basic wood stain (minwax early american) slathered it on and then wiped away any excess. This will stain any areas that you exposed the bare wood and give a antiquing to your paint finish.


Step 5: Cut your letters. Using scrapbook paper cut out paper letters. For those who are lucky enough to own a cricut cutter, this will be an easy task. For the rest of us it is a little less simple. I wrote the letters up in a photo editing program in a font I liked. I than mirrored the image so that after I printed and cut the letters out, the "right" side wouldn't have any computer ink. My program also allowed me to outline the letters so I didn't have a huge inky mess. I than cut them out with scissors, using an exacto knife in tight spaces.

Step 6: Apply the letters. I used modge podge to apply the letters to my blocks. I carefully made sure that all the letters were firmly down.

Step 7: Seal. Using a spray acrylic finish, spray all sides of your blocks. I chose a matte finish but a gloss would look nice too.


OPTION: Since I had extra blocks I decided to make 3 additional "decorative" blocks. I finished them the same as above just instead of putting on letters, I put on squares of seasonal scrap paper. (Christmas, Easter, 4th of July, Thanksgiving, Fall, Summer...etc) They are fun to mix in with the other blocks or use as spacers between words. Here is a small sampling of some of my decorative options.


So here are the letters you need on your blocks:
Block 1: H Y E D A N
Block 2: A C R S N I
Block 3: R P E T U N
Block 4: V N L O A S
Block 5: E O M D S R
Block 6: S M K I A O
Block 7: T F B W Y E
Block 8: U A G L Y T
Block 9: P J I H O W
Block 10: F P S C U E

And with those letters you can spell (in no order what-so-ever)....

Birthday
Flake
Hearts
Christ
Jesus
Bloom
Flag
Irish
Sun
Sunny
Swim
Pool
Ghost(s)
Witch(es)
Peace
Bunny
Be Mine
Vampire
Fright
Thanks
Fairies
Jolly
Flowers
Wishes
Leaf
Treats
Turkey
Party
Heart
Smile
Wonder
Dance
Thankful
It’s a boy
Harvest
Welcome
Faith
Family
Spooky
Friends
Winter
Freedom
Blessed
Fall
Happy
Merry
Joy
Grace
Rainy
Country
It’s a girl
Fairy
Snow
Home
Hope
Monster
Mother
Dream
Easter
Lucky
Lucky You
Love
Love You
Santa
Garden
Let it Snow
Imagine
Halloween
Glory
Romance
Pumpkin
Frosty
School
Autumn
Spring
Spring Time
Summer
Father
America
Brrr
Believe
Christmas
Snowflake
New Year
Give Thanks
Kitchen

and I'm sure a ton more! (I keep finding other options)

As I mentioned before I decided to make four sets as mother's day gifts. My hubby wondered why we couldn't just get them some bath products but I insisted this would be "SO MUCH FUN!" Boy did I bite off more than I could chew. If you do the math, I made 52 blocks and cut out 240 letter by hand! I wasn't able to get them ready for Mother's Day but I'm sure they will love them and be well worth the wait.

I made a black set for my Mom,


the brown set is for my Mother-in-law,
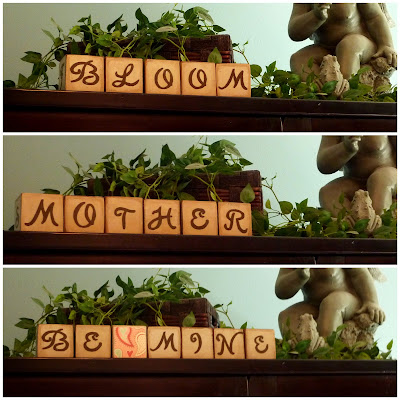


the green set is for my step Mother-in-law,


and the grey set is for me!
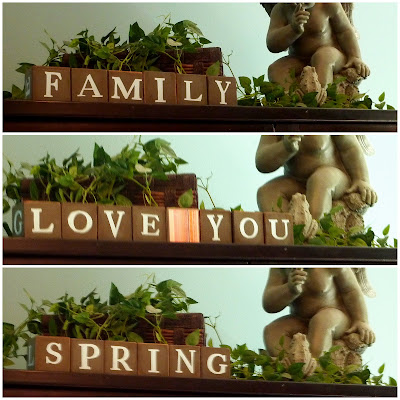
Sorry about the blurry pictures, photography isn't my strong point.

So which one is your favorite?

Linking up at:
Under The Table and Dreaming
DIY Day @ A Soft Place to Land
Someday Crafts
Women Who Do It All
Creations by Kara
Remodelaholic
Poppies at Play
Tatertots and Jello

GO VOTE...again!

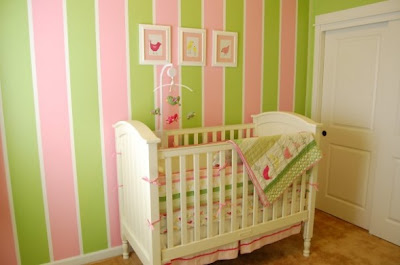
So Ava's room made it into the top 3 on the rate your space contest over at Mann Land 5. A big thanks to all those who voted for me! Now I need you to go vote again though. Click HERE
Thanks a ton!

Wednesday, May 12, 2010

Vote For Me!

Mann Land 5 is hosting a "Rate Your Space- Nurseries/Kids Rooms" contest so I entered both my kiddos rooms. I will love you forever and ever if you hop on over and give me your vote. (rooms 6 & 7 if you didn't already know) Or you could hop on over and vote for anyone you like, just GO VOTE! Click HERE.

Thanks a ton!

Sunday, May 09, 2010

All Season Blocks (part 1)

First off, this is by no means an original idea. However I still thought I'd show you my spin on it.

Awhile back I saw this post by Whimsikel and thought "That is so cool. I want to make those." You make 10 wooden blocks and each block has four letters. Than with those blocks you can spell over 60 words that fit every holiday or occasion. Well, since the blocks have 6 sides I decided to add a few extra letters and it turns out I can make over 80 words including....

New Years
Be Mine
Lucky You
Easter
Spring Time
Birthday
Freedom
Summer
Harvest
Spooky
Give Thanks
Christmas
Let It Snow
Blessed
Welcome
Family
and SO many more!

I also thought it would be fun to have a few extra blocks with decorative images that you could accent with.

Now, I can never do things small. Go big or go home is my motto! Except when it come to your hair. So I decided I would make a set of these for Mother's Day for my Mom, (love her) my Mother-in-law, (love her too) my step Mother-in-law, (love her 3) and, of course, myself. So that means this past week I made a total of 52 BLOCKS! (It makes me tired just typing about it.)

Of course all four sets are different to fit each person.


I hand painted on the letters but I'm not thrilled with how they turned out. So I'm thinking I'm going to try something different. But I thought I'd share what I've got so far. Once I get it just right I will post a full tutorial included all the possible words you can make with a set of these blocks.

So to all the Mothers in my life, THANK YOU for being such inspirational women. Through your examples I know that I can continue to grow as a women and mother. I appreciate all that you do for me and my kids and love you all more than words can express. So here is your Mother's Day gift although it probably won't be in your possession for another couple of weeks.

Happy Mother's Day!

Scrumptious Sunday- Shipwreck

For today's scrumptious Sunday I'm going to share a meal that my family really enjoys. It is a Kraft recipe that my mother-in-law found in a "food and family" magazine. Its way yummy, the kids love it (so does my husband) and best of all SUPER QUICK AND EASY!!!!

Shipwreck Dinner


photo credit


1 lb. extra lean ground beef
1 pkg KRAFT Macaroni & Cheese Dinner
1 can (14-1/2 oz.) stewed tomatoes, undrained
1 cup frozen green peas
1 cup milk
1 cup shredded Mozzarella Cheese

BROWN meat in large nonstick skillet on medium-high heat; drain, if necessary.

STIR in Macaroni, Cheese Sauce Mix, tomatoes, peas and milk. Bring to boil; cover. Simmer on medium-low heat 12 min. or until macaroni is tender, stirring occasionally.

TOP with mozzarella. Remove from heat. Let stand, covered, 5 min. or until mozzarella is melted.

Next time you need a quick, yummy, kid friendly meal you'll know just what to do!

Wednesday, May 05, 2010

Sneak Peek

As mother's day is just around the corner, all minds are thinking about the perfect gift for the mothers in their life. I really like giving gifts. There is something about finding the perfect thing, presenting it in the perfect package, and seeing the delight on the receiver's face. Since the blogsphere is chuck full of inspiration, it didn't take me long to decide what I wanted to do for my moms. However, I can't tell you what I'm doing as I'm sure they will read this blog! So here is a little sneak peek into what I've been up to until the big reveal on Sunday. (Hopefully it doesn't give too much away.)


I will say this much, so far I am thrilled with how they are turning out!

Sunday, May 02, 2010

Scrumptious Sunday- Chicken Tortilla Soup

So this is supposed to be an "interior design" blog but Remodelaholic is hosting a recipe link party so I thought I'd share one of my favorite recipes. (Everyone likes a little crossover anyway right?!?!) In fact, I have several great recipes that are definitely share worthy. So I've decided, from this day forth, I will hold what I'm going to call "Scrumptious Sunday" and share a new and delicious recipe every Sunday.

* If you also read my family blog, this first recipe will be a repeat.

I consider myself a fairly decent cook. I have been pretty proud of some of the things that have come out of my kitchen, but when I made Chicken Tortilla Soup and my husband declared it "the best tortilla soup ever and possibly the best thing I have EVER made," I knew it was too good not to share. And the best part? It is SUPER easy!

The recipe originally came from allrecipes.com but I've changed it up a bit to get it perfect.

Slow Cooker Chicken Tortilla Soup

3-4 frozen chicken breasts
1 lg can whole tomatoes (mashed)
1 can red enchilada sauce
1 medium yellow onion (chopped)
2 cloves garlic (minced)
2 cans chicken broth
1 cup frozen corn (add more or less as you like)
1 can black beans
1 tsp. cumin
1 tsp. chili powder
1 tsp. salt
1/4 tsp. black pepper
1 bay leaf

*note: seasoning measurements are approximate. I just eyeballed everything so be sure you season to taste.

Place all ingredients in a large slow cooker. Cook on low for 6-8 hours or on high for 3-4 hours. I just put the chicken in frozen and then removed it about an hour before I was going to serve and shredded it. Garnish with tortilla chips, cheese, sour cream and/or avocado slices. Serves 8 but make the whole batch as the leftovers are killer!

Saturday, May 01, 2010

My Favorite Room

I had a hard time deciding what to post as my favorite room in today's parade of homes link party. We probably spend the most time in our living room, but its in need of a revamp. (At least in my eyes.) I like how my basement is shaping out but nothing down there is quite "done." So in the end I decided to link the past post of Ava's room.


So if you are new to this blog be sure to head on over and check it out! Even though I wanted to show off something new, I felt like her room really is the shining jewel of our home. (How unfair is that?) But not to worry, this has motivated me to get downstairs and finish some stuff up. Hopefully I'll have something new to show you in the near future.

LinkWithin

Related Posts with Thumbnails
Don't stop there! Click "older posts" to keep reading!