Wednesday, March 30, 2011

Using CSS Coding in Template Designer

Since I have had a crazy busy last few days and have nothing creative new to share, I thought it would be a good time for another installment in my blog design series.


Today we are going to talk about adding CSS coding in template designer.

*Please note:  This tutorial is for the simple template in the new template designer.  While it should work in other templates and I've tried it in a few, I can't guarantee anything.

Cascading Style Sheets (CSS) is a style sheet language used to describe the presentation semantics (that is, the look and formatting) of a document written in a markup language. (according to wikipedia) But what that means to us is that they are snippets of code that you can use to override template formatting.  Its small stuff that makes a BIG difference.

Here is how to get started.


Sign into your blogger account and go to design.


Then click on the template designer tab.


In template designer, go to advanced, then add CSS.  Its at the very bottom. Then you can just type in the codes you want to use into the white box.

Here are some of my favorite codes. 

So there you have it.  Adding CSS coding.  Its a fun way to make a big difference!  So play around with it and let me know if you have any questions.  While I'm stilling learning myself, I'd be happy to help if I can.

If you missed any of my other posts in this series, you can view them all HERE.

Monday, March 28, 2011

Home Sweet Home

Holy cow, what a week!

We just got back from our Hawaiian vacation.  Without boring you with all the details and the 5000 pictures I took (that's what the family blog is for), here is a quick recap.  We spend a lot of time on the beach and in the water, went snorkeling, went hiking, did a zip line tour (without kids), jumped off a waterfall (they made me!) ate a ton of food, shopped, went to a luau, and watched my Mom get married. 

Here's my cute little family...


Me with my hottie...


And the whole fam damily.  (not the best picture)


Have I ever mentioned that I come from a huge family?  In this picture is my Mom and her new husband, my 11 siblings, my 3 brother-in-laws, my nephew, and of course my little family.

It was a great trip.  It felt so good to spend the week with everyone and take a break from the real world.  I left my computer at home so that I wouldn't be tempted to check in on the ole blog here, and I think the break from being "online" was long over due. 

Today I'm suffering from a major case of jet lag, melancholy over the 3 inches of snow we got last night, the pile of laundry that needs to be done, and all bags that need to be unpacked.  So bare with me while I try and get back on track.

In other news, I host Wood You Like to Craft for April and it starts next Monday.  I will be sharing the full tutorial on how to make my candlestick rabbits (pictured below), and then we will see what the other ladies came up with.  The link party will start next Friday.  I'm so excited to see what everyone does! I sure hope you'll join in, make some too, and help spread the word.  It'll be a blast!

Monday, March 21, 2011

Vacay

This week I am here...


So I won't be spending my time here...


See ya next week!

Friday, March 18, 2011

Inspiration File

Only one thing to share this week.

I have a new blog to introduce to you, Hot Mess in a lil Black Dress.  Aimee claims to be a hot mess but she seems to have it all together to me!  Her blog is brand new, has only posted a few times, but already she has shared this gem.


Isn't it perfect?!  Love all the soft spring color in this wreath and the eggs are the perfect Easter touch. (but could be removed after Easter so the wreath could last all season.)  Great job!

Grab a featured button if you'd like Aimee!

Also, if you are working this month's "Wood you Like ton Craft?" project, the link party ends tomorrow night.  So hurry up and get linking!  I'm in charge of this month's prize so you won't want to miss it!


Wednesday, March 16, 2011

Winner!

The winner of the 30% off coupon to TMoOT is....

Megan who said,
"I love the lemon and lime bag! SO cute for summer."

Congrats Megan! Contact me and I will get you in touch with Kristol so you can claim your prize.

Monday, March 14, 2011

No Soliciting

Just in case you missed it last week, I wanted to share my Wood You Like to Craft? project.  It was a blast to make and I sure hope you'll play along and link up your take on this months project.  And if you did miss it, be sure to head over to Under My Umbrella to see the rest of the projects.  They all turned out amazing!

-----------------------------------------------------------------------

I was so happy when Melinda announced this month's craft because I new instantly that this was going to be a solution to one of my problems.  You see, we have a solicitor problem.  In the summer especially, its relentless.  Sometimes the people that come to our door are really pushy and down right rude, and being home alone a lot of the time it makes me uncomfortable.  At one point in time I had a little vinyl "no soliciting" sign on the door but it got in the way of my wreath and came down. (Because we all know the wreath is far more important!)  My husband has been asking me to put something back up, so when I saw Melinda's sign, I new mine would be a "no soliciting" sign.

Wanna See?


Sigh.... I'm in love!  Its almost too pretty to have such a functional message.  But my favorite part is that its not subtle in the least.  Anyone who comes to my door is going to notice it and know my wishes.  Do you think it will work?  Let's hope so!

Mine is made the same as Melinda with the following exceptions.
  • I have a love affair with scrapbook paper.  I literally get sucked down the scrap aisle at the craft store and get stuck there.  (Although I've yet to use a page to make an actually scrap book.) I just adore all the patterns and colors.  So I decided to use scrap paper for my design.  The letters are also cut from card stock and all of it is modge podged on.
  • When I went to Lowes and asked for a 6x6 castine, they looked at me like I had sprouted horns.  So I ended up finding a 7x7 wood plaque at Micheal's.  Same difference really.
  • To hang, I drilled two holes so I could thread my ribbon through and have a cute little bow up front.
  • Because the majority of my sign is created from paper, I was worried about it holding up to the weather outside.  So after is was complete I sprayed the whole thing down with Thompson's water seal.  (the same stuff you'd seal a deck with.)  This gave it a water proof finish, although it does leave the sign a bit greasy feeling, so be warned.
Here are a few (okay a bunch) more pictures because I can't help myself.  


(Jeez Krystal, get a new doorbell!)

Thanks so much Melinda for the awesome inspiration.  I can't wait to see what you create!

Linking to these great parties.

Friday, March 11, 2011

Inspiration File

Hey everyone!  I have a few fun projects to share this week.  I must have "things for my kids" on my mind because these all fall under that category.

First up are these adorable Easter baskets by Crafty Sisters.  I fell completely in love with them when I saw them and think they would be a blast to make.  I love that they are made of wood and would last forever.  I can totally see something like this being passed through the generations, and I'm putting these on my list for sure!


Then I came across the blog Gluesticks and loved her I-spy bag tutorial.  I have seen these before and always wanted to get a couple for my kiddos.  I think they would be a perfect quite church toy. (Not that my kids are ever quite in church.)  I really love how she made hers using simple household items and even thought to include a pocket for a dry erase card with all the objects.  I'm going to have to make some!


The other thing I really loved from Gluesticks was her Wooden Peg Matching Dolls.  Aren't they the cutest?  I know my little girl would get a kick out of them.  I'm going to have to remember these so I can make them for her birthday.  Too cute!


Thanks for the inspiration ladies!  Remember to grab a featured button from the sidebar if you'd like.

And don't forget to enter the TMoOT giveaway going on HERE.

Thursday, March 10, 2011

TMOOT and a giveaway!

I'm am so pleased to introduce Kristol, the creative genius behind The Magic of Ordinary Things.  I met Kristol through blogland but really got to know her when I worked on her blog design.  On her blog you will find amazing things like...


Just to name a few of her more recent posts.  But where Kristol will really blow you away is with her mad skills as a seamstress.  Kristol owns TMoOT, a fabulous etsy site where she sells her amazing quilted bags.  I was in dire need of a new bag for church.  I teach Primary (the children's Sunday school class) at my church and I have a lot to carry around.  So I decided to commission Kristol in making me my dream church bag.  Being the difficult person that I am, I can't just pick out a bag though. I love the styles of the bags but needed mine extra large and I also wanted to pick out my fabrics. (Because that's how I roll... picky much?)  So I sent her some vague dimensions, a couple yards of fabric, and I got back this.


L.O.V.E

I was completely blown away by the quality of the craftsmanship.  Being a novice seamstress I can really appreciate what it take to create something that is so professional.


I am in love with all the details.  From the perfect quilting, the adorable ties, that to-die-for ruffle, and the perfectly chunky button.


The inside is lined beautifully and surrounded by pockets so you have a place for everything.


And everything fits perfect!  This is the perfect size bag for church, the park, or a diaper bag.  (You know what I mean, big enough to carry everything you need without feeling like you are carrying a piece of luggage.)


If you haven't caught on yet, I'm extremely happy with my bag!

But it gets better!  Kristol has kindly offered to give a 30% off coupon to one of my readers! So if you are in the market for your own perfect bag to fall in love with, head on over to TMoOT.  She has a bunch of purse size bags in stock or you can have her make you a large tote like mine.  Just convo her for details on pricing.

To enter just leave me a comment telling me what your favorite "in stock" bag from her shop is and what you'd use your 30% off coupon towards.

Thanks Kristol! 
 

Tuesday, March 08, 2011

Wood You Like To Craft?

Hey, just wanted to drop in and let you all know that I'm over at Under My Umbrella today showing off my Wood You Like to Craft project. So come by and say hi!

Monday, March 07, 2011

Lucky Banner

I have to admit I was really bummed to take down my Valentine's decor.  I was slow to get it up and really only had a couple weeks to enjoy it.  I was in love with my cute heart banner and was sure I wouldn't be able top it.  But I really think the banners kinda "make" the mantle so I set out to make a St. Patty's day one too.

I went to Zurchers (a discount party supply store and the place I got my heart doilies) to see if I could find some inspiration.  I found fabric shamrock confetti and it all clicked.

Here is what I came up with.


I literally did a happy dance once I hung it.  I think its my favorite banner yet.

Here is how you can make your own.


Gather your supplies (A)  I used paper doilies, scrapbook paper (I used the scraps from my shamrocks and its a card stock weight) yarn, spray adhesive, hot glue, craft glue, tape and gold glitter. 

Start by spraying your doilies with the spray glue and gluing them to your card stock.  Cut them out leaving a bit of a boarder of the paper.  Then cut your letters out of the card stock and glue those down too. (B)

Then to give the letters a little extra punch, I lined them with craft glue and glittered. (C)

Then you use a hole punch and make holes in the circles so you can string them up.  Thread the yarn through and spread everything out. (D) You can see in the image how I tried to space it evenly and left extra yarn at the ends.  Tape the yard in place on the back of the circles so everything stays put.

Then you take your confetti and sandwich the yarn between two shamrocks, hot gluing in place. (E)  I did two shamrocks between each letter and two on each end.

Then just hang and enjoy! (F)


So there you have it.  The completion of my St. Patty's Day mantle.  Love it!
And just a reminder, Wood you like to craft? starts today at Under My Umbrella.  Be sure to check it out!

As always I'm linking to these great parties and events:

Friday, March 04, 2011

Inspiration File

So this week I discovered a new blog.  Funky Polkadot Giraffe and spent a lot of time looking through her site.  A definite must read if you don't already.  A couple things really caught my eye. 

First was her button rainbow printable.  That's right, I said PRINTABLE.  Too cool huh?!?  I totally thought they were real buttons when I first saw them.


And the second was this rainbow Jello.  Doesn't it look so pretty?!  What a fun treat to make for St. Patty's day!


Then Just Another Hang Up made this cute rabbit pillow.  I love it and think its the perfect spring accent.  I'm so ready for spring! I love that this technique could be used for any image too.  Great job!

 
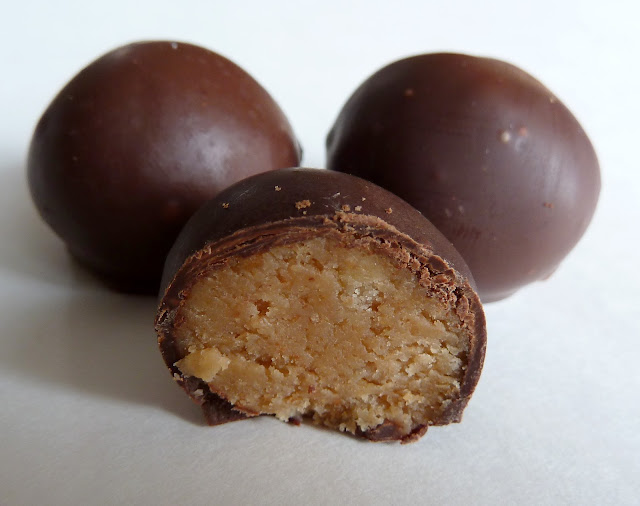
And finally, Simply Designing made Nutter Butter Cookie Balls.  Uh... hello! You had me at nutter butter. But mix that with cream cheese and dip in chocolate... yes please!


Thanks for the inspiration!  Feel free to grab a button.

Wednesday, March 02, 2011

How to align pictures.

So its time for another installment in the blog design series.


One of my readers, Michelle, commented,
"Thanks for the tip. One of my questions is how do you post pictures side by side? Or is that all done in photoshop?
Thanks again, can't wait to hear more!"

So this one is for you Michelle.

How to align pictures.

If you want to align your pictures (or sponsors) side by side then two things will be your best friends, java script codes and photobucket. 

So the first thing you are going to do is log-in to your blogger account, go to design, add a gadget, and open a html/javascript gadget.


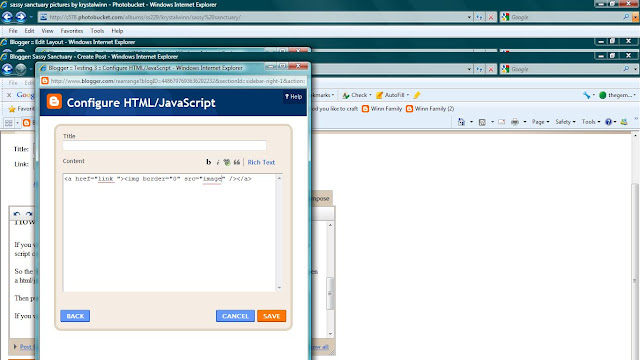
Then put the following code into the box.  That code is for one picture.  Repeat it for as many pictures as you have. (remember you can click the images to view them larger)


If you want the images to link to a web page, then the code will look like this.


Now you open a new window and go to photobucket. Upload your pictures (or buttons). Before you upload your images you want to make sure they are going to fit side by side in your sidebar.  I like to resize my photos before putting them into photobucket, but it can be done in photobucket as well. 


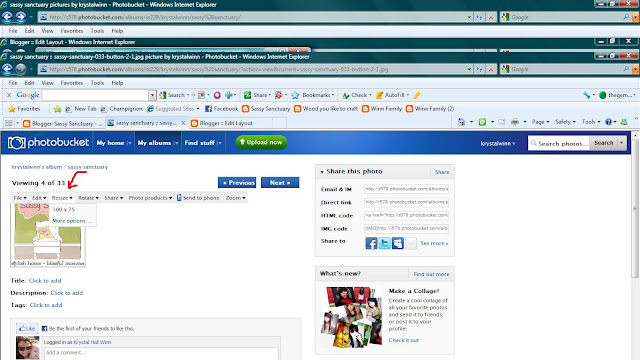
To resize, click on the image, then hover your mouse over it and a tool bar will appear.  I find the preset sizes usually come out clearer, or you can hit more options and select an exact size.


If you don't need to resize, then just hover over your image and this tool bar will appear.  Click the "direct link" and it will copy.


Go back to your javascript gadget and replace the word image (only the word, leave the " " in place) with the code you just copied.  If you are using the code with a link, then replace the word link with the web address you are linking to.  (I underlined the parts of the code that I added.)


Now repeat for as many pictures as you have.


If you want the images centered, add the code underlined in blue (image above) before and after the entire thing.  Click save. If your images are not side by side, it means that your sidebar is too narrow. Try adjusting the width of your sidebar.


That's it!

This process can be used for pictures, sponsor buttons, sidebar category buttons, and menu bar buttons.  It can also be used in your posts to align pictures that way, just insert the code while in "edit html" mode.  So play around with it and have fun!

The next installment will be on how to use CSS coding to do some really fun stuff!

LinkWithin

Related Posts with Thumbnails
Don't stop there! Click "older posts" to keep reading!