Showing posts with label tutorial. Show all posts

Tuesday, August 28, 2012

Picture Frame Growth Chart

I just realized I never posted my WYLTC growth chart from earlier this month.  In case you missed it here it is.  And if you never checked out all the other growth charts be sure to head on over and take a look.  They all turned out so cute!
_______________________________________________________________

Hey everyone!  Krystal from Sassy Sanctuary here today.  I'm so excited about this months theme!  With a  new baby on the way a growth chart was the perfect way to get started on my nursery design.  The babies room is in the very preliminary stages... I have to move my older son out first, which means we have to finish a room downstairs.  So yeah, VERY preliminary stage!

I know I am doing a woodland theme in there and I'm keeping the current wall color.  The only thing I have bought for the room is this adorable owl clock.


Isn't he cute!?  I have also order a sample of this cute fabric to use somewhere in the bedding...


I love it and can't wait to see it in person!  It's called "Wonderland in Blue" from the Fox Hollow line by Monaluna.  The whole line is adorable!

Anyway... you can kinda see where I'm going in there and my idea for his growth chart was something rustic that could also display pictures.  Here is what I came up with.


Obviously it will hang on the wall and the white squares will be filled with pictures.  I'm thinking I will start out by filling it with baby pictures and then updating them as he grows so that eventually the pictures will show the progression of his growth.  Fun!


The markings for the ruler on the side are done in vinyl and the big numbers are actually house numbers from Lowes.

The picture frames I got unfinished from Micheals.  It would have been pretty easy to make my own but I really wanted glass so it was just more convenient to buy.

The process was pretty simple.


I started out with a 6ft long board.  I measured up 6" and that is where I put my 1 foot mark.  (So I will hang it 6" off the ground once I know where it is going) and figured out the spacing of my frames.  It worked well to make a paper template.  Then I used a jig saw to cut out holes for the frames.  You just want the holes big enough that you can get to the backs of the frames, but that the cuts are covered by the frames.  I used wood glue and nails to tack the frames down.  And then finish however you want!  I painted my frames and stained the body.


Anyway.... that's it!  I may have to repaint the blue frames a little lighter blue once I get the fabric in there but I'm excited to see how it looks in the actual space once its done.


And I'm super excited to fill those frames with cute little baby faces!

Thanks for reading!

As always I'm linking to these great parties and events:

Monday, January 30, 2012

My Memories Suite- a Video Tutorial, a Freebie, and a Giveaway!!!

I have quite the treat for you today!

A couple of weeks ago I was contacted by My Memories Suite asking if I'd like to review their digital scrap-booking software.  As most of you know digital designs are a big part of my life and I use digital scrap-booking software to create the majority of everything I make.  Its just so much easier to work with then Photoshop.  So while I am not new to digital scrap-booking, I had never used the My Memories Suite software and was excited to give it a try.

Now, I have to confess that because I have used another program for years that I know like the back of my hand, it did take me a little time to figure MMS out.  But once I did I really liked the program.  While its not the easiest program to learn, there are some neat features that My Memories Suites has over the other programs I've used, like being able to add videos and Internet links to create interactive "online" scrapbooks.

So anyway, I thought the best way to give you guys an honest look at how this software works is to do a video tutorial.   I'm going show you guys how you can make your own custom "scrapbook style" desktop backgrounds for your computers.  Something like this...


The first thing I did was go to the MMS store and pick out a digital kit.  I ended up purchasing this kit by Crazy-4-Monograms.


It is a super cute kit and it is HUGE!  I was shocked at how much was in this pack!  (Tip, if you become a fan of MMS on FB you can get a discount code for $5 to the online store.  Score!)

I decided the easiest way to do a tutorial was through video. (Can you image all those screen shots otherwise?!)  This is my first video of this kind and in hindsight I should have used a headset microphone instead of recording the audio through my web cam.  So forgive the background noise.


So what do you think? Fun huh?!

Well, you can either have fun making your own, or if you want you can just use the one one I made.  :)  You're Welcome!


Be sure to click on the image to view it large and then save it as a PNG.  This will make the picture cut-outs transparent so you can put in your own pictures.  Here is another tutorial on how to do that.


Now for the best part...

A Giveaway!!!

My Memories Suite has kindly offered to give one of you a copy of their software!  

To Enter you must visit the My Memories website, look around, and tell me in the comments what your favorite kit is.
Bonus Entries (one comment for each one)

Follow the My Memories Blog
Follow Sassy Sanctuary

Oh, and one more thing.  If you are too anxious to wait and see if you win and want to purchase a copy of the software now, use code STMMMS28310 at checkout to get $10 off the software and a $10 credit to the store!  Now that's a good deal!

Good luck!!! 

Monday, January 16, 2012

Printable on a Pillow!

I've been looking for fabric to make an accent pillow for my front room.  I wanted something that would tie all the colors together.  So I needed grey, blue, brown and a touch of gold.  But it couldn't be floral because I got a new rug that's floral (I'll show you guys soon)  Turns out that finding what I wanted wasn't such an easy task. 

I've heard about printing on fabric but I had yet to try it, so I decided to try my hand at making my own fabric design by printing at home.  I used the chorus to "I Cross my Heart" by George Strait because its the song my husband and I danced to at our wedding (ahhhh.... cute I know!)

Here is what I came up with.

(Feel free to use the above printable however you want for personal use... not for resale in any form.  Following first would also be appreciated.)

And here is how my cute pillow turned out.


 I'm really proud of it and was pleasantly surprised at how well the printing of fabric actually turned out. 

If you search "printing on fabric" you can find a bunch of tutorials on how to do it.  Some say to soak your fabric in a product (Bubble Jet) to make it colorfast, other say just to iron it after printing to seal the color.  I ended up just using the print and iron method.  Mostly because I was too lazy to try to find Bubble Jet and its sits in my front room and most likely wont get much wear.  Depending on the application, you may want to look into the other method.


That being said, all I did was take some white cotton fabric and some freezer paper and cut them both to the size of printer paper.  Then you iron the fabric to the shiny side of the freezer paper so that your fabric has a backing.  Then print it using your printers best quality setting.  Once the ink has dried you can peel it from the paper and then iron the ink.


Now its ready to incorporate it into a pillow!  I cut my print into a square and then sewed it right onto the front of another square. I used a pretty stitch that had some weight to it.  Then I frayed all the raw edges.  I love the look!   I just made the pillow an envelope style case. 


Now think about all the cute printable that are out there....or better yet... search "printable" on Pinterest.

I know, enough said!  Go make a pillow!

As always I'm linking to these great parties and events:

Friday, December 23, 2011

Christmas Tree Bible Quote

 Sorry about the long absence people!  We finally got moved into our new house and are somewhat settled.  Man, I forgot how much work moving is!  The hardest part for me though was we had trouble with our phone lines and it took forever to get a technician out to fix it so I could get my Internet working.  I was 17 days without Internet access.  I have felt so disconnected from the world!  It sure feels good to be back!

Anyway, a couple weeks ago was WYLTC and I wanted to share my project with you in-case you missed it over there.  The theme this month was Christmas (of course!) and everyone made some super cute stuff.  So be sure to check them all out.

I'll be back tomorrow with a progress report on our house at this point.  Although there is still a ton to do, we have come SO far!

--------------------------------------------------------------------------

Hello!  Krystal from Sassy Sanctuary here.  Isn't Melinda's Christmas tree stand adorable?!  What a fun alternative to a tree skirt.  Unfortunately, just like last month, I am in the process of moving and don't have access to any of my power tools.  I don't have a tree yet either, so a tree stand was out for me.  Bummer, cause its SO cute!

(Before you feel too bad for me though, we are moving TODAY so things are finally going to start to settle down!  Hooray!)

So instead of a tree stand I just thought about Christmas Trees in general. (that works right!?) I went to the craft store and found a frame that had a 12x12 opening and decided to make one of those cute signs that uses a quote as the shape of the tree.... you know.... like this!


Now, I have to confess that this was one of those projects were everything went wrong!  First I painted the frame and the board inside the frame the same grey color, used vinyl to make a stencil for the text and antiqued the heck out of it.  It was cute but the colors I used were so similar that it was hard to tell what it was from a distance.  I hated it.

So I redid the inside of the frame only (the outside stayed) in a cream color and used a bolder color pallet to paint on the text.  This time though, for some reason when I pulled up the vinyl stencil it took half the paint with it.  It was a disaster!

Then miracle of miracles, I got a fun package in the mail from Oh My Crafts later that very day.  They sent me some vinyl to review  (more on that later!) and they had a ton of colors.  So I decided to give this poor sign one more shot.  This time I painted the inside of the frame a light grey color, I added some "birchwood" texture inspired by my friend Sarah (although mine turned out more like a snow storm) and then just cut the text from the vinyl.  

I worked like a dream! (the OMC vinyl is amazing!)

I love how it turned out and I LOVE the bible verse to remind me what Christmas is really all about.  And it looks great with the rest of my mantle decor!


The outside of the frame turned out super cute too with the little stencil I put on the corners.  I'm thinking once Christmas is over I will reuse the frame with something else.


Anyway... I thought it would be fun to share the file I used to make the tree.  So if any of you are silhouette users, you can click HERE and download the file to cut a bible verse tree of your very own. 
Personal Use Only Please!

(let me know if that link works since I've never shared files that way before.)


I hope you all have a very merry Christmas!


As always I'm linking to these great parties and events:

Wednesday, December 07, 2011

Reversible Table Runner

I actually made this a few weeks ago but haven't had time to write about it.  Even though fall is over, its still a cool idea.

Anyway, I have the most adorable table runner from Silly Mama Quilts that looks so cute with my spring and summer decor.  But I needed a fall runner.  I also knew that almost as soon as I got a fall runner made I'd need a winter one too.  So I decided to kill two birds with one stone and make a reversible runner.  I love it!


I had so much fun picking out the different fabrics.  I bought 4 fat quarters for each side and have enough left that I could easily make a couple more.


This was my first EVER quilting experience so I'm super proud!  It's far from perfect (aka straight) but I love it and how it looks with the rest of my seasonal decor!


Here is how I did it if you'd like to make one of your own.


Step 1:  Gather your fabric.  Like I said I used 4 fat quarters for each side with TONS left over.  I decided how wide I wanted my runner (cut it about an inch wider to make room for seams) and then just vary the size of your pieces. (image a)

Step 2:  Using the first side as a guide, cut your second side so that its the same size.  (image b)

Step 3:  Then start piecing your sides together.  Just lay right sides together, stitch, and then continue. (image c) Once you have both sides done be sure to iron all your seams really well.

Step 4:  I basically made mine like you would a big pillow.  I put right sides together and then a piece of quilters batting below it.  Then sew all around the edges leaving an opening to turn it. (image e)

Step 5:  Once you have it turned, hand stitch the opening close and then press really well again.  Then you can finish it by sewing a top stitch all around the runner and doing wavy lines down the body of the runner.  (image f)

I just used a regular sewing machine for this with a regular foot.  It was really quite easy and came together pretty quick.  A great project for a first time quilter! 


You should give one a try.  :)

Monday, November 21, 2011

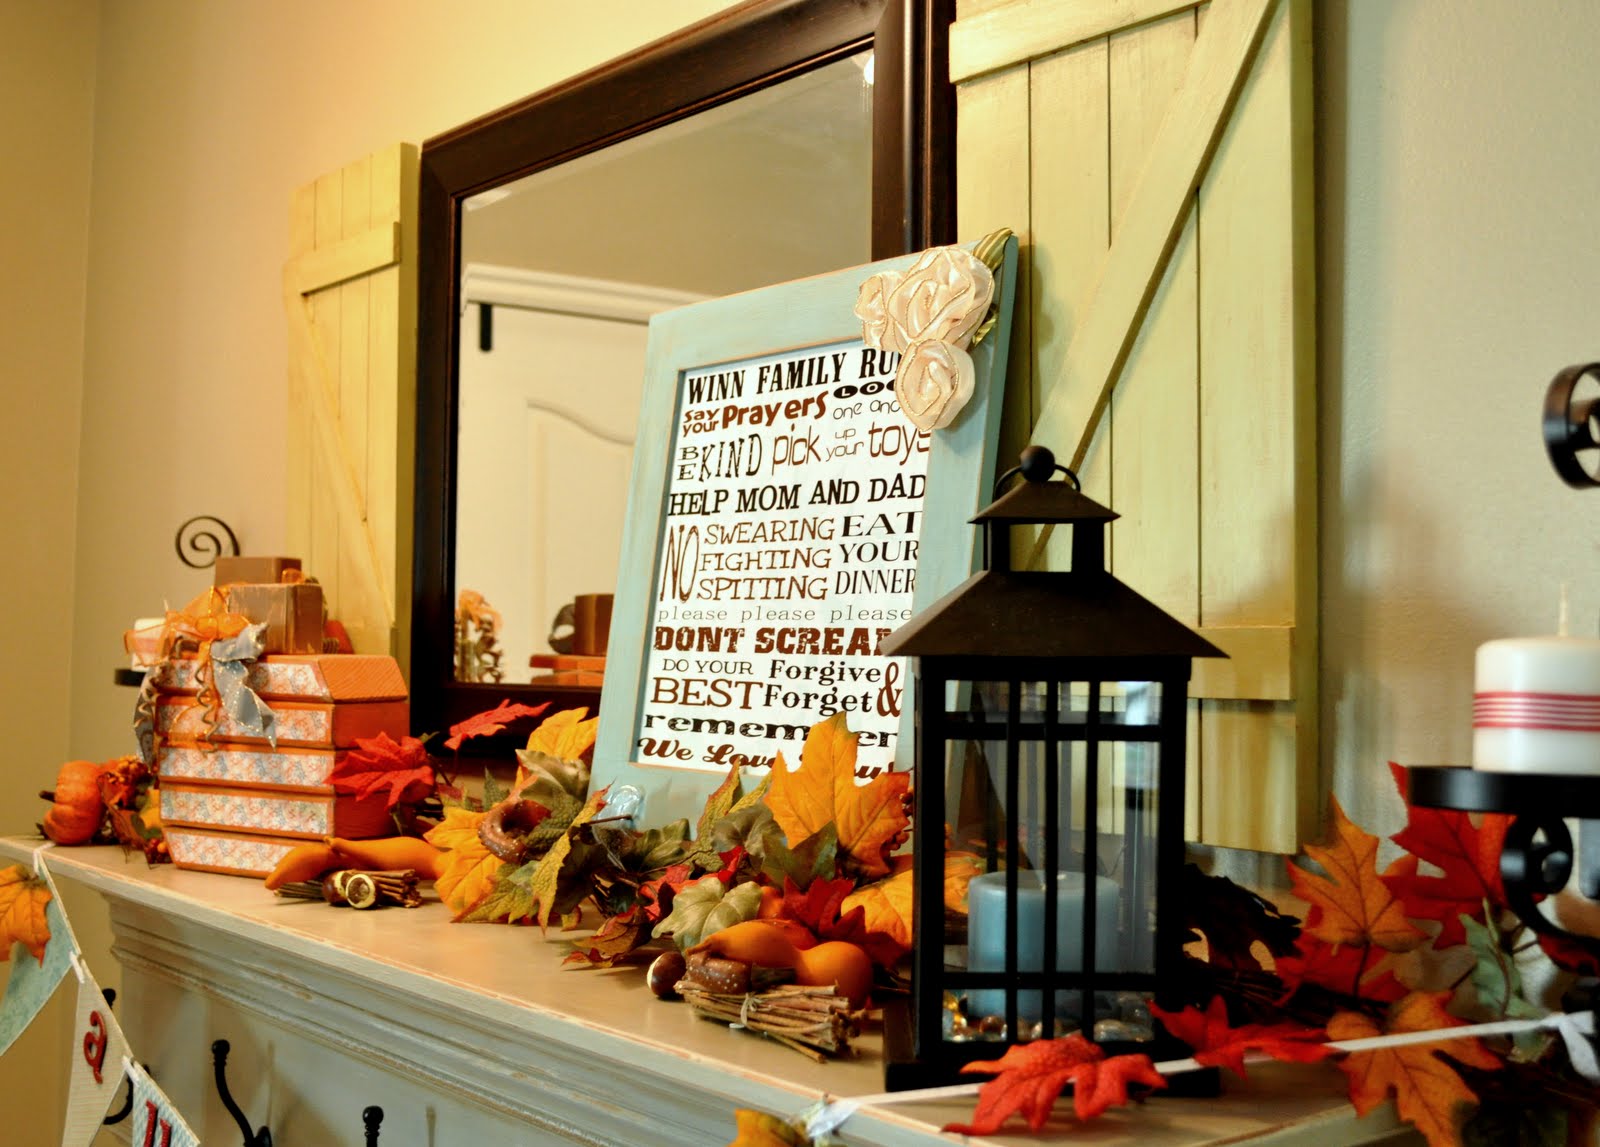
Family Motto Picture Frame

In case you missed it last week, here is my post for WYLTC.  This month's theme was "family" and everyone shared some seriously cute stuff, so be sure to head on over and check them all out. Also, the "family" link party is going on now so be sure to play along and link up!  We can't wait to see what you made!
 ________________________________________________________________

Hello! Its Krystal from Sassy Sanctuary here today!  I'm so excited to show you guys my take on Wendy's adorable Family Rules Sign.

To be honest, I was a little nervous about this months project because we are in the process of moving to another state and my husband has packed up all the tools and moved them to our new house!  So I knew that whatever I made, I was going to have to take some help from the craft store. There is nothing wrong in that right?!

So I went to one of my favorite local stores.  (It's called Porter's if any of you have one near you) and found a 12x12 unfinished MDF frame that had a 4x4 opening.  I grabbed that and went to see if I could find some scrapbook paper inspiration and found one of those 5x7 paper packs in adorable prints.  Then a light bulb went off in my head! 

I wanted to make 4x4 compartments and use each square to place a quote.  Then thanks to pinterest I found the PERFECT family motto to put in my frame. 

Here is the final result.


Ahhhh!!!! I love it!  Seriously this is one of my favorite things I have ever made! (I swear I say that about every WYLTC project, but this time I mean it!)

So, do you want to make your own?  This is how I did it.


A- First get a 12x12 frame with a 4x4 opening.
B- Paint it a base color that goes with all your papers
C- Cut your papers to 4x4 squares and arrange them how you would like them on your frame.
D- Modge Podge the paper on.  I found it best to do the corners first and then the middle squares.
E-  Once its good and dry, cut vinyl to make a stencil for your text. (if you don't have a craft cutter, you could use Wendy's transfer method too!)
F-  Paint your text.  I found it turned out better if I let my paint dry to the touch before removing my stencil.

And that's it!

Oh.... but you may have noticed that my frame has a good amount of distressing.


Funny story about that....

I walked away from this project to use the bathroom after doing the text in one square.... and left it and my paint sitting on the counter. (Do you see where this is going?)  When I came back my 3 year old daughter had painted brown paint all over it!

I screamed.

Then I got a rag and scrubbed the thing off.  Luckily the modge podge sealed it pretty well and most of the paint came off... Except for in a few spots where I scrubbed through the paper!

Then I cried.

Once I regained my composure I decided to just go with it.  I strategically scrapped up the surface of the paper (just using my fingernails) and rubbed brown paint into the scratches.   I actually LOVE the way it looks. So yay for happy accidents!

So anyway... thats it.  My family motto picture frame.


I hope you love it as much as I do!
I can't wait to see what everyone else does!


As always I'm linking to these great parties and events:

Monday, October 10, 2011

Halloween Advent Picture Tree

Did you all follow Wood you like to craft? last week?  It was awesome!  We had a blast sharing our Halloween advent displays.  The link party is going on now and we want to see all Halloween wood crafts, so be sure to link up!  In the meantime I wanted to share my project from last week in case you missed it.  Enjoy!
-----------------------------------------------------------------------

Hello wood crafting friends!  Its Krystal from Sassy Sanctuary here and I am SO excited to share my project  with you today!  I know I've said it before, but I love WYLTC!  Each month it pushes me to create something that I never would have otherwise.  Some of my most prized creations (besides my children) are WYLTC projects.  But I think this one is my all time favorite.

When the Crafty Sisters first shared this month's project I was so excited.  I  loved the idea of an advent tree, but the last thing my kids need in October is more candy.  I also had been brainstorming ideas on how to display pictures of Halloween's past so I knew I would kill two birds with one stone and create a count down tree with a photo display.

Ready to see it?


I just love it!

The base is magnetic so I can change out the number tiles while we count down to the big day.  And the tree itself hangs little pictures of my kiddos in their costumes.  So cute!  I just love looking back on all those fun memories!

  
So if you want to make your own, here is the method to my madness.  (its easy... promise!)

First I drew the tree silhouette onto a piece of 1/8" plywood and cut it out with my scroll saw.


If you are a newbie with a scroll saw, then a tree is perfect! If your cuts get crazy it just adds to the look!  Then for the base I simply glued (gorilla glue) some 2x4's together, becuase its cheaper then a post and I had it in the garage.  :)


Time to break out that magnetic primer I've been promising myself I'd use again!  I did a liberal (you want it thick!) application of the primer and let that dry.  Sand it smooth.


Time to paint!  You want to paint your tree, a dowel, and a pack of small screw hole buttons black.  You also want to paint the small wood tiles orange.  And of course distress to bring out the detail!


Then to assemble, drill a hole in your post and push your dowel into it.  Hot glue your buttons all over the tree to hang your pictures from, and then hot-glue the tree to the dowel.

Finish it off by using vinyl (or paint) to add your text and numbers.  I cut white vinyl using my beloved silhouette.  Oh, and add magnets to the number tiles of course!


Then just hang your pictures and enjoy!  I used little picture pendant from the jewlery section of the craft store for my mini frames.


Everything is cuter in miniature!  I put nine frames on so I had room to grow and just filled the empty frames with scrapbook paper.

I love it!


But I've already said that.  :)

Thanks for the inspiration everyone!  This week has been amazing.  You ladies always blow me away.  I can't wait to see all the great Halloween wood crafts the rest of you are going to share!  See ya soon!

Krystal As always I'm linking to these great parties and events:
Visit thecsiproject.com

Wednesday, September 14, 2011

Barn Door Shutters

 Awhile back I came across this photo on Pinterest.

 
(The photo isn't linked so I don't know the source.  If anyone knows, let me know!)
Update: source found, thanks Kelsey! Image above via Aunt Ruthie's Sugar Pie Farmhouse

And I thought to myself, "Wow, I love those shutters!  I should make some!" and then thought nothing more of it.  
Then last week Melinda shared her barn door shelf on WYLTC.


And that sealed the deal.  I went that afternoon to pick up supplies.  I whipped out a couple of barn door shutters and pulled out my fall decor, and now my mantle looks like this.


So fun!  

I love that I was able to make them custom for my space.  They are the same height as my mirror giving me a window look.

I went with a green color because 1) I wanted a fun color and 2) green would go good with any season.


I went out of my comfort zone on the finish of these and used a glaze instead of a stain over paint treatment.  It was a lot of fun trying something new and I love how it turned out!


If you want to make your own, they seriously couldn't be easier!
All you do is take a 1x3 board and cut it into your desired lengths.  Then take a 2x1/4 inch slat and make your Z.  My boards were 23" tall.  The two short slats were 10" long and the cross slat was about 16" long with a  31.62 degree angle cut.  Your measurements will depend on the size.


Then I just laid it on the ground and used gorilla glue to glue it together.  It worked like a charm!  This was my first time using Gorilla Glue too, and I will say I was impressed!

Then finish however you want.  Like I said, I used green paint and a brown glaze.


I love them!

As always I'm linking to these great parties and events:

Monday, September 12, 2011

Mason Jar Bathroom Shelf

In case you missed it on WYLTC last week, I wanted to share the tutorial for my mason jar bathroom shelf.  You saw a sneak peek of it when I shared my bathroom makeover.   The WYLTC link party is going on now and you have till Friday night to link up anything shelf related.  We hope you'll join in!

-------------------------------------------------------------------------------------------

We are back!

It's Krystal from Sassy Sanctuary here.  I hope everyone has had a fantastic summer.  Mine has been great but busy... and went by super fast!  I'm going to kick off this month's WYLTC and the theme is shelves.  I was inspired by all the fabulous mason jar shelves around Blog-land and Etsy.  I can't wait to see what every one comes up with!  Remember anything goes, whether you build a shelf, finish a craft store shelf or repurpose a shelf, we want to see it!

So here is my bathroom mason jar shelf!


It turned out being such a fun addition to the bathroom!  I love having a place to display soaps and bottles, keep the (always necessary) reading material, and the mason jar for some flowers is the perfect touch.  It was a lot of fun and actually a really simple build.  It can easily be customized to fit any space and finished to any taste.  I love how I was able to finish it to match my bathroom cabinet making it feel like an extension of the cabinetry.


And here is how I did it!

(Please note: all my measurements are approximate.  Please measure and double measure to be sure everything is lining up.)

The blue lines are 1x6 boards, the green are 1x2 boards, and the purple backing is 1/4" plywood.   The first step is cutting your wood.  I had Lowes cut my plywood to the correct width before bringing it home.  Then you need to cut your 1x6 into 2 (22 inch) lengths and 3 (15 inch) lengths.  Cut the 1x2 into 3 (15 inch) lengths.


Next I used my scroll saw to cut a scroll along the top.  If you don't have a way to cut this, just leave it square.  I made a paper template of the scroll to draw on the design before cutting it.

If you plan on having a mason jar in the shelf, you will need to get a circle drill bit the size of your (wide mouth) jar.  Drill a hole in one of the 15 inch 1x6 pieces.


Then you are ready to assemble the shelf.  I used wood glue and a nail gun to put it all together. Note that 2 of the 1x2's is for the slats of the magazine rack, but the other one goes along the back to give a sturdy place to screw through once its time to hang.  Don't worry if its not perfect.  I had to fill in a bunch of gaps with wood putty, but once it was sanded and painted, it looked great.

I finished the shelf the same way I did the bathroom cabinet.  (tutorial here)

Then to hang, just drill a couple holes through the back slat and attach with wall anchors.

Like I said, its been the perfect addition to my bathroom decor and I love it to bits!  You can check out more of the bathroom here, if you'd like.


So that's it.   I can't wait to see what everyone else comes up with this week! I'm sure we are going to be blown away!

As always I'm linking to these great parties and events:

LinkWithin

Related Posts with Thumbnails
Don't stop there! Click "older posts" to keep reading!