Monday, February 28, 2011

Shamrock Garden

Since Valentine's is well and over its time to start the St. Patrick's day decor.  This is the first year that I have really embraced decorating for all the holidays.  Now that I have my mantel shelf I'm really enjoying changing it out month to month and having to a place to create my holiday vignettes. 

By the way, I've received a lot of questions on where I got my shelf.  My husband built it for me.  I know, so lucky!  He has agreed to sit down and write some basic instructions and measurements so you can attempt your own if you wish.  So that will be coming soon.

Anyway, when trying to decide what to add to my mantle to St. Patty's Day it up, I of course thought of shamrocks.  This is what I came up with.


Not bad right?  Here's how you can make your own.


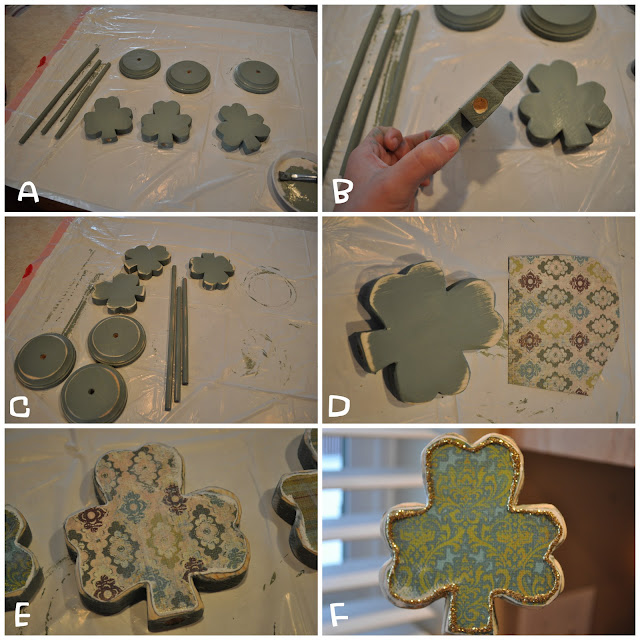
First gather your supplies.  The shamrocks I cut with my scroll saw using a basic shamrock image that I printed online as my template.  They are about an inch thick.  The bases are little wood plaques I found at Micheal's.  You will also need dowels (two are 9 inches long and the other is 12 inches), scrapbook paper, modge podge, sanding paper, hot glue, craft glue, and glitter.

You will need to drill a hole in the center of your plaques and the base of the shamrock that's the same width as your dowels. (B)

Start by painting all your wood peices green. Or any color you want your shamrocks, but I suggest green. (A)  Give it a good sanding to distress the finish. (C)

Then cut a piece of scrapbook paper that is a bit larger then your shamrock. (D)  Apply a generous coat of modge podge to the shamrock and put the paper on, rubbing all the air bubbles out.  Allow to dry.  Once dry sand away all the excess paper. (E)  My paper was really thick so I cheated and used the palm sander.  If you don't have access to a palm sander, I recommend using thinner paper if using this modge podge technique.  You can always cut you paper to fit before applying too.

Then to give it a little extra somethin somethin, I outlined them with craft glue and gold glitter. (F) 

Then all that's left is assembling the pieces.  I used hot glue in my joints to keep everything secure.  Be sure to get it straight before your glue dries!

And there you have it.  Your own little shamrock garden.


As always I'm linking to these great parties and events:

Sunday, February 27, 2011

Scrumptious Sunday

It has been awhile since I did a Scrumptious Sunday post so I thought I'd share the goodie I made for Valentine's day.

The day before V-day, I asked my hubby what special dessert I should make to celebrate with.  His reply was "Do you remember that melting chocolate cake we went crazy over on our cruise? Make that!."  Uhh.... he must have greater faith in my cooking abilities then I do.  But that same day while blog hopping I came across a recipe from Chocolate and Carrots for Nutella Chocolate Souffles.

So I gave it a shot and they were incredible... amazing... unbelievable... rich chocolaty goodness.


That's her picture, not mine.  Mine were gone before the camera could even cross my mind.  They were actually really easy to do too, so you have to try it!

Recipe found HERE.

(Note: In the original recipe, she forgot to tell you to bake the cups in a water bath.  You just put the cups in a roasting pan and fill with boiling water about half way up the cups, then bake as directed.)

Friday, February 25, 2011

Inspiration File

 I've been super busy planning for Wood you like to craft? (If you haven't yet, be sure to check that out!) so I only have a couple of inspirations for this week.  But never fear, for they are good ones!

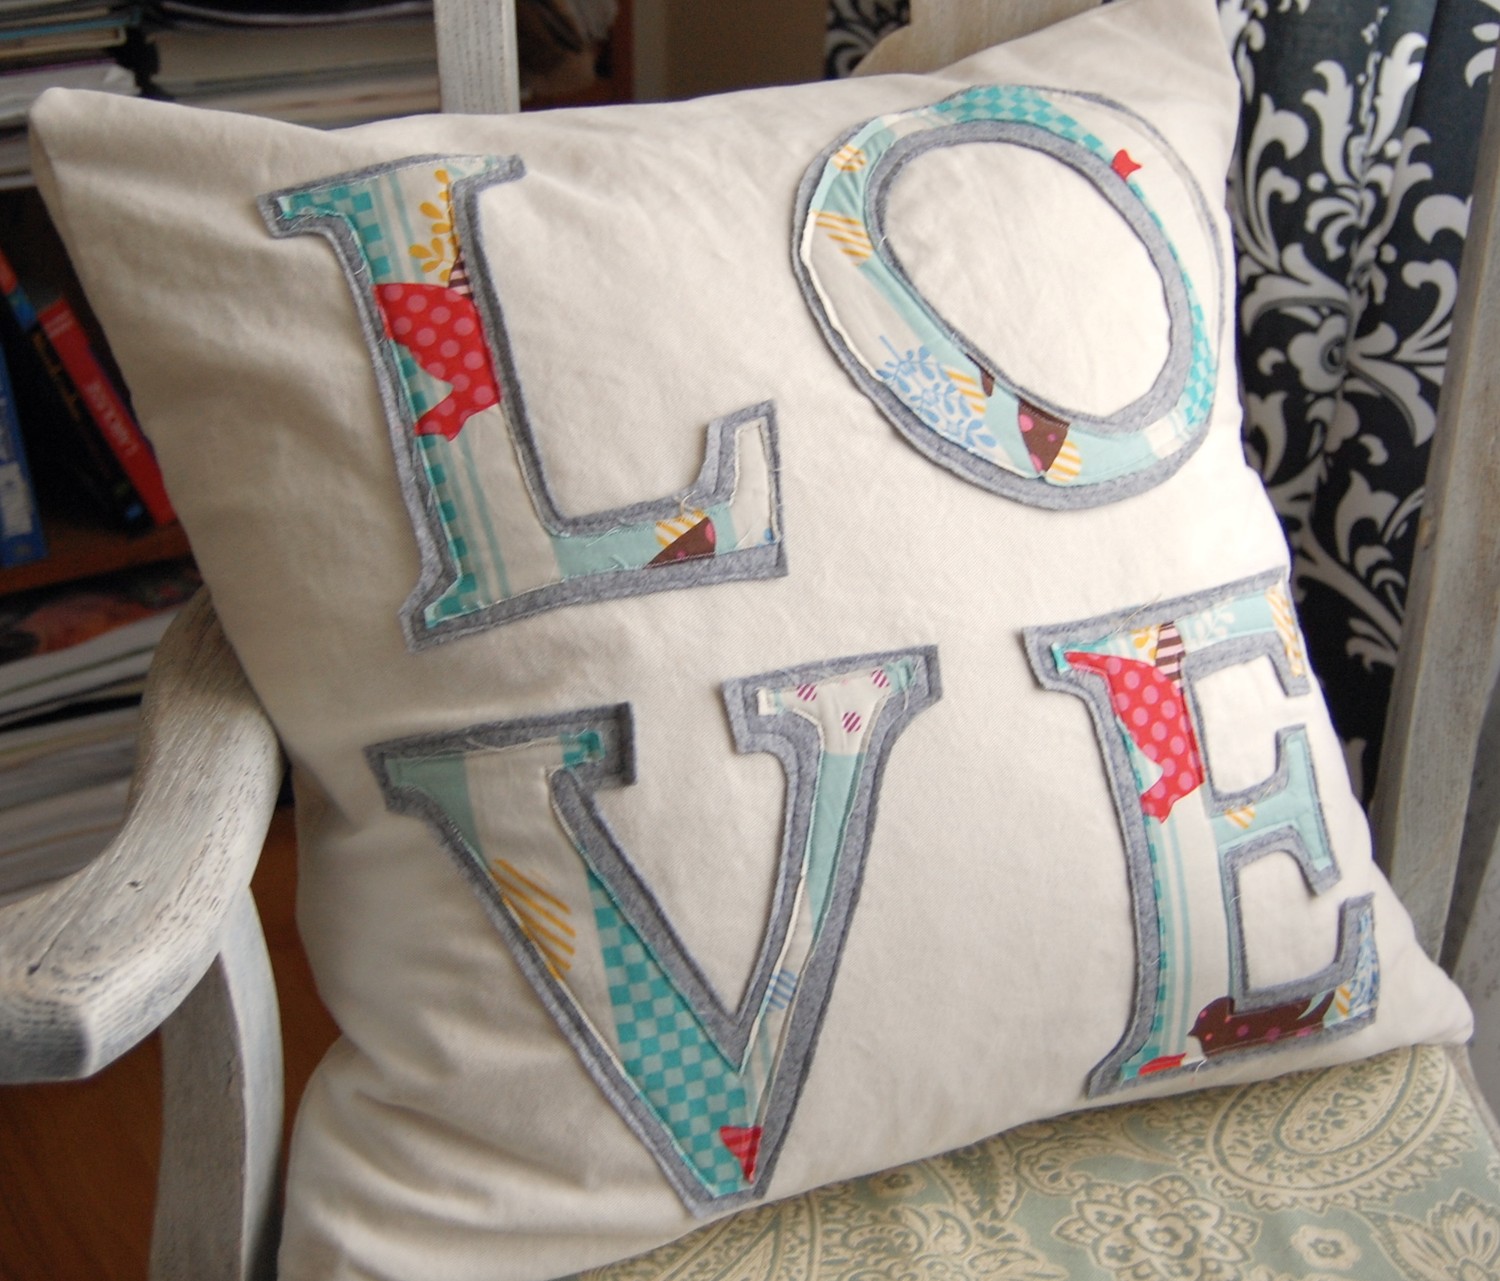
First up is this AMAZING pillow from The Crafty Nomad.  My jaw literally dropped when I saw this.  Normally I like to feature projects that I would like to make someday, but I will never be this talented of a seamstress. Simply amazing.  I love that its so fitting for St. Patty's day too, although that thing would be out all year round at my house!


Now, the way my family room is set up, our couch acts as a divider from the family room and the entry.  I have a sofa table behind it to hide the back of the couch, and on that table is nothing.  Sad, I know.  Unfortunately anything there gets knocked around by my kids and I don't want to block the view of the mantle shelf that's directly across from it.  (This is where I should have just stopped to take a picture because I'm sure my thousand words made no sense.)  Anyway, when I saw this oh so cute candle holder from Bloom in Color I knew this was the answer.  Simple, indestructible, low and beautiful.  This is going on my very soon list.


Thanks for the inspiration ladies!  Feel free to grab a featured button.

Wednesday, February 23, 2011

Wood you like to craft?

I am SO excited to announce the new "bloggers" craft group that I am involved in! 

wood you like to craft?

I have teamed up with three other fantastic blogs, Under My Umbrella, Crafty Sisters, and Craft Goodies.  We are going to take turns "hosting" the craft group for the month.  The event will start the first Monday of the month on the blog of whoever is hosting.  (So follow each of the blogs so you don't miss anything!)  The host will pick a project but all four of us will show our variations of the same idea.  Then we will be having a link party so all of you can join in too! 

I'm so excited about this and hope you all will play along.  Its so much fun seeing what people can do with an idea and i love seeing all the inspiration from other bloggers.

Please visit our Wood you like to Craft? site for more details. 

Melinda at Under my Umbrella is kicking it off on Monday, March 7th.  So be there or be square!

Also,  I would LOVE LOVE LOVE you forever if you would help spread the word.  So give us a little shout out on facebook or your blog and tell all your friends.  The more people who join in, the more fun it will be!

Monday, February 21, 2011

Embellished Sandals

I have a confession.  If I tell you, you have to promise to not be so jealous that you refuse to be my friend!

In about a month from now, I'll be on a plane headed to Hawaii.

I know, I know!  I'm SO excited.  We are actually going with my family because my Mom is getting married.  It will be a fun trip and we'll get to spend some time with all my siblings.  There is a lot of us... as in 12 (not including spouses), so its not often that everyone gets together.

Anyway, because this is also a wedding trip I have been helping my Mom get some of the last minute details ready.  They are getting married on the beach and everyone is going to be wearing ivory.  We will all have leis so that's where the color is going to come from.  But since we'll be in the sand, I decided to make sandals for all the girls.

Here's how they turned out.


This is just a small sampling.  I actually made 10 pair.  They are all slightly different but I figured 10 pictures of ivory colored flip-flops might get a little old.

They were a lot of fun to make and my sisters love them. I think I might have to make a few more in various colors for the summer.  While I didn't take the time to take pictures along the way, they were super simple to do.

I used white flip-flips from old navy.  They were only $2.50 a pair, score!  Then I wrapped the straps with ivory satin ribbon, hot gluing along the way.  Then you embellish however you want.  I used a variety of ribbon roses, silk flowers, sequins, lace, and beads.

That's it!  Super fun huh?!  I can't wait to get out of this snow and use them!

As always I'm linking to these great parties and events:
Friday, February 18, 2011

Inspiration File

Hello everyone!  I have a couple of cool things to share this week. 

This first idea comes from Crafts and Sutch.  Now I have had this elaborate plan for awhile to organize all my recipes and make a way to display them, and basically Erin beat me to it.  Only hers is so much better (and simpler) then what was going on in my brain.  Love it! Now I just need to get the organization part done and I can make one just like hers!


And this second one comes from Craftify It.  She made this beautiful family tree for her Mom.  I love it to bits and think I'm going to have to make one too... but for myself! (yeah, that's how I roll.)  Love that it so pretty and graphic but still holds meaning.  Great job!


Thanks for the inspiration! Feel free to grab a button.

Monday, February 14, 2011

How to stretch your blog.

Welcome to the first installment of my blog design tutorials!


I want to start off by saying that I love doing blog designs.  It is so much fun creating web homes for people.  But I also understand that a lot of people can't hire a blog designer.  In fact that is how I became a blog designer.  I couldn't afford to hire someone to makeover my blogs so I learned how to do it myself and a whole little home based business sprung from it.  I can't even tell you what a blessing its been.  I am completely self taught.  Everything I have learn to do I either found through blogger forums, other kind peoples tutorials, or trial and error.... a LOT of trial and error.  So doing this mini series is my way of paying it forward to all the kind people out there willing to share their knowledge and inspiration.  Let's make blogland cuter!

How to stretch your blog beyond 1000 pixels.

Most of my blog designs start out as the "simple" template in template designer.  While I have never done this particular trick in another template, it should work whichever template you use.


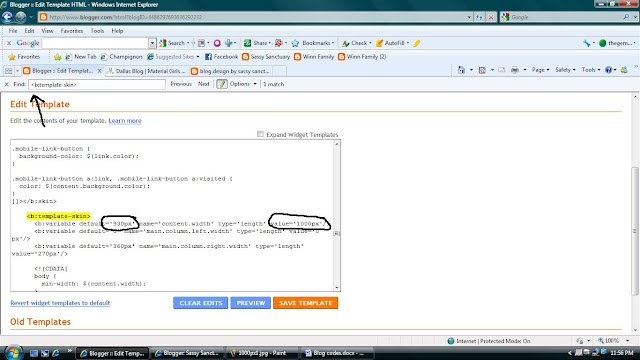
Step 1:  Sign into your blogger account and go to design-- edit html.  It is always a good practice to back-up your template before editing in case you screw everything up.  (you do that by downloading and saving the template...as circled) That being said, I never back it up but I always preview any changes before I hit save.  If you are at all nervous about edit html code then I suggest you back it up.


Step 2:  Find the part of the code that says 
On a  PC you can hit CTRL F and a little search box will appear.  That helps a lot when searching for codes.


Step 3:  See the two number circled in the image above? (click image to view larger) Change those numbers to the width you'd like your blog.  I suggest somewhere around 1200 px.  Do not change anything but the numbers. CLICK PREVIEW.  If everything looks good then click save.


That's it!  super easy huh?!?  Now your blog went from this...


To this.  Look at all that extra room.  Love!


You will probably want to re-upload your header as it will now be a wee bit small, but that's an easy fix.


I hope you enjoy!

Feel free to give any suggestions on any other blog design tutorials you'd like to see.  I'm all ears! 

Have a Great Valentine's Day!


Friday, February 11, 2011

Inspiration File

So are you guys sick of me yet?  Man, this has been a busy blogging week!  Of course, I had to get all my Valentines projects up before the whole thing was over.  That's what I get for being a slacker!

Anyway, I have a couple of fun things to share today.

My Computer is my Canvas made these adorable chap stick labels.  What a fun idea! These would make a great alternative to candy attached to a Valentine or you could make your own to fit any occasion.  They'd make great party favors.  Great job Colette!  Such a fun idea!


And finally,  I WANT this bowl!  Doesn't it look amazing?!?  Totally in love.  The Speckled Dog made it out of a thrift store salad bowl and a candlestick.  I'm going to have to start scouting for some supplies because I have to have one! Thanks Kristi!


Thanks for the inspiration ladies! If you were featured you can grab a button from the sidebar if you'd like.

Wednesday, February 09, 2011

Valentines Wreath/ Door Hanging

I'm not sure if this is a wreath or not.  Its hollow like a wreath and hangs on the door, but its made from wood and has two tiers.  Hummm... quite the dilemma.

Whatever its called, its cute and is now hanging on my front door.


Awwww.... I just love Valentines Day! You can get away with such cutsie and girly stuff! 


Plus this one was super easy too.  I completed it during one nap time (minus cutting the wood out) and that was while having a major case of crafters ADD.  Does anyone else suffer from that?  Its was particularly bad this time.  I'd glue a couple of flowers and then catch myself checking my email or playing bakery story.

Here is the method to my madness.


First cut out two hearts as a base.  I used wood and cut them out the same time I did my XOXO but this could be made with foam or sturdy cardboard even.  The first, larger heart you make hollow.  Notice I flattened the point?  That was so I could hang my ribbon.  The second smaller heart is basically the same size as what you cut out of the first one.  (see A)

Give your base a coat of paint that matches your flowers. 

Then take a bunch of artificial flowers ( I used pink hydrangeas) and pull them apart.  Then you hot glue the flower petals onto your base, reconstructing the flower.  (see B)

Add a drop of glue (C) and some glitter. (D)

Continue until everything is covered.  Then attach some ribbon and a bow.  I hot glued the ribbon to the back so it would stay in place.  Attach the two hearts together with a couple eye hooks and some chain.

Hang and enjoy some lovey dovey cuteness on your front door!


Now the only thing left is to decide what to call it. 


As always I'm linking to these great parties and events:

Tuesday, February 08, 2011

XOXO tutorial

So, you want to make your own XOXO do you? Well here is what I did.


First you need to make a paper template.  I played around with my fonts and fell in love with a font called Chicken Hawk. (download here)  The software I use for all my graphic stuff (scrapbook max) allows me to adjust the spacing of my font, so I scrunched it together so that they'd be touching and then printed and cut it out.  If you can't do that then you can just cut it out how it comes and then make them touch when you trace it to your wood.  The font actually has little hearts in the O's so that where I got the idea.  Trace onto the wood.  I drew a straight line along the bottom and adjusted my letters a bit so that it would stand by itself. (see image A)

oh, and ignore the other two hearts in the first two images, those are for another project.

Then very carefully cut out your design and sand down any rough edges. (image B)

(It would be a good idea to cut out the centers on your O's first.  I didn't do this and ended up snapping it in half when I was trying to drill the hole for my saw blade.  Live and learn.  Lucky I was planning on modge podging the front with paper anyway so I just glued it back together and no one is the wiser.... except you guys because I just spilled the beans.)

Give it a base coat that matches the main color of whatever scrapbook paper you plan on using. (image C)

Once dry set your design backwards onto the backside of your paper and trace around it.  You want your paper to be a bit larger then your wood. (image D)

Apply a generous coat of modge podge to your wood and then smooth your paper onto the wood.  I used a card to make sure I had it good and down and there weren't any air bubbles.  Allow to dry. (images E and F)

While that is drying add some modge podge (or glue) to the little hearts and glitter the fronts of them. (image G)

Once your X's and O's are dry (or mostly) then grab some sand paper and sand the edges, sanding away all the extra paper. (image H)

DO NOT DO THIS NEXT STEP.  I decided to take some stain and add a little brown distressing to the edges.  I hated it!  The paper soaked in way to much and it looked awful.  So I ended up taking more of my base coat paint and dry brushing over the stain.  the end result it okay but I so wish i had just left it alone. (image I)

The last step is to add small eye hooks to the inside of the O's and the hearts and hang then with a link of chain.

I hope you make one, it was a lot of fun!


Monday, February 07, 2011

XOXO and the Completion of My V-day Mantel

Look what I made.


And by made I mean completely made, from scratch, all by myself, straight from my crazy brain to my shelf.  Yes, I'm a little proud.

I got a scroll saw for Christmas have have been so excited/ terrified about it.  I love wood crafts and have been wanting to be able to cut and design my own stuff, but I was also SURE I'd loose a couple of fingers in the process.  I finally decided to be brave and give it a shot.  While it is f.a.r from perfect I think it turned out pretty good for my first cut.


My favorite part is the little hearts hanging form the O's.

To finish of the rest of my V-day mantel I added these two adorable love birds I found for 1/2 off at Micheal's.  They are so cute!  Totally in love with them!


I also added this little cupid I cut from some pink vinyl to my mirror.


So here is the completed mantel shelf with all the Valentines touches.


I'm totally loving it and wish I had finished it sooner so I could enjoy it longer.  Its so lovey dovey and sweet it about makes you sick.  :)


I'll get a tutorial on the XOXO written up for you guys later today or tomorrow, and I heard your requests for a "How to stretch your blog past 1000 px" tutorial and will try to get that to you sometime next week.

Be back soon!

As always I'm linking to these great parties and events:

Saturday, February 05, 2011

Blog Design Reveal

Okay guys, here it is.  The new face of Sassy Sanctuary.  What do you think?  It took me forever to figure out what I wanted and I am BY FAR the hardest person to design for, but once I found that amazing chair graphic it all clicked.  Now that its done I love it! 

Let me take you on a quick tour. 

The menu bar links are all the same except I removed the "past projects" link.  Lets face it, I never updated that page anyway!  I just recently figured out how to stretch the blog past 1000 pixels and I'm loving all the new space!

I created a mini sidebar to the left where I have a spot for sponsors. (I'm now offering your first month free if anyone is interested)  Below that I have a category menu bar.  Not all of those links are working yet but I'm going to go back through all my old posts and put everything into its proper place.  Below that is my ginormous blog roll.

Now onto the right sidebar.  At the very top you will notice some social networking icons.  I have a link for email, rss feed, subscribe by email, and facebook.

That's right! I bit the bullet and put sassy sanctuary on facebook.  Now, let me just say that I am a blogger and anything worth sharing is going to go here.  I will never use facebook as a requirement for giveaways and probably won't actually post there very often.  That being said, I know a lot of people love fb so if you like my page then you can get fb updates on when I post.  I'm just trying to make this as user friendly as possible.  So far I am the only one who "likes" sassy sanctuary (despite sending out a bunch of recommendations to friends and family) so I am hoping at least a few of you will "like" me so i don't feel like such a loser.

The rest of the right sidebar is pretty basic.  Some new buttons if your interested but not much else new there.

Anyway, that's it.  I hope you love it as much as I do.  I'd love to hear your input!

Friday, February 04, 2011

Inspiration File

Hey everyone!  Hows your week going?  Mine has been busy.  Not only do I have several craft projects in the works but I have been working with the most annoying client for a blog design... myself.  Yup, I'm re-doing my blog.  Not that there is anything wrong with it, its just that I have learned soooo much since I have started doing blog designs and I feel that my blog needs to better reflect my abilities.  The big reveal should be in the next couple of days.

Anyway, on to business.  Here are some awesome things I have found this week on my travels through blogland.

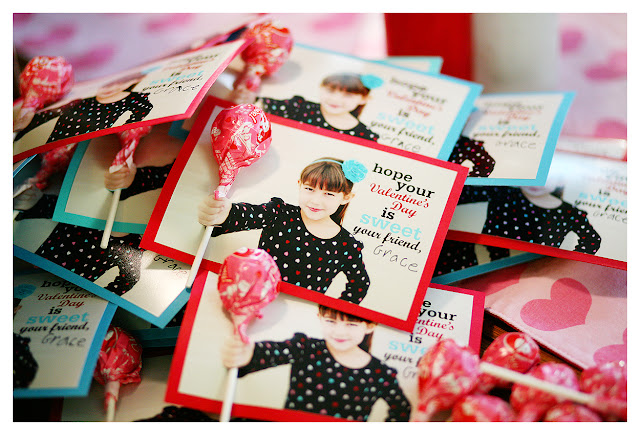
Eighteen25 (love their blog) has been sharing a bunch of homemade Valentines ideas, but my favorite is the one they made last year. SO cute!  I haven't heard if my son's preschool is going to pass out Valentines at their party yet, but if they are we are making these for sure!


I love this pillow from A Crumbly Marriage.  It's to die for cute.  Love the layering and the color scheme.  I would totally leave it out all year.  We are in the process of transitioning our daughter from a crib to "big girl" bed and once I figure out what I'm doing for bedding I'm going to make a bunch of pillows.  You can be sure a knock off of this one will make the cut!


Now, I always love subway art, but I think this mixer from A little of this, A little of that is such a clever application.  What a fun way to add some flair to your mixer and incorporate subway art in a creative way.  Plus the fact that she actually thought to make half of her words upside down so that they could be read from both sides make her a genius. Love it!


Thanks for the inspiration!  If you were featured feel free to grab a button from the sidebar. 

Wednesday, February 02, 2011

Valentines Garland

Yup, I jumped on the V-day garland bandwagon too. 


I love what it adds to my mantle. Plus it was so simple to make.


All I did was get a package of white paper heart doilies at a party supply store and a few sheets of card stock.  I used spray adhesive to glue the doilies to the card stock and then cut them out.  I used a hole punch to make a hole on each side and strung them up with ribbon.


It was so easy but I think it makes a big impact and is super sweet.  Love it!

As always I'm linking to these great parties and events:

LinkWithin

Related Posts with Thumbnails
Don't stop there! Click "older posts" to keep reading!