Monday, January 31, 2011

My Winter Mantle

Now, I should have shown this off about a month ago, but my dear sweet husband decided to patch a few holes behind the mantle right after I finished it... before I had a chance to take pictures.  Now this may seem like a good thing but by "patch" I really mean "fill with putty and leave it for a month, but don't you dare try and paint it yourself Krystal because I have to prime and  fix the texture and you'll never get the texture right... I'm getting to it, jeez!"  So this is coming a little late.

My winter mantle!


Isn't it nice?

My mirror and subway art came back and I added "winter" touches by using blues and silvers.  The garland actually came off of my Christmas tree.  I paired it with a pretty mirrored vase and some "sugared" fruit I got for next to nothing during the after Christmas sales.


To add some height, I put some snowy branches (also scored after Christmas) into a glass vase with some blue beads on the other side.  More sugared fruit and a few pine cones tie both sides together.

So there you have it.  This is going to be my "basic" mantle till I'm ready to change it out for spring, but I will still add valentines and st. patty day touches to it.

I'll show you the first of my V-day touches in a few days.

Stay tuned!

Friday, January 28, 2011

Inspiration File

Its been a busy week and I didn't get a lot of blog surfing in, so I only have one thing to share.

How Does She made the CUTEST v-day cookies.  I love them to bits and think they would be so much fun to make. 


Aren't they funny?  Shelley was worried about offending people but I think they are great.  I'd even give them out to neighbors... but I'm like that.  ;)

Anyway, since I only had one inspiration post to share I'd thought I'd answer a readers question in case anyone else is curious.  Heather wanted to make some vinyl inspired by my family rules subway art and was wondering what fonts I used.  So here they are.


All of these font can be found at either Kevin and Amanda or Scrap Village Fonts.  (except simsun and paperback are ms word fonts I believe)  I have a thing for fonts and have a bazillion.  As you can imagine, doing blog designs I get to work with all kinds of fonts... but my subway art actually came about after a font download spree.  I had to try my new fonts out!   So I encourage you go download some new ones, you never know what kind of inspiration can come from it.

Oh, and speaking of fonts, have you all noticed that blogger added a ton of fonts to their template designer?  Go check them out!

Monday, January 24, 2011

Valentines Stemware

I've been dragging my feet when it comes to Valentines Day.  After finally getting Christmas over and done with I just didn't want to deal with another holiday.  But I have finally pulled myself out of my rut and have begun my Valentines crafts.

I'd like to introduce my hand painted Valentine's stemware.


So fun right?!  They will make a nice addition to our little V-day celebration!


And they were SO easy to do! I used the same glass paint pens I used when I made my Christmas Candy Jars.


And no artistic skill is necessary.  All you have to do is find some cute images.  I did a google search for "valentines doodles" and found a couple I liked.  Printed and cut them out, put the paper inside the glass and traced.  Couldn't be easier! 

Follow the directions on your pens, but mine dried for 24 hours and then baked at 325 F for 40 minutes.  Now they are even dishwasher safe! Gotta love it!

Oh, and just so you know, if you decide you don't like your design before you bake it, the paint easily washes off so you can try again.

Now all I need is a yummy desert and a bottle of sparking cider for the perfect post-Valentines-date evening.  (Had to put that in there in case my hubby gets it in his head that we are staying home that night.  This momma needs a night out!)

As always I'm linking to these great parties and events:

Friday, January 21, 2011

Inspiration File

Oh, guys... this is a good one!  I have three projects to share and all three are must haves. 

First up, I just discovered the blog Cottage Hill and am so glad I did!  What a beautiful blog full of really wonderful ideas.  Her painting skills are amazing and my jaw dropped with her faux grandfather clock.  I seriously want one!  Isn't this the best idea and a flawless execution?!  I'm in love.


Then Crafty Sisters showed off the scalloped adore heart.  Isn't it beautiful?!  I thought I was going to make a Valentines wreath for my front door but now I'm thinking something along these lines would be SO much better.  I also love how they glittered some of the flower petals.  So beautiful!

And finally, Peppermint Plum made this adorable Valentines snowflake garland.  I think this is SO cute and a great way to decorate for Valentines while still respecting all your other winter decor.  She has a great tutorial on how to make the cute snowflakes and I'm totally going to copy her and make one for my mantle... today.  Love projects that are simple, inexpensive, and still completely adorable!


Thanks so much for the inspiration ladies! 
If you were featured feel free to grab a button from the sidebar.

Tuesday, January 18, 2011

We have a WINNER!!!

Drum roll please.....

According to random.org the winner of the Dish Towel Belt is...

Positive Polly who said...

"You are awesome!
You are generous!
You play well with others .. :-)
Love this Dish Towel Belt and I am hoping that some of my girlfriends who know their way around a sewing machine will make some of these for our Craft fair. :-)
Would love to win yours! I could say I have an original. Hope you autograph it. :-) "

CONGRATS POLLY!  Contact me to claim your prize!

Boy did I enjoy the ego trip you guys put me on with your comments.  It wasn't until after I published that I realised how badly I was fishing for complements... but it was fun either way.

Thank You to everyone who entered and all your kind words.  You guys are totally awesome too!

Monday, January 17, 2011

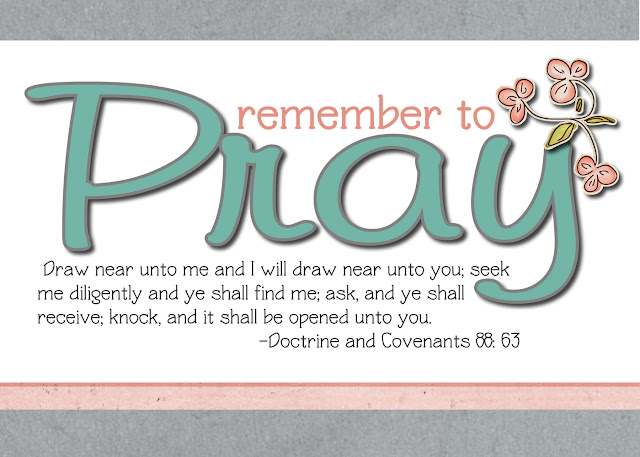
Remember to Pray- free printable!

Okay guys, I'm going to get a little personal here.

When I sit down and make my goals for the year, one that always makes the list is "build my relationship with my Heavenly Father and Savior."  Its something I feel that always can use improving upon.  Last year I made making it to my church meetings more regularly my priority.  This year its saying my personal prayers.

I will admit that I have become horribly lax in saying my prayers.   I know that personal prayer is the key to having a close relationship with God and I am determined to do better.  But because I'm out of habit, it is really easy for me to simple forget to pray.  Lets face it, I forget to EAT some days and I have a belly that growls at me!

So my solution was to make a not so subtle reminder to sit next to my bed. 


I made a simple print telling me to remember to pray.  I also included a favorite scripture quote.  It reads "Draw near unto me and I will draw near unto you...." which pretty much sums up what I want.   I want to feel close to the Lord.


The frame is a cheap dollar store frame that I gave new life to with a crackle finish.


I have been having a lot of fun with crackle lately and it is really simple to do.  Just take a frame, give it a base coat and let dry.  Then paint a layer of craft glue, let that begin to setup but not dry completely, and then add a top coat of paint in a different color.  Then just sit back and watch the magic happen!

If anyone else needs a reminder to pray anywhere in their home, here is the graphic I used.  Just click, save, and print.  The image is made at 5x7 but you are welcome to resize however works for you.


So what things are you working on this year?

(In case anyone is wondering, I belong to The Church of Jesus Christ of Latter Day Saints and you can learn more about what we believe HERE)

As always I'm linking to these great parties and events:

Sunday, January 16, 2011

Scrumptious Sunday- Goodies

I'm on a diet.  I realise that half of the female population is probably on a diet right now too.  But for me, being on a diet means obsessing over food.  As soon as I put myself on a diet I start watching food network and browsing recipes like a crazy women.  My husband asks me why I torture myself, but its actually therapeutic.  I enjoy thinking about all the good things I can eat once I'm done and it helps me not feel deprived. 

Anyway, since nothing delicious is coming out of my kitchen right now, I thought I'd share a couple goodies that are on my "I will eat you one day" list.

Both these recipes come from Kevin and Amanda. (great resource for blog tips and fonts, btw)

First up Mascarpone Oreo Snowflake Cookies.

Mascarpone Oreo Snowflake Cookies


She describes them as "incredibly rich, dense, and chewy" but she had me at Oreo.  Recipe found HERE.

The second is Candy Dipped Peanut Butter Ritz Sandwiches.

Candy Dipped Peanut Butter Ritz Cookies

Umm... hello!!!  Peanut butter, Ritz crackers, and candy coating all in one place? Yes please!  Recipe found HERE.

I can't wait for this stinking diet to be over!  (But I have lost 10lbs already.  Go me!)

Friday, January 14, 2011

Inspiration File

Man guys, thanks for the ego fest!  Yeah, so I kinda twisted your arm but still I'm loving all the complements on the giveaway.  If you haven't already, be sure to enter!

Now onto this weeks inspiration file.

First up, Modern Moments made the cutest cupcake stands ever.  Now I have seen a lot of DIY cake stands around, but having little mini ones for individual cupcakes is such a fun idea! I really want to have a party so I can have a reason to make a whole bunch.  Love it!


Now, you all know by now that I have a thing for 2x4 crafts and have to bookmark all the cute ones I find.  I just love 2x4 crafts because you start with something so simple and make it adorable.  Here are a couple more great ideas.

Brown Paper Packages made conversation blocks.  Too cute! I totally love them and want some right now!

Then Today's Fabulous Find made this little snowman family out of 2x4's.  They are so cute I almost want to cry.  Totally have to make these sometime too!


And last but not least, Shoestring Sophistication made this sunburst mirror.  That's right, I said MADE. Amazing and beautiful, I know.  Plus she has a great, easy to follow tutorial and it actually looks easy, which means I get to make one too!  So excited!


Thanks for all the great ideas!  As always there are featured buttons on the sidebar if anyone who was featured wants one.


Wednesday, January 12, 2011

Its a GIVEAWAY!

I am so glad you guys liked my dish towel belts!  They really are a simple solution but they work great and look adorable.  I just love them.  (tutorial found here)


But guess what?!?  I made an extra one to give away to one of you.  Surprise!


To enter this giveaway all you have to do is leave me a comment telling me how awesome I am, and random.org will pick a winner next week.  Please remember to include contact information so I can get a hold of you if you win.

DISCLAIMER:  This product is 100% handmade by me and is in no way perfect.  Whoever wins this giveaway must love it intensely but is not allowed to look too closely at my sewing skills (or lack thereof) or make fun of me in any way.


GIVEAWAY NOW CLOSED!

Monday, January 10, 2011

Dish Towel Belts

So about this time last year I got fed up with my dish towels being on the floor and came up with a solution.  While I loved them intensely over the past year, I was ready for a change.  So I came up with this instead.  The dish towel belt.


I think they turned out SO cute and I am really happy with them.  I just paired them with a white towel because I wanted the belt to be the focus.  But you could make a more neutral belt and pair it with a cute towel too.

But of course I couldn't just make one. I had to make four!


So do you want to make your own?  They are super easy and you can bang out a bunch in an afternoon.  Great way to use up those scraps too!


You start with a piece of fabric that is 12" x 6".... or what ever size you want.  The narrower one was 12" x 4".


Fold it in half  right sides together and sew along the long edge so that you make a tube.


Turn right side out and press.  (yes I said press.  Normally I would skip this step but it really makes a big difference. )  Fold the ends over and pin.


Then do a top stitch around the entire thing.  This will sew down the two edges and make the whole thing more stable.


Then add a few pieces of Velcro.  You can use any kind of closure you like but Velcro is easy.  I used an iron-on type that is supposedly permanent and machine washable.  Follow the package directions but for mine you just peeled of the backing, stuck it on, and then heat set it for 90 seconds.


Embellish however you wish.  On this particular one I made a simple ribbon bow and just hot glued it on.  It would probably be a good idea to attach your embellishments to a safety pin and attach them that way, but I didn't have any on hand and was being lazy.

You can also embellish with some rag flowers.
There are a ton of ways to make fabric flowers, but for mine I took a length of fabric and tied knots all down it leaving a little untied at the end.  Then starting at one end you roll it up, hot gluing as needed to keep it together.  I opened the untied end and hot glued it to the back to help secure everything.  Yes, I totally made that up as I went, but I think it turned out kinda fun.

The other way I embellished was with a ruffle.  Basically make a tube the same way you did before and then run a long straight stitch down the middle.  Gather it and then sew it onto the belt.

Wrap them around the towel and enjoy!  Here are how all the variations look hung.


They are a really simple solution for keeping that dish towel off the floor and I love how they look.  I'm so proud!

As always I'm linking to these great parties and events:

Today's Creative Blog
WhisperWood Cottage
Creations by Kara

Friday, January 07, 2011

Inspiration File

I'm back! Did you guys miss me?  I hope everyone had a great holiday.  We sure did although it feels good to have it behind us.  Things are getting back to normal around here and I'm finally getting some decorating, crafting, and blog designing done.  It feels SO good to be busy and back on track.  So without further ado, here is this weeks inspiration file.

First up WhipperBerry (is it just me or does it seem like WhipperBerry makes it on every one of my inspiration posts?) made these adorable cupcake burp cloths.  These would be the cutest baby shower gifts especially since cupcakes are all the rage.  Love them!

IMGP9417-3--2

Then Bobbypin's Boardwalk  completely blew me away with her window treatments.  She took thrift store draperies and gave them new life using permanent marker.  Unbelievable.  These things are true works of art!


Next, Crafts by Amanda made these beautiful jar luminaries.  They are so romantic.  What a perfect addition to any decor.  I'm going to have to make a few.


Amber from Knee Deep in Glue emailed me to let me know that she used my family rules printable, but I was really impressed with her application.  Instead of just framing it she attached it to a 12 x 12 piece of plywood.  She then did the same with some photos and cute scrap paper and ended up with a great wall display.  What a great and inexpensive solution for a large wall! Great job!


Now, I'm always looking for ways to keep my kids busy.  This idea by The Life of Jennifer Dawn is right up their alley. You use a sharpie and watercolor pencils to make a personalized painting color book.  Just add water and you have instant fun! Love this idea.


And last but not least Bubsies Boutique shared a recipe for this yummy looking breakfast casserole.  I'm dieting right now so everything looks good, but this looks particularly yummy.  I would totally serve this for dinner too.... with pancakes! Breakfast for dinner is a favorite around here.  Thanks for sharing!


If you were featured you can grab a button from my sidebar. 

I'll be back soon... I promise!


LinkWithin

Related Posts with Thumbnails
Don't stop there! Click "older posts" to keep reading!