Friday, October 08, 2010

Inspiration File

Just a few things to share this week. 

First off, Crafty Sisters made this adorable haunted village.  Isn't that SO fun?!?  She used an assortment of bird houses from the craft store, painted them black and then embellished with Halloween scrapbook paper.  I love this idea.  While I may not make a whole village, I'm totally going to add at least one haunted house to my Halloween decor.


I am Momma, Hear me Roar showed us how to make this adorable petal pillow.  I think this is seriously amazing.  Now I'm not much of a seamstress, but I want to attempt this pillow.  It is just too pretty and would be a great addition to any bed.


And speaking of pillows, look at this one made by Not Just a Housewife.  She painted that fabric BY HAND!  Amazing job! I totally feel her pain when it comes to trying to find the fabric that matches the image in my head, but next time I'll be brave and make my own like she did.  Great Job!

Well, that's all for now.  The project I've been working on this week hasn't turned out like I envisioned so I'm off for round two. 

If you've been featured on this blog, you can grab a featured button on my sidebar.


Wednesday, October 06, 2010

The Bird's Papaya and some exciting news!

So I wanted to show off my newest favorite craft blog.


The Bird's Papaya

Not only is it chuck full of great ideas like these...


[magnet+boards+006.JPG]

[Christmas+2009+103.JPG]


...but the blog itself is super cute!


Guess what?!?   I designed it!

That's right! After redoing this blog Sarah contacted me asking who did it for me.  I had been toying with the idea of trying to do a little blog graphic design on the side because, quite frankly, I love to do it! This was the perfect opportunity to try my hands on a blog that was owned by someone I wasn't related to and Sarah was brave and kind enough to let me.  The process went really smooth and turned out amazing (if I do say so myself) so I now feel confident enough to start offering graphic design services.  (Blogger blogs only)

You can check out some of my other work over there -->  and click here for more details. 

I'm so excited!

Monday, October 04, 2010

2x4 Pumpkins

So I was asked to come up with a project for the ladies at my church to do at an activity.  I was told to come up with something that would take 1-1 1/2 hours to make, and cost under $10.  Yikes! Pretty restrictive.  This is the first time I've been asked to come up with the craft and since its sorta my thing, I wanted to make something good.  So 2x4 pumpkins it was, cheap and easy yet super cute.  But of course I had to put my twist on them. Here is my version of the 2x4 pumpkin.


Pretty cute right? I love the pattern added with the scrapbook paper and the big bow.  I also found some paper cover floral wire and added curlies to the bow.  They remind me of the vines pumpkins sometimes have.  I also angled the corners so that the pumpkins would be a little more round.

Here are my two cents on making a 2x4 pumpkin.

Buy a 2x4.  They cost about $2 and you can get two pumpkins out of one.  I had my husband cut them down for me.  The short pumpkin has five 10 inch pieces and a 3 inch piece for the stem.  The short one has six 8 inch pieces and a 3 inch stem piece.  Cut the angles on two of the pieces per pumpkin.


Paint them orange (or brown for the stem) and then get out your palm sander and rough up all the edges.  You can do this by hand too. 


Apply a light coat of stain all over.  This is optional but it tones down the orange and I like the look. Then use modge podge to apply the strips of scrapbook paper.


Hot glue all the pieces together and top with a cute bow.  I made my bow by making two simple bows  and attaching them together and added a curly out of floral wire. And that's it, easy peasy!

Here are a few up close and personal pics of each of the pumpkins.


So what do you think?  I hope all the ladies in my ward like them and we'll have fun making them.  I'll show off pics of all the different combinations after we do them. 

Thanks for reading!

I will be linking to these weekly parties and these special event parties.


SYS Thurs
Get Your Craft On Tuesday

Saturday, October 02, 2010

Inspiration File

What a week in the blog world! I found a ton of great projects to show off to you today. Once again we'll start with seasonal projects.

Tiffany at Simply Complicated made these adorable witch legs.  Aren't those the cutest things? I thought this was so funny, probably because the last few weeks the shoe has definitely fit! Go check out her tutorial!


And along those same lines, check out the "girl's night out pillow" from Just Another Hang Up.   The talent here just amazes me.  This pillow is completely adorable.  Love it and want it!


Now the Pennant Banner made by Crafty Sisters is such a cute idea and so doable.  I love all the banners all over blogs right now and I think this technique is particularly cute.  Plus I love how it would hold up over many seasons.  The possibilities are endless and the same idea can be used for any holiday or special occasion.  Be sure to check them out!


Next up are the painted luminaries by Crafts by Amanda.  She made a whole bunch of these out of mason jars and they turned out super cute.  My favorite are the ghosts.  I could totally see a whole bunch lined up on the sidewalk Halloween night.  Great idea!

[luml.jpg]

Under My Umbrella was getting ready for a Super Saturday craft day and listed a bunch of projects that her group could make. I loved this post because, even though there aren't tutorials, most crafters could recreate these projects and this post is chuck full of great ideas, check them out! Here is one of my favorites, which inspired the project that I'm going to show you Monday. Can't wait!


This week I discovered the blog How Does She and oh my word, where have you been my whole life? This blog is amazing and full of amazing ideas.  I got lost on there for hours...One project I really like, while not a new post, was their chore chart.  My kiddos are still a little young for chores but it won't be long.  When the time comes, this is the system I'm going to use. 

chore-chart-for multiple=

And finally, Miss Mustard Seed.  If you don't already read her blog, YOU MUST! I want to be her.  Everything she does is simply beautiful and her style is flawless.  One of my favorite things she makes are incredible signs.  This week she gave some great tips on making and designing our own signs.  Be sure to check it out, I can't wait to try my hand at one of my own.


And that's a wrap!  Have a great weekend!

P.S. You may have noticed my blog got a face lift.  I'm really happy with how it turned out.  I also have new and improved buttons so be sure to grab one if you've been featured on this blog.

Wednesday, September 29, 2010

Fall Mantles

I don't have a fireplace. (moment of silence)  It's tragic really.  It's this time of year that I really wish I had one so I could decorate my mantle.  Since I'm pining away for a fireplace, I'd thought I'd show some drool worthy fall and Halloween mantles.

[banner1.jpg]
The Polka Dot Chair

boopsie daisy
[mantle+long+shot.jpg]
A Soft Place to Land

Outdoor Rooms and Outdoor Fireplaces
Southern Living
m+m=l
(thou shall not covet, thou shall not covet, thou shall not covet.....)
Sigh...... someday right?!?

Monday, September 27, 2010

Halloween Rag Wreath

So do you remember that rag wreath I featured from A Little Bit of Everything a couple of weeks ago?  Well the other day I was in Hancock Fabrics and they had all their holiday fabric 40% off.  That sealed the deal and I set off to make my own version of the rag wreath.  Wanna see?


I think it turned out pretty cute.  Here are my two cents on how to make a rag wreath.


A.  Find some super cute holiday fabric.  I got a total of 2 yards in four different patterns and had a little left over.  You could probably get away with a yard and a half, but it would be close.  Also, the original inspiration used a metal hanger as the form but I found a wire wreath form for only $1.99 at the craft store.  Since it has four rings your wreath will turn out much fuller.  Then just cut strips of fabric, about 6" long and 1" wide, and tie in a random pattern around your ring.  I doubled knotted because I didn't want my hard work to come undone.

B. Take a piece of ribbon and tie a loop about the top of your wreath to hang it from.  I tied it around the second ring.

C. Next I made a bow to attach to the loop.  I made two simple bows, one larger then the other, and then hot glued the two together.  Take a small piece of ribbon and wrap that around the middle to finish the look. (D)

E.  Glue the bow to the loop.

F.  I wanted to attach the word "BOO" but the craft store was out of "b" so I went with "EEK."  I painted them green and then topped it with sparkly silver paint.

G.  Attaching the letters to the wreath ended up being a little more tricky.  I ended up hot gluing a opened bobbi pin to the back of the letter. (Glue it at the top, not the middle like in the picture.) Make a small hook in the end of the pin.

H. Use that hook to hot glue the letter to the back of the wreath.  I also had to add a few drops of hot glue to a couple fabric pieces to keep the letters where I wanted them.

And your done, just hang and enjoy!


I love it!

I'm linking up to these parties, today's creative blog, and

Sunday, September 26, 2010

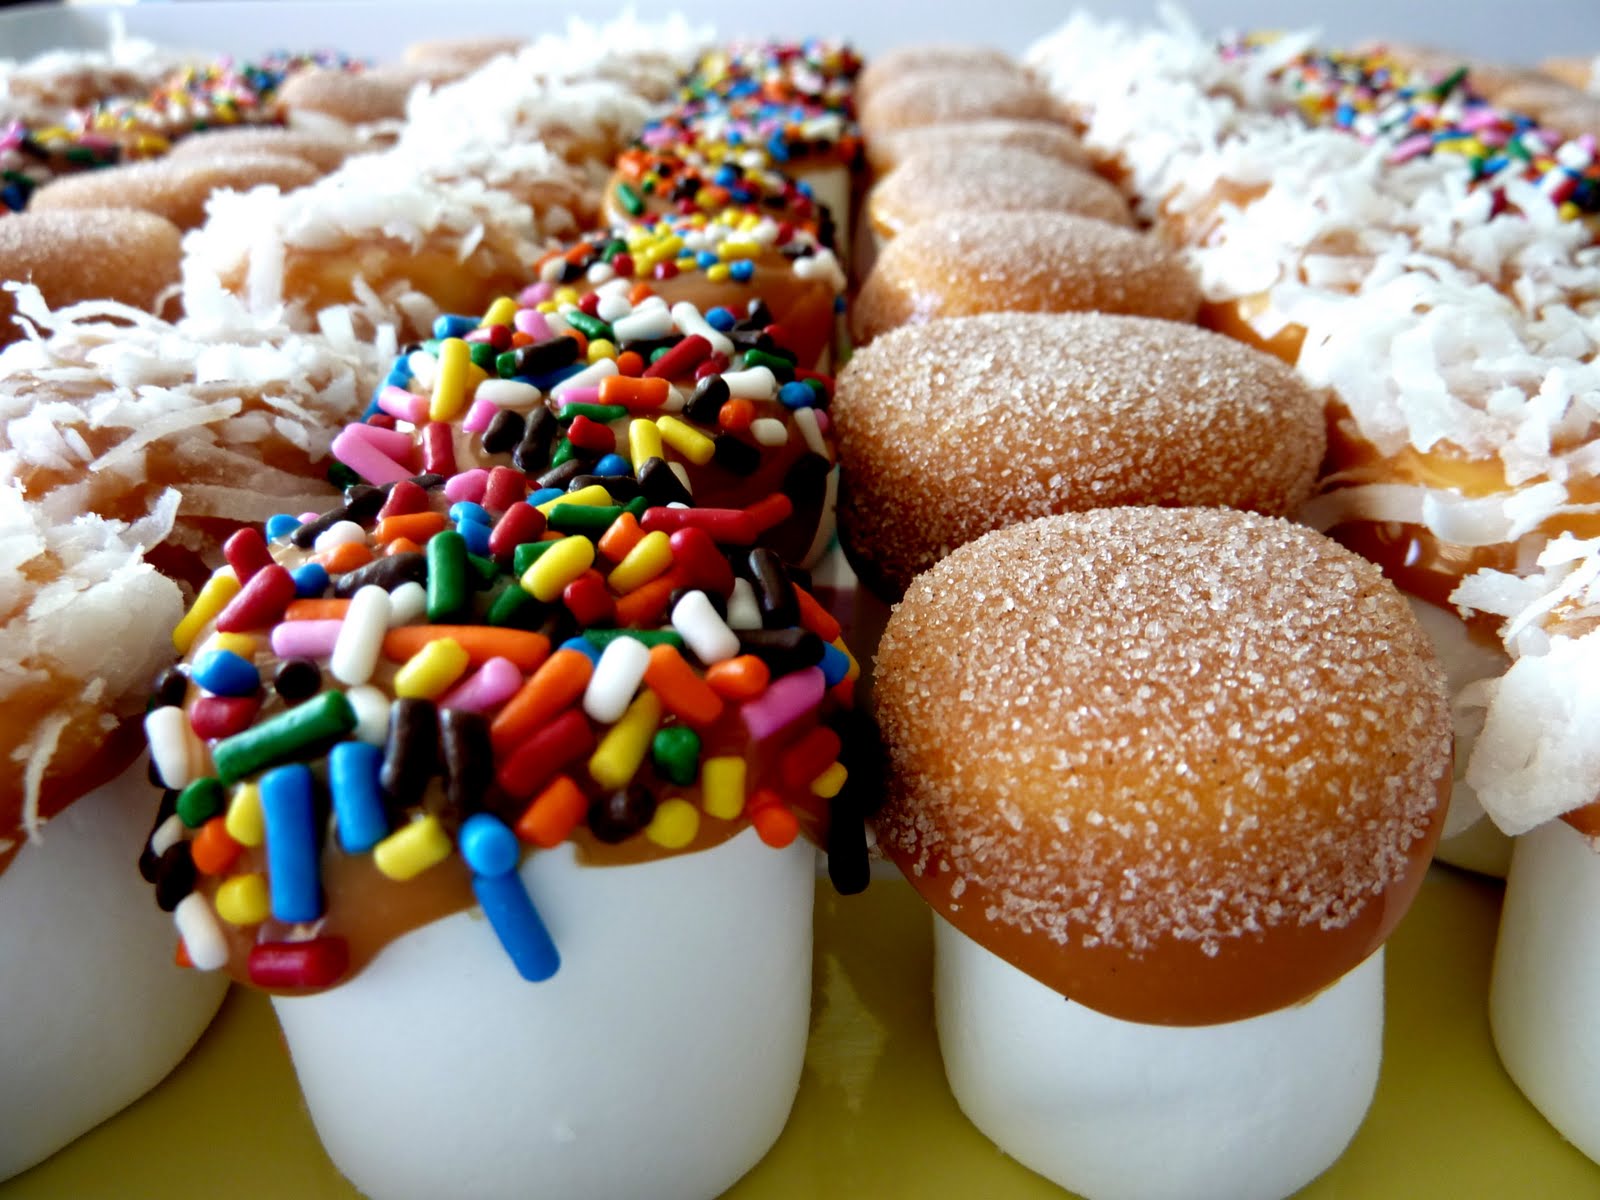
Scrumptious Sunday- Carmel Dipped Marshmallows

Last week we went to a back to school potluck for the families at my son's preschool.  I was asked to bring a dessert.  I wanted to do something fun that the kids would love and be easy to bring, so after much pondering I decided to make Carmel Dipped Marshmallows.  They turned out so pretty!


Its a really simple process.  You simply heat up Carmel candies in the microwave (follow the package directions)  and then dip a marshmallow in about half way.  Let as much of the excess drip off as you can.  Then dip it into your favorite topping.  I used coconut, sprinkles, and cinnamon sugar.  Then place them, marshmallow side down, on a piece of wax paper to set up.


While this was easy to do, it was a bit time consuming since I made two bags of marshmallows.  But they look way impressive all lined up on a tray!


and the best part? The kids LOVED them!

Thursday, September 23, 2010

Inspiration File

Just a few things to share with you this week. 

First off Crafty Sisters made the cutest Halloween topiaries with candy.  These are seriously adorable and would be so fun for a party or just to decorate a table scape or mantle with.  LOVE this idea!


Next, Naptime Crafters showed us how to make a korker bow.  I've always thought korker bows were particularly cute and wondered how they were made.  I'm really excite about this tutorial and you can bet there will be some new bows in my daughter's future! (Isn't her baby too cute for words?!?)


And finally I cried a little when Jen at Tatertots and Jello revealed her laundry room redo.  Our laundry room is the most neglected room in our house... which wouldn't be so bad if we didn't have to walk through it to get to our garage, like ALL THE TIME.  I am SO jealous of this space.  But seeing the fabulousness has inspired me to add decorating the laundry room to "the list."
(Can you believe blogger is trying to tell me that fabulousness isn't a word?)


Well, that's it for now but I can't wait to show you what I have been working on this week.  It turned out way cute if I do say so myself!  Plus I have a fun Scrumptious Sunday scheduled so be sure to check back.  See you next week!

If you were featured on this blog feel free to grab a featured button over there. -->

Monday, September 20, 2010

Spit and Vinegar

If you were to ask my parents about me as a child, they would tell you that I was easy, mild mannered,  and sweet tempered.  If you talk to my husband's parents about him, they would say the exact same thing.  So it would stand to reason that we would produce easy, mild mannered, sweet tempered children right?
Wrong!  We were blessed with...


Now don't get me wrong, I love my kids to death... but they are T.R.O.U.B.L.E!  So I decided the only fair thing to do is make them "Spit and Vinegar" shirts to warn the general public what is coming their way. 

I used the same freezer paper stenciling technique as my theater room pillows.  The background images were found via google images when I searched tribal tattoo and the font is from my computer.    I did run into an issue with my stencil bleeding when I overlapped the letters onto the background.  Luckily it only bled where the white paint was so I was able to touch it up with a brush.  I also used some embroidery floss and hand stitched around the wording to give it an extra kick.  I think they turned out pretty cute!


Just don't let these cute faces fool you, they will give you a run for your money. They sure are me!

Partying with:


Creations by Kara
   Party Button    

LinkWithin

Related Posts with Thumbnails
Don't stop there! Click "older posts" to keep reading!