I just wanted to let everyone know that I set up a new blog for my blog design business. When I first started I wasn't sure where it all would go, but since its picking up I though it would be nice to set up a separate blog so I could have more detail and information about the process. I had a lot of fun setting it up and played around with a different template, which I am loving and going to use more of. So whether you are in the market for a blog makeover or not, go check it out! I'd love to hear your feedback.
You can go here or just click on the blog design link on my menu bar.
Thanks!

Sunday, November 14, 2010
Scrumptious Sunday- Old Virginia Wassail
Now this recipe I actually made for the first time last year, but it was instantly declared a holiday must. My Father-in-law, who had traveled to Germany when he was younger, said it tasted just like the stuff they served there. It's good, try it.
Old Virginia Wassail

recipe via allrecipes.com, image via liz and kate
2 quarts apple cider
2 cups orange juice
1 (46 oz) can pineapple juice
2 (3 inch) cinnamon sticks
1 tbs cloves
1/2 cup honey
Put everything in a large pot and bring to a boil. Simmer on low or transfer to a slow cooker to keep warm until served. Strain out cinnamon and clove before serving. I usually make it up and let it do its thing while I'm cooking so it has plenty of time to get nice and delicious.
Old Virginia Wassail
recipe via allrecipes.com, image via liz and kate
2 quarts apple cider
2 cups orange juice
1 (46 oz) can pineapple juice
2 (3 inch) cinnamon sticks
1 tbs cloves
1/2 cup honey
Put everything in a large pot and bring to a boil. Simmer on low or transfer to a slow cooker to keep warm until served. Strain out cinnamon and clove before serving. I usually make it up and let it do its thing while I'm cooking so it has plenty of time to get nice and delicious.


Friday, November 12, 2010
Inspiration File
Once again, I have a lot to show off this week. You guys are clever! I'm starting with Thanksgiving ideas and then will move on to Christmas.
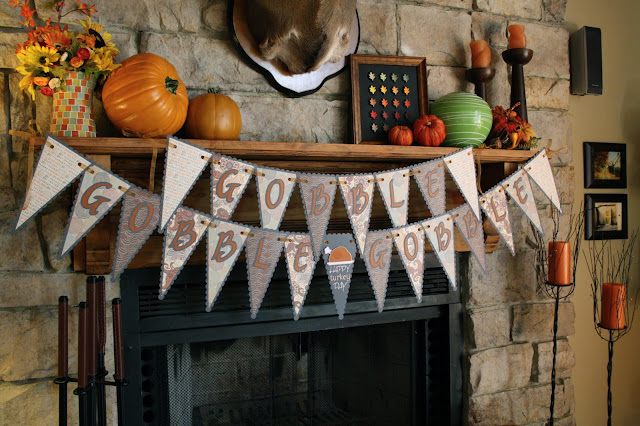
First up, The Magic of Ordinary Things made her own bunting banner, and it is SO SO pretty! Her whole mantle is to die for in fact. I just love it!


And then last, but not least, Kristi from Life through the Lens guest posted on Tatertots and Jello and shared the tutorial on this amazing yarn ball wreath. I think it is such a cool and neat wreath idea. Great job!

Once again, you guys rock. I love browsing through blogland and seeing all the fun and inspiring ideas. It's what keeps me creating.
If you were featured, feel free to grab a button.
First up, The Magic of Ordinary Things made her own bunting banner, and it is SO SO pretty! Her whole mantle is to die for in fact. I just love it!

Then, Craft Goodies made these adorable 2x4 turkeys. They are really cute and would be a ton of fun to make. I have a fondness for 2x4 crafts. I think they are just a lot of fun.

And speaking of 2x4's. Young and Crafty made these adorable Christmas trees. These are definitely going on my to do list.

And then last, but not least, Kristi from Life through the Lens guest posted on Tatertots and Jello and shared the tutorial on this amazing yarn ball wreath. I think it is such a cool and neat wreath idea. Great job!

Once again, you guys rock. I love browsing through blogland and seeing all the fun and inspiring ideas. It's what keeps me creating.
If you were featured, feel free to grab a button.
Thursday, November 11, 2010
Safety Pin Bracelet and Napkin Rings
I'm still waiting for my shipment... dang postal service. So in the meantime I have rearranged my schedule so I can hopefully get back on track. That's the problem with making yourself a schedule, if something doesn't go as planned then everything gets thrown off. I guess the lesson learned is quit trying to be organized! ;)
Since I'm going to be sharing some Christmas gift ideas over the next couple of weeks, I thought it would be great to start with this fun, easy and inexpensive idea that would be great for any of the women in your life. Let me introduce you to the safety pin bracelet.

Super fun right? I of course made a Christmas bracelet but you could used any color beads to make whatever suits your fancy.
Its really simple to make too. All you do is get a pack of safety pins and some beads. Be sure your beads are big enough to fit onto the safety pin. Then just open the pin, add some beads (I used 5 per pin) and then close them up again. Once you have all your pins beaded you take a couple lengths of clear stretchy cording and string them up. One string going through the back of the pin and the other through the front. Make sure your beads all face the same directions and turn the pins around each time. Once its long enough, just knot closed and you are done! (Does that make sense? I was going to do a picture tutorial but it is really so simple I felt stupid taking the pictures so I stopped. If any one has any questions, just email me.)
After making my first bracelet I had the brilliant idea of making them into napkin rings. Super cute too!

They are made the exact same way, just smaller.
So for about $20 in materials (that's with 2 packs of safety pins) you can make 4-5 bracelets or 3-4 (set of 4) napkin rings. Now that's a cute $5 gift!
As always, I will be linking to these parties.

Since I'm going to be sharing some Christmas gift ideas over the next couple of weeks, I thought it would be great to start with this fun, easy and inexpensive idea that would be great for any of the women in your life. Let me introduce you to the safety pin bracelet.

Super fun right? I of course made a Christmas bracelet but you could used any color beads to make whatever suits your fancy.
Its really simple to make too. All you do is get a pack of safety pins and some beads. Be sure your beads are big enough to fit onto the safety pin. Then just open the pin, add some beads (I used 5 per pin) and then close them up again. Once you have all your pins beaded you take a couple lengths of clear stretchy cording and string them up. One string going through the back of the pin and the other through the front. Make sure your beads all face the same directions and turn the pins around each time. Once its long enough, just knot closed and you are done! (Does that make sense? I was going to do a picture tutorial but it is really so simple I felt stupid taking the pictures so I stopped. If any one has any questions, just email me.)
After making my first bracelet I had the brilliant idea of making them into napkin rings. Super cute too!

They are made the exact same way, just smaller.
So for about $20 in materials (that's with 2 packs of safety pins) you can make 4-5 bracelets or 3-4 (set of 4) napkin rings. Now that's a cute $5 gift!
As always, I will be linking to these parties.
Tuesday, November 09, 2010
Pillows
I have a bunch of great gift ideas and holiday stuff coming up. I'm super excited about it all and to keep me sane I decided to make a calender and schedule the order and frequency I wanted to post for the next few months. That way I knew what needed to get done and I wouldn't forget anything. Then I hit a snag. I was waiting for something in the mail and it got lost. So I can't post what was supposed to post yesterday, and what I plan on posting tomorrow must come after the post I'm missing.... Ahhhh. Long story short, sometimes plans don't go as planned.
Anyway, to make up for my lack of something to show, I thought I would actually repost an older post from back when this blog was just a little baby. And since its pillow challenge over at The CSI Project, I'm killing two birds with one stone. (I've always hated that expression) Don't worry, we'll play catch up later this week.

I made four covers to go over some existing pillows using the leftovers from my blind project. I then made two more "basket weave" pillows to accent with. They are so pretty! My pictures really don't do them justice. Isn't the basket weave divine?

So... do you want to make your own?
Supplies:
fabric (I got one yard to make two pillows and had some left over.)
ribbon (I used three spools of sheer ribbon per pillow but it will depend on the size of your pillow.)
pillow form
sewing notions

Step 1: Cut out a piece of fabric for the face several inches larger than your pillow form. You want to consider the fullness of your pillow and hem allowance.
Step 2: Cut out two more pieces the same width and about 3/4 of the length of your face fabric.
Step 3: Starting in one direction pin your ribbon in strips next to each other, pinning on both ends till you cover the entire piece.
Step 4: Start weaving by taking strips of ribbon and place them over, under, over, under... in the opposite direction. You will alternate every other strip. Once it is in place, tuck it next to the edge (or previous ribbon) and pin both ends. (I'm sure all of you know how to weave but I'm trying to make this thing thorough, but man its hard to explain in words!)
Step 5: Sew a top stitch as close to the edge as possible in order to hold everything in place while you work with it. Then trim around the piece. (At this point you could take some binding tape and bind the edge to make a beautiful place mat)
Step 6: Take your other fabric pieces and turn over and sew one of the edges. You may need to trim these pieces as well depending on how much you trimmed your face piece.
Step 7: Place the right sides together with the two back pieces overlapping. The turned edges should be in the center. Pin in place.
Step 8: Sew all around your pillow. Once done, clip the corners so they will be sharp when turned.
Step 9: Turn your cover right side out and stuff your pillow in. You may need to adjust the ribbon when done. And there you have it!
Note: the other pillow covers where made the using the same method as above.

Simply beautiful!

Anyway, to make up for my lack of something to show, I thought I would actually repost an older post from back when this blog was just a little baby. And since its pillow challenge over at The CSI Project, I'm killing two birds with one stone. (I've always hated that expression) Don't worry, we'll play catch up later this week.
PILLOWS
The greatest thing about making your own custom roman blinds is that you can make custom throw pillows that match! And the greatest thing about making custom throw pillows is that you can make them envelop style. So when grimy fingers use your pillow as a napkin, you can put the covers in the wash!I made four covers to go over some existing pillows using the leftovers from my blind project. I then made two more "basket weave" pillows to accent with. They are so pretty! My pictures really don't do them justice. Isn't the basket weave divine?
So... do you want to make your own?
Supplies:
fabric (I got one yard to make two pillows and had some left over.)
ribbon (I used three spools of sheer ribbon per pillow but it will depend on the size of your pillow.)
pillow form
sewing notions
Step 1: Cut out a piece of fabric for the face several inches larger than your pillow form. You want to consider the fullness of your pillow and hem allowance.
Step 2: Cut out two more pieces the same width and about 3/4 of the length of your face fabric.
Step 3: Starting in one direction pin your ribbon in strips next to each other, pinning on both ends till you cover the entire piece.
Step 4: Start weaving by taking strips of ribbon and place them over, under, over, under... in the opposite direction. You will alternate every other strip. Once it is in place, tuck it next to the edge (or previous ribbon) and pin both ends. (I'm sure all of you know how to weave but I'm trying to make this thing thorough, but man its hard to explain in words!)
Step 5: Sew a top stitch as close to the edge as possible in order to hold everything in place while you work with it. Then trim around the piece. (At this point you could take some binding tape and bind the edge to make a beautiful place mat)
Step 6: Take your other fabric pieces and turn over and sew one of the edges. You may need to trim these pieces as well depending on how much you trimmed your face piece.
Step 7: Place the right sides together with the two back pieces overlapping. The turned edges should be in the center. Pin in place.
Step 8: Sew all around your pillow. Once done, clip the corners so they will be sharp when turned.
Step 9: Turn your cover right side out and stuff your pillow in. You may need to adjust the ribbon when done. And there you have it!
Note: the other pillow covers where made the using the same method as above.
Simply beautiful!
Sunday, November 07, 2010
Scrumptious Sunday- Candied Yams
It has been awhile since I have done an installment of Scrumptious Sunday and since Thanksgiving is around the corner I thought it would be fun to share a few of my favorite holiday dishes. Now, I am a big fan of the yam. I have never met a yam I didn't like. That being said, I have never met a yam I liked more then my Mom's Candied Yams. (And I'm sure she got the recipe from her Mom, who got it from her Mom, and so forth.) So here it is.
Candied Yams
 Now if that isn't a picture of Thanksgiving, I don't know what is!

Serves 4-6 (you will probably want to double this recipe)
1 lg. can cut Yams (or sweet potatoes), drained
1 8oz can crushed pineapple, loosely drained
1/2 cup brown sugar
1 tbs yellow mustard
mini marsh mellows
Preheat oven to 350 degrees. Put yams into a casserole or baking dish. In a separate bowl combine pineapple, brown sugar, and mustard to form a sauce. Pour over yams and baked covered for 20 min. or until bubbly. Remove cover, top with marsh mellows and bake until browned. This only takes a couple of minutes so watch closely so you don't burn your marsh mellows! Enjoy!
Friday, November 05, 2010
Inspiration File
I hope you guys are ready for the Christmas season to start, because ready or not here it comes! Poor Thanksgiving, the seriously neglect holiday that is stuck in between Halloween and Christmas. I really try to give Thanksgiving its fair share, but I will admit my mind has gone to Christmas. While I refuse to decorate until Thanksgiving is over, I'm still getting projects and ideas ready. I guess the rest of blog land is with me on this because all my features are Christmas related.
First up, the Layla Grace blog offered this great giveaway this week and showed us this adorable Christmas mantle. I about died when I saw it and want to win SO BAD. Now, I'm sure a good part of my excitement was that the painting has my name on it... literally! (In case you didn't know, we are the Winns) The mantle scape itself is pretty dreamy too. Love all the fun and happy colors!


First up, the Layla Grace blog offered this great giveaway this week and showed us this adorable Christmas mantle. I about died when I saw it and want to win SO BAD. Now, I'm sure a good part of my excitement was that the painting has my name on it... literally! (In case you didn't know, we are the Winns) The mantle scape itself is pretty dreamy too. Love all the fun and happy colors!
Next, Colleen from And Baby Makes Five shared with us her Cinnamon Salt Dough Gingers Cookies. These aren't the kind for eating, but for painting and decorating with. I'm going to make these this year with my kiddos and I know we will have a blast. I am thinking I will put mini trees in my kids rooms and let them make their own ornaments to decorate their trees with. I'm excited. Thanks for the tutorial Colleen!
And finally, Poppies at Play shared the tutorial on how to make this cute shadow box snowman. I think he is just adorable and would be a super fun craft to make. If anyone has a craft group coming up, I'd put this little guy on the list for sure! Love it!


Well, that's it for now. If you were featured please feel free to grab a featured button from my sidebar. I have decided that since I won't start showing off any Christmas decor till after Thanksgiving, that I will spend the next few weeks sharing some fun gift ideas. I have some great things planned (if I do say so myself) so be sure to come back and join in on the fun!
Monday, November 01, 2010
Reversible Bunting Banner
Okay guys, I finally jumped on the bunting banner wagon and made myself an adorable trick-or-treat banner.

Isn't it fun?! Now I know what your thinking, your thinking "uhh, Krystal, Halloween was yesterday so we really don't care about your trick-or-treat banner. Yeah its cute, but that information would have been nice LAST WEEK!" Well, never fear.....this banner is reversible!

I love it so much! I'm over here doing the happy dance because I am REALLY proud of myself on this one! Its not your typical bunting either. I wanted to make something with some substance that would hold up and use materials I felt comfortable working with. That's why the typical paper (to weak) and fabric (I'm just not that talented of a seamstress) banner was out. So this one is made with craft foam and scrapbook paper.
Do you want to see how its done? Okay fine, you twisted my arm.

Step 1: Prep. Cut out 11 triangles from your craft foam. I used 2 sheets of black. I recommend making a pattern out of paper. Cut out 11 more slightly smaller ones from various Halloween papers and 11 from various Fall/ Thanksgiving papers. Also cut out paper letters to say "TRICK or TREAT" and "GIVE THANKS" (see image A) Note: the "or" will be on one pennant and there will be one blank pennant between give and thanks.
Step 2: Make an assembly line and modge podge a paper onto the foam. Pick one side first and just go with it. You can immediately add the letter and then set aside to dry. (see images B and C) When you set them aside, line them up as they would appear when hung. This will keep you from getting confused. (see image D)
Step 3: Once that side is dry, you can begin the other side. Repeat the same process but remember the first letter will be on the last pennant of the side you just finished. So work from the back to the front. (See image E)
Step 4: Once everything is dry, take a hole punch and punch a hole into each top corner. (see image F) Then take a piece of ribbon about 6 inches long, thread thru the hole and tie a knot. I trimmed the ribbon and seared the edge with a lighter to give it a finished look. (see image G) Then add a pennant to the ribbon and tie a second knot as far apart as you want your pennant. Finish that edge like you did before. (see images H and I) You want to be sure that your knots all end up on the same side of the banner. I did them on the "give thanks" side, but it doesn't really matter as long as you are consistent. (see image J) Do this for all the pennants leaving extra ribbon at the ends to hang with. Enjoy!
Now, if you want to make a Thanksgiving and Christmas banner instead, you can still do "give thanks" on one side and "Christmas" on the other with the first and last pennant being blank...OR...wait for it..... the Christmas side can say "Let it Snow." I know, I'm good.
Now for some more pictures of my adorable two-sided banner!


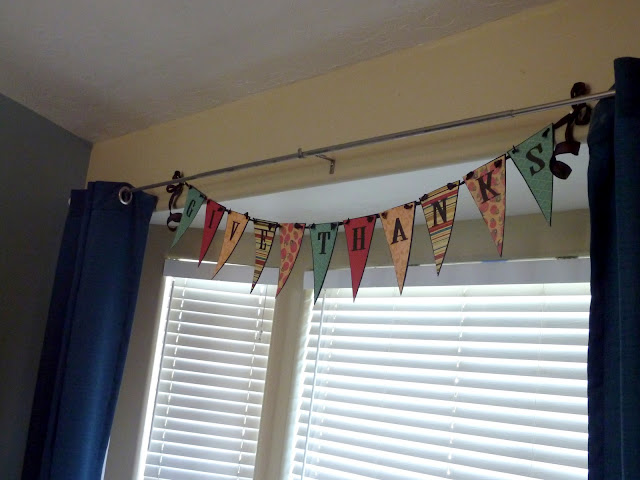
Now go make one! And if you do a Thanksgiving/Christmas one, promise to send me a link. I'm dying to see one done!


Isn't it fun?! Now I know what your thinking, your thinking "uhh, Krystal, Halloween was yesterday so we really don't care about your trick-or-treat banner. Yeah its cute, but that information would have been nice LAST WEEK!" Well, never fear.....this banner is reversible!

I love it so much! I'm over here doing the happy dance because I am REALLY proud of myself on this one! Its not your typical bunting either. I wanted to make something with some substance that would hold up and use materials I felt comfortable working with. That's why the typical paper (to weak) and fabric (I'm just not that talented of a seamstress) banner was out. So this one is made with craft foam and scrapbook paper.
Do you want to see how its done? Okay fine, you twisted my arm.
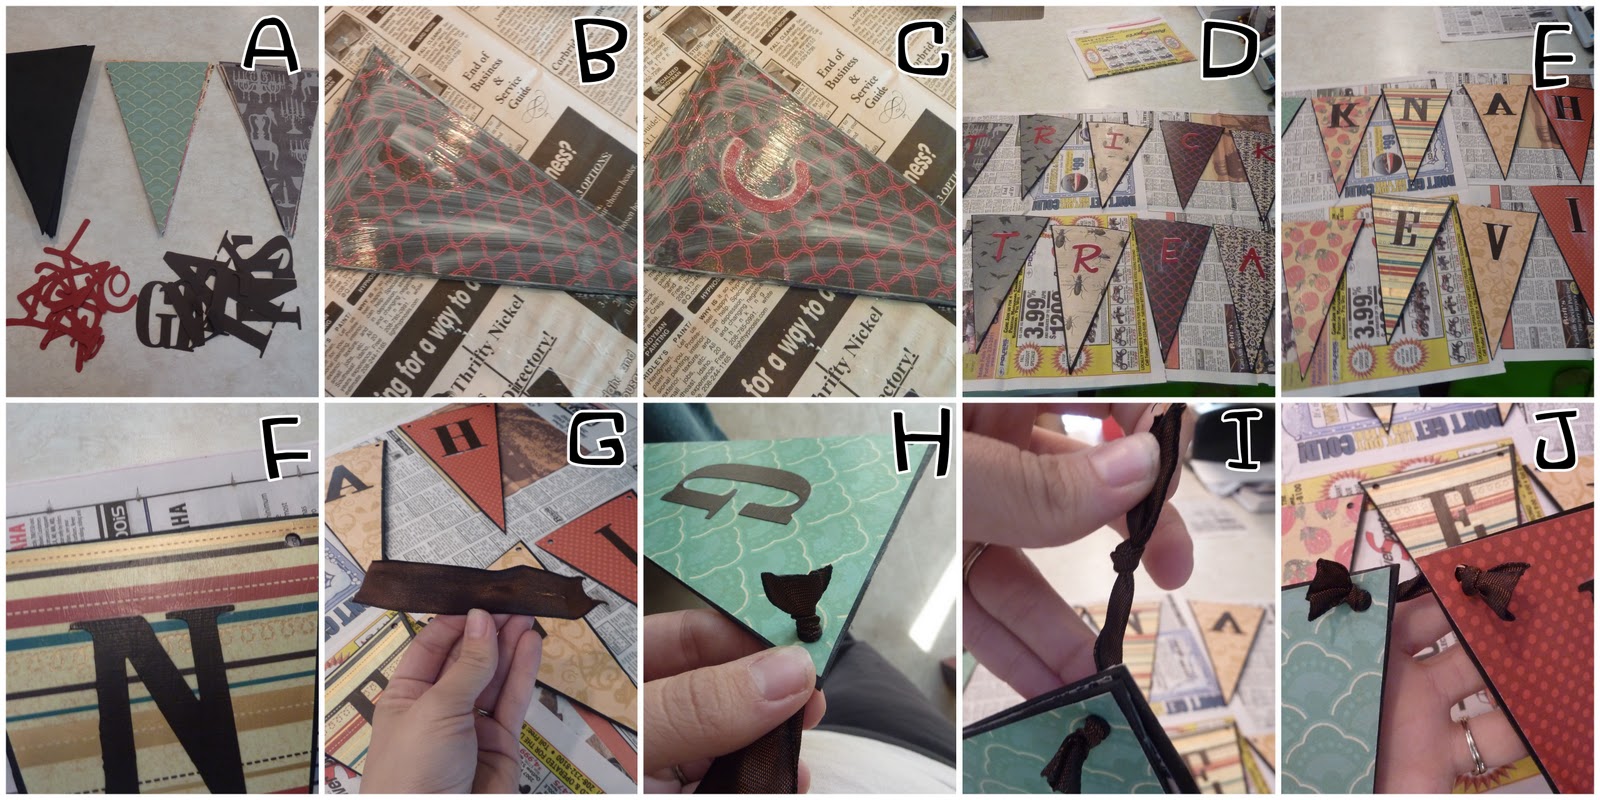
Step 1: Prep. Cut out 11 triangles from your craft foam. I used 2 sheets of black. I recommend making a pattern out of paper. Cut out 11 more slightly smaller ones from various Halloween papers and 11 from various Fall/ Thanksgiving papers. Also cut out paper letters to say "TRICK or TREAT" and "GIVE THANKS" (see image A) Note: the "or" will be on one pennant and there will be one blank pennant between give and thanks.
Step 2: Make an assembly line and modge podge a paper onto the foam. Pick one side first and just go with it. You can immediately add the letter and then set aside to dry. (see images B and C) When you set them aside, line them up as they would appear when hung. This will keep you from getting confused. (see image D)
Step 3: Once that side is dry, you can begin the other side. Repeat the same process but remember the first letter will be on the last pennant of the side you just finished. So work from the back to the front. (See image E)
Step 4: Once everything is dry, take a hole punch and punch a hole into each top corner. (see image F) Then take a piece of ribbon about 6 inches long, thread thru the hole and tie a knot. I trimmed the ribbon and seared the edge with a lighter to give it a finished look. (see image G) Then add a pennant to the ribbon and tie a second knot as far apart as you want your pennant. Finish that edge like you did before. (see images H and I) You want to be sure that your knots all end up on the same side of the banner. I did them on the "give thanks" side, but it doesn't really matter as long as you are consistent. (see image J) Do this for all the pennants leaving extra ribbon at the ends to hang with. Enjoy!
Now, if you want to make a Thanksgiving and Christmas banner instead, you can still do "give thanks" on one side and "Christmas" on the other with the first and last pennant being blank...OR...wait for it..... the Christmas side can say "Let it Snow." I know, I'm good.
Now for some more pictures of my adorable two-sided banner!


Now go make one! And if you do a Thanksgiving/Christmas one, promise to send me a link. I'm dying to see one done!


Friday, October 29, 2010
Inspiration File
Just a couple things to share with you today. Jen over at Tatertots and Jello did it again and completely blew me away with her chalk board chargers. She took cheap plastic charges, primed them, and sprayed them with chalkboard paint. So easy and smart. Now she can decorate them for any holiday or occasion. Love this idea. A set of these would make a FAB gift!

And then Miss Mustard Seed showed off her Christmas ornament line. WOW. I adore Miss Mustard Seed and kinda want to be her.... except she works way to hard. I wouldn't like that part. But I would love to have half her talent and inspiration. And making my own Christmas line.....wow. All I can say is WOW.

Well, that all. Have a fab weekend and holiday!
And then Miss Mustard Seed showed off her Christmas ornament line. WOW. I adore Miss Mustard Seed and kinda want to be her.... except she works way to hard. I wouldn't like that part. But I would love to have half her talent and inspiration. And making my own Christmas line.....wow. All I can say is WOW.

Well, that all. Have a fab weekend and holiday!
Subscribe to:
Posts (Atom)
LinkWithin
