Isn't it fun?! Now I know what your thinking, your thinking "uhh, Krystal, Halloween was yesterday so we really don't care about your trick-or-treat banner. Yeah its cute, but that information would have been nice LAST WEEK!" Well, never fear.....this banner is reversible!

I love it so much! I'm over here doing the happy dance because I am REALLY proud of myself on this one! Its not your typical bunting either. I wanted to make something with some substance that would hold up and use materials I felt comfortable working with. That's why the typical paper (to weak) and fabric (I'm just not that talented of a seamstress) banner was out. So this one is made with craft foam and scrapbook paper.
Do you want to see how its done? Okay fine, you twisted my arm.
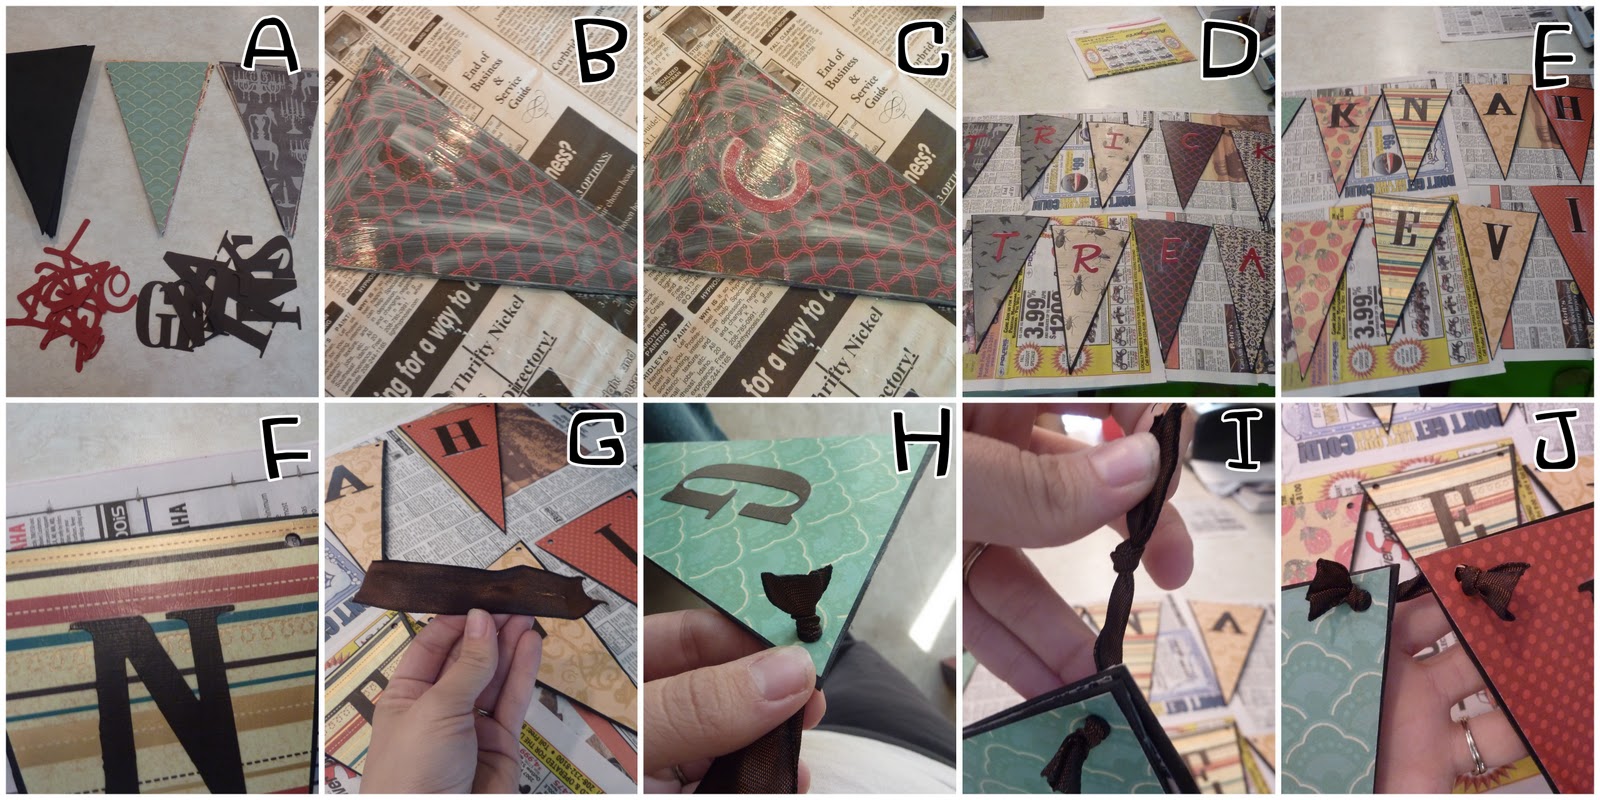
Step 1: Prep. Cut out 11 triangles from your craft foam. I used 2 sheets of black. I recommend making a pattern out of paper. Cut out 11 more slightly smaller ones from various Halloween papers and 11 from various Fall/ Thanksgiving papers. Also cut out paper letters to say "TRICK or TREAT" and "GIVE THANKS" (see image A) Note: the "or" will be on one pennant and there will be one blank pennant between give and thanks.
Step 2: Make an assembly line and modge podge a paper onto the foam. Pick one side first and just go with it. You can immediately add the letter and then set aside to dry. (see images B and C) When you set them aside, line them up as they would appear when hung. This will keep you from getting confused. (see image D)
Step 3: Once that side is dry, you can begin the other side. Repeat the same process but remember the first letter will be on the last pennant of the side you just finished. So work from the back to the front. (See image E)
Step 4: Once everything is dry, take a hole punch and punch a hole into each top corner. (see image F) Then take a piece of ribbon about 6 inches long, thread thru the hole and tie a knot. I trimmed the ribbon and seared the edge with a lighter to give it a finished look. (see image G) Then add a pennant to the ribbon and tie a second knot as far apart as you want your pennant. Finish that edge like you did before. (see images H and I) You want to be sure that your knots all end up on the same side of the banner. I did them on the "give thanks" side, but it doesn't really matter as long as you are consistent. (see image J) Do this for all the pennants leaving extra ribbon at the ends to hang with. Enjoy!
Now, if you want to make a Thanksgiving and Christmas banner instead, you can still do "give thanks" on one side and "Christmas" on the other with the first and last pennant being blank...OR...wait for it..... the Christmas side can say "Let it Snow." I know, I'm good.
Now for some more pictures of my adorable two-sided banner!


Now go make one! And if you do a Thanksgiving/Christmas one, promise to send me a link. I'm dying to see one done!