

Showing posts with label halloween. Show all posts
Showing posts with label halloween. Show all posts
Tuesday, October 08, 2013
WYLTC- Spiders
Its WYLTC week again and everyone is sharing cute Halloween wood crafts of course! So head on over and check them out. I made these cute little spiders. Seriously, easiest craft ever! Click HERE to learn how to make your own.


Wednesday, October 03, 2012
A Black Cat
Hello everyone! Yes, I'm still here and I'm still alive. :) We have about 6 more weeks till baby comes so I'm not moving very fast these days but I did manage to get in a Halloween craft! It was my Mom's birthday a couple weeks ago so I used the push to make us both a cute Halloween kitty for our front doors.

And I just love him to bits!
He was a ton of fun to make too.
 I started out making a paper template, transferring the template to a piece of plywood, and cutting the pieces out with my jig saw. I glued him together using gorilla glue. (crazy good stuff... just dont use to much!) Then I taped off his eyes and painted him black. After he was dry I hit the edges with the sander to bring out the detail and painted on the eyes. Give him a coat of sealer and the finish him off with a Halloween ribbon and some wire whiskers. (just drill little holes in the side of his face and stick some wire in.)
Easy peasy and oh so cute!!
As always I'm linking to these great parties and events

And I just love him to bits!
He was a ton of fun to make too.

Easy peasy and oh so cute!!
Monday, November 01, 2010
Reversible Bunting Banner
Okay guys, I finally jumped on the bunting banner wagon and made myself an adorable trick-or-treat banner.

Isn't it fun?! Now I know what your thinking, your thinking "uhh, Krystal, Halloween was yesterday so we really don't care about your trick-or-treat banner. Yeah its cute, but that information would have been nice LAST WEEK!" Well, never fear.....this banner is reversible!

I love it so much! I'm over here doing the happy dance because I am REALLY proud of myself on this one! Its not your typical bunting either. I wanted to make something with some substance that would hold up and use materials I felt comfortable working with. That's why the typical paper (to weak) and fabric (I'm just not that talented of a seamstress) banner was out. So this one is made with craft foam and scrapbook paper.
Do you want to see how its done? Okay fine, you twisted my arm.

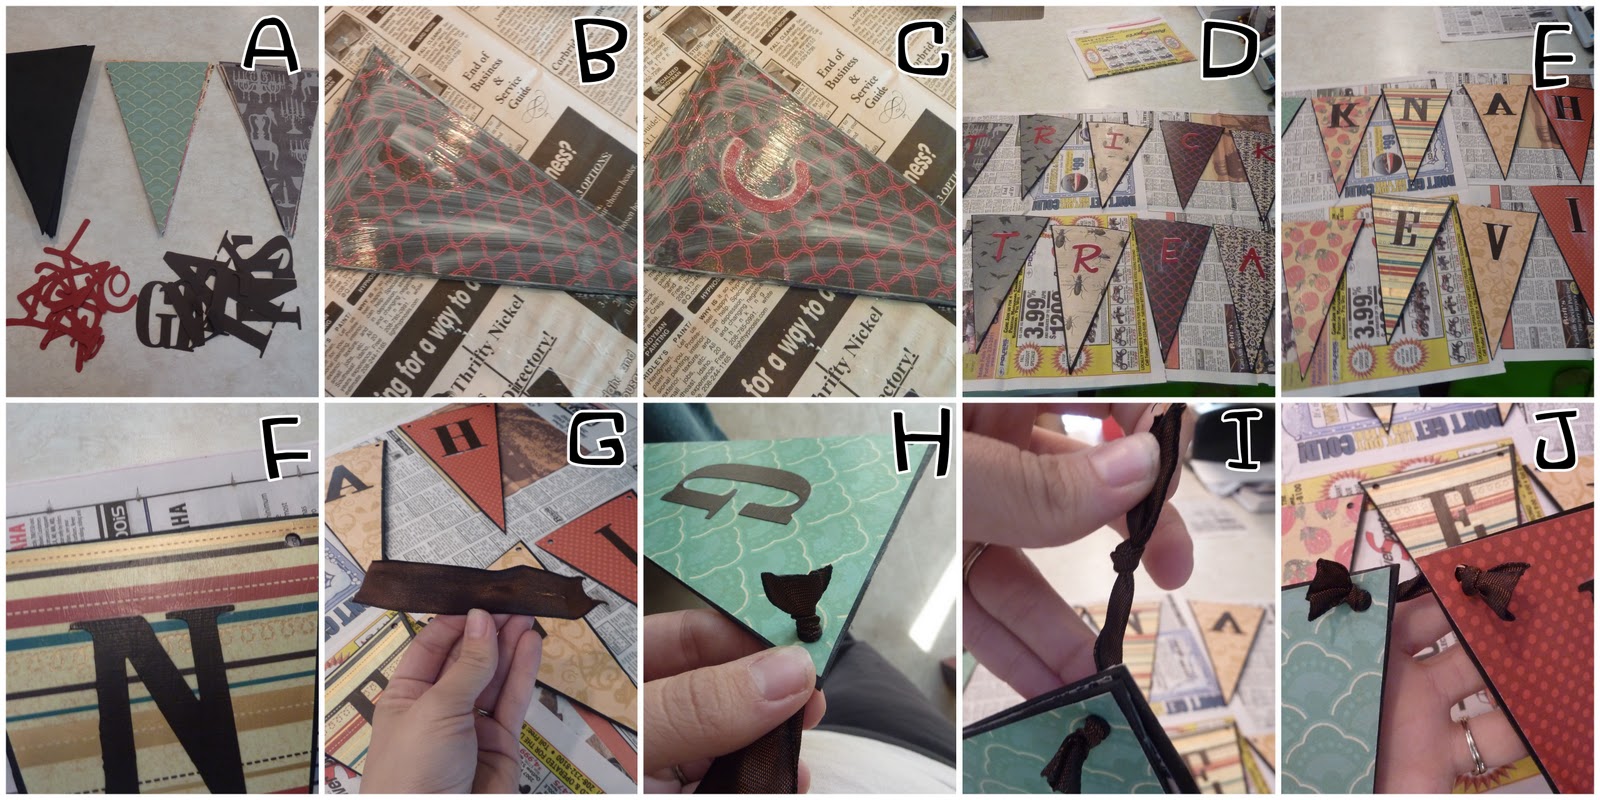
Step 1: Prep. Cut out 11 triangles from your craft foam. I used 2 sheets of black. I recommend making a pattern out of paper. Cut out 11 more slightly smaller ones from various Halloween papers and 11 from various Fall/ Thanksgiving papers. Also cut out paper letters to say "TRICK or TREAT" and "GIVE THANKS" (see image A) Note: the "or" will be on one pennant and there will be one blank pennant between give and thanks.
Step 2: Make an assembly line and modge podge a paper onto the foam. Pick one side first and just go with it. You can immediately add the letter and then set aside to dry. (see images B and C) When you set them aside, line them up as they would appear when hung. This will keep you from getting confused. (see image D)
Step 3: Once that side is dry, you can begin the other side. Repeat the same process but remember the first letter will be on the last pennant of the side you just finished. So work from the back to the front. (See image E)
Step 4: Once everything is dry, take a hole punch and punch a hole into each top corner. (see image F) Then take a piece of ribbon about 6 inches long, thread thru the hole and tie a knot. I trimmed the ribbon and seared the edge with a lighter to give it a finished look. (see image G) Then add a pennant to the ribbon and tie a second knot as far apart as you want your pennant. Finish that edge like you did before. (see images H and I) You want to be sure that your knots all end up on the same side of the banner. I did them on the "give thanks" side, but it doesn't really matter as long as you are consistent. (see image J) Do this for all the pennants leaving extra ribbon at the ends to hang with. Enjoy!
Now, if you want to make a Thanksgiving and Christmas banner instead, you can still do "give thanks" on one side and "Christmas" on the other with the first and last pennant being blank...OR...wait for it..... the Christmas side can say "Let it Snow." I know, I'm good.
Now for some more pictures of my adorable two-sided banner!


Now go make one! And if you do a Thanksgiving/Christmas one, promise to send me a link. I'm dying to see one done!


Isn't it fun?! Now I know what your thinking, your thinking "uhh, Krystal, Halloween was yesterday so we really don't care about your trick-or-treat banner. Yeah its cute, but that information would have been nice LAST WEEK!" Well, never fear.....this banner is reversible!

I love it so much! I'm over here doing the happy dance because I am REALLY proud of myself on this one! Its not your typical bunting either. I wanted to make something with some substance that would hold up and use materials I felt comfortable working with. That's why the typical paper (to weak) and fabric (I'm just not that talented of a seamstress) banner was out. So this one is made with craft foam and scrapbook paper.
Do you want to see how its done? Okay fine, you twisted my arm.
Step 1: Prep. Cut out 11 triangles from your craft foam. I used 2 sheets of black. I recommend making a pattern out of paper. Cut out 11 more slightly smaller ones from various Halloween papers and 11 from various Fall/ Thanksgiving papers. Also cut out paper letters to say "TRICK or TREAT" and "GIVE THANKS" (see image A) Note: the "or" will be on one pennant and there will be one blank pennant between give and thanks.
Step 2: Make an assembly line and modge podge a paper onto the foam. Pick one side first and just go with it. You can immediately add the letter and then set aside to dry. (see images B and C) When you set them aside, line them up as they would appear when hung. This will keep you from getting confused. (see image D)
Step 3: Once that side is dry, you can begin the other side. Repeat the same process but remember the first letter will be on the last pennant of the side you just finished. So work from the back to the front. (See image E)
Step 4: Once everything is dry, take a hole punch and punch a hole into each top corner. (see image F) Then take a piece of ribbon about 6 inches long, thread thru the hole and tie a knot. I trimmed the ribbon and seared the edge with a lighter to give it a finished look. (see image G) Then add a pennant to the ribbon and tie a second knot as far apart as you want your pennant. Finish that edge like you did before. (see images H and I) You want to be sure that your knots all end up on the same side of the banner. I did them on the "give thanks" side, but it doesn't really matter as long as you are consistent. (see image J) Do this for all the pennants leaving extra ribbon at the ends to hang with. Enjoy!
Now, if you want to make a Thanksgiving and Christmas banner instead, you can still do "give thanks" on one side and "Christmas" on the other with the first and last pennant being blank...OR...wait for it..... the Christmas side can say "Let it Snow." I know, I'm good.
Now for some more pictures of my adorable two-sided banner!


Now go make one! And if you do a Thanksgiving/Christmas one, promise to send me a link. I'm dying to see one done!

Thursday, October 28, 2010
Dressing Up
Do you dress up for Halloween? While I love to get the kids all decked out, I usually don't go all out on a costume for myself. I do like to do something though. I will admit to being a cat many many times. I simply wear black and a "cat ear" headband. I like it because I feel dressed up without feeling silly. This year however I had another idea. I am being "the other mother" from the movie Coraline.
Have you seen Coraline? Great show. My kids love it and I love that its one of the few that my husband and I can actually sit through. If you are looking for a good, family friendly Halloween movie, I would recommend it. Creepy without scaring your children to death! :)
Anyway, back to the other mother. This is what I was going for.
Its the perfect character because, other then the button eyes, I can basically be myself. And its creepy! So this is what I came up with.

I apologize for the totally dorky picture, but whats a girl to do?
Haha.. too funny huh!?! I love it. And it case you are wondering, yes I can see. I wouldn't recommend driving with them on or anything, but I can definitely wear them trick-or-treating with the kids. I actually made them with Palmer's clay. They have a rim, like you'd do with glasses, so that I can blink, and I can see out of the little thread holes. I attached them to each other and my head with stretchy clear beading string.
So are you dressing up this year? Do tell!
Monday, October 25, 2010
A haunted house, spider web, and window clings.
So do you remember when Crafty Sisters made the cutest little Halloween village out of bird houses? Well, I totally copied them. I only made one house but still I think it turned out pretty cute and is a fun addition to my Halloween decor.

As always, I had to get a "front step shot" so I could get a good pic. But I thought I'd show you what it actually looks like mixed into my "stuff" too.


It worked perfect! Make sure your glue dries completely before putting them on the window, but since it dries clear, it looks cute from both sides. (my embellishments were two sided.) Oh, the possibilities are endless!

As always, I had to get a "front step shot" so I could get a good pic. But I thought I'd show you what it actually looks like mixed into my "stuff" too.

All I did was paint a craft store birdhouse black and then "decorate" the back side of it with scrapbook paper and embellishments. It was a fun project.
And since we are on the topic of coping my fellow bloggers, here is one more. I was asking my husband the other day if he thought our front door Halloween decor (Say that 10 time fast!) was cute, and he said "Well, yeah but its a little boring." We can't have that! So I totally copied Staci at Craftify It and made a yarn web in my front window. I then put up some fake cobwebs and a few more spiders and now it looks a lot more "done." (We still need a few big pumpkins on the steps but we haven't made it to the pumpkin patch yet. Were getting there!)

But I do have one original idea for you! After making my haunted house, I had a bunch of adorable Halloween scrapbook embellishments left and I was determined to use them somehow. I had heard that you could use hot glue to make window clings, so I grabbed a few, put a bunch of glue on the back, let them dry and stuck them to the window. It worked great... until the sun went down. As soon as that glass got cold they all fell off. (pout) I'm not easily deterred though so after some research I found that there is actual "window cling" paint. So I got a bottle of this...

And did this...

And now I have this!

It worked perfect! Make sure your glue dries completely before putting them on the window, but since it dries clear, it looks cute from both sides. (my embellishments were two sided.) Oh, the possibilities are endless!
Friday, October 22, 2010
Inspiration File
Wow, my inspiration file is full this week! So many fun things out there in blog land. I hope you guys aren't getting tired of Halloween yet because most my features are Halloween related this week. I love Halloween so I don't really mind. However, I will admit my mind has started to shift to Thanksgiving and even (gasp) Christmas. I got Pottery Barn's holiday catalog in the mail this week, and oh boy, do I have plans! I'm really excited but am refusing to allow myself to start crafting for Christmas until after Halloween at least.
Anyway, on to the features. First off I was excited to get a note from Megan at The Barefoot Copy Cat telling my that she followed my rag wreath tutorial and made not one but two adorable wreaths. I have to admit, I'm a little jealous. I can tell she found a larger frame then the one I used and I just love the size. Too cute, great job Megan.

Next up is this advent calender from Something From Cassie. I think this idea is BRILLIANT! She made adorable magnetic squares using scrap papers and then put them on a muffin pan filled with treats. I'm so going to make a bunch of different covers for all kinds of count downs. Great idea, thanks Cassie!

Now the next three are all from Tatertots and Jello. Jen sure had a great blog week! I figure most of my readers probably read Jen's blog so this will probably be a repeat for most of you, but I still want to document all these great ideas so I don't forget about them.
Jessica, who blogs at Craftily Ever After, made these adorable beaded spiders for a guest post. Aren't they too cool? She has some great ideas on how to use them two, like magnets for your fridge and on a headband. Love them!

Then Jen showed us her Christmas version of her painted pillows. These are SO cute! I love all the embellishments she used to really make the ornaments special. Great idea!

And finally, Jen showed us her adorable Thanksgiving garland. I love that you can clip all the things to be thankful for on it and get the family involved. Plus it is simply BEAUTIFUL! Gotta make one of these for sure.

And last, Layla Grace showed this adorable Halloween Cake. Its an old Martha Stewart cake and recipe but such a cute idea. Plus, its looks easy enough that even I could do it! Love that!

Anyway, on to the features. First off I was excited to get a note from Megan at The Barefoot Copy Cat telling my that she followed my rag wreath tutorial and made not one but two adorable wreaths. I have to admit, I'm a little jealous. I can tell she found a larger frame then the one I used and I just love the size. Too cute, great job Megan.
Next up is this advent calender from Something From Cassie. I think this idea is BRILLIANT! She made adorable magnetic squares using scrap papers and then put them on a muffin pan filled with treats. I'm so going to make a bunch of different covers for all kinds of count downs. Great idea, thanks Cassie!

Now the next three are all from Tatertots and Jello. Jen sure had a great blog week! I figure most of my readers probably read Jen's blog so this will probably be a repeat for most of you, but I still want to document all these great ideas so I don't forget about them.
Jessica, who blogs at Craftily Ever After, made these adorable beaded spiders for a guest post. Aren't they too cool? She has some great ideas on how to use them two, like magnets for your fridge and on a headband. Love them!

Then Jen showed us her Christmas version of her painted pillows. These are SO cute! I love all the embellishments she used to really make the ornaments special. Great idea!

And finally, Jen showed us her adorable Thanksgiving garland. I love that you can clip all the things to be thankful for on it and get the family involved. Plus it is simply BEAUTIFUL! Gotta make one of these for sure.

And last, Layla Grace showed this adorable Halloween Cake. Its an old Martha Stewart cake and recipe but such a cute idea. Plus, its looks easy enough that even I could do it! Love that!
Well, that's all for now. If you were featured remember to grab a button. See ya soon!
Monday, October 18, 2010
The (not so) Itsy Bitsy Spider
I really hate spiders. Or at least I really hate real spiders. But during Halloween I think spiders are a lot of fun to decorate with so I set off to create a big old spider to hang from the light by my front door. He turned out SO cute too! I just love him! Wanna see?


So, do you want to make your own? It was really easy and fun! Here's how.

You will need:
6" Styrofoam ball
black paint
black glitter paint (optional)
1 large puffy chenille pipe cleaner. Not sure what they are really called, but I found it at Micheal's with the rest of the pipe cleaners.
3 googlie eyes. (that's the technical term) Or however many you want your spider to have.
hot glue
string or yarn
Step 1: Paint the ball black and let dry. This was the hardest part of the whole project because it took forever to dry and I'm not the most patient crafter.
Step2: Do a coat with black glitter paint. While the glitter added a little, I'm not sure it made enough of a difference to be really worth the extra step.
Step 3: While that is drying, cute two 2-3 inch pieces off your pipe cleaner for the fangs. Divide what it left into eight pieces for the legs. I gave the fang pieces a little hair cut so they weren't to furry.
Step 4: Once the ball is dry, decide which side is the front and hot glue on a couple of eyes. I started with two and later added the third. Use a pencil or something to make a hole in the ball. Add some hot glue into the hole and push the fang in place. Do the same thing for the legs. Shape the legs to look like legs by bending a the "knee" and giving a little foot.
Step 5. Add another hole to the top. Tie a big knot in your yarn and use the pencil to shove the yarn into the glue filled hole. Add a little more glue on top for extra measure.
Step 6: Hang and enjoy your cute new friend!


Isn't he fun!?! Here are a couple more close up.


And here is the front door so you can see it all together. It really is big. I would totally die if I saw a real spider that size, but he is too cute to be scary.

So, do you want to make your own? It was really easy and fun! Here's how.

You will need:
6" Styrofoam ball
black paint
black glitter paint (optional)
1 large puffy chenille pipe cleaner. Not sure what they are really called, but I found it at Micheal's with the rest of the pipe cleaners.
3 googlie eyes. (that's the technical term) Or however many you want your spider to have.
hot glue
string or yarn
Step 1: Paint the ball black and let dry. This was the hardest part of the whole project because it took forever to dry and I'm not the most patient crafter.
Step2: Do a coat with black glitter paint. While the glitter added a little, I'm not sure it made enough of a difference to be really worth the extra step.
Step 3: While that is drying, cute two 2-3 inch pieces off your pipe cleaner for the fangs. Divide what it left into eight pieces for the legs. I gave the fang pieces a little hair cut so they weren't to furry.
Step 4: Once the ball is dry, decide which side is the front and hot glue on a couple of eyes. I started with two and later added the third. Use a pencil or something to make a hole in the ball. Add some hot glue into the hole and push the fang in place. Do the same thing for the legs. Shape the legs to look like legs by bending a the "knee" and giving a little foot.
Step 5. Add another hole to the top. Tie a big knot in your yarn and use the pencil to shove the yarn into the glue filled hole. Add a little more glue on top for extra measure.
Step 6: Hang and enjoy your cute new friend!
Linking up to these parties and these events:
Monday, October 11, 2010
Painted Glass Candy Jar
I have to tell you, for such a simple project this thing was trouble! Some projects just fall into place, but this wasn't one of them. That being said, now that its finally done I'm happy with the result. Let me introduce you to the painted glass candy jar.

Now for my story. I have had a bowl of candy corn sitting on my kitchen counter for the last few weeks. My kids LOVE candy corn and since its a seasonal treat, we take advantage this time of year. But the problem was every time I walked past that bowl, I grabbed a few. I was having serious sugar shock and next thing I new I was chewing more candy corn. Tell me I'm not the only one who eats without thinking?!? I decided I had to move my candy into something with a lid. That way I had to make the decision to take the lid off if I wanted candy, and would quite eating without thought.
My idea was to take a mason jar and use a stencil and frost the glass. I did this and it turned out really cute, but it was subtle. You had to look really close to see the design, not quite what I had in mind. While I was making this first jar, I also made a few jar votive holders with the same technique. They actually look cute.

.JPG)
So I decided to try again and this time paint the jar with stain glass paint.
Here's how I did it:
1. Cut out a design with contact paper and place it on your jar.
2. Paint your jar with glass paint. It will take many many thin coats.
3. Once dry to the touch, remove your stencil and watch half the paint come off with it.
4. Paint the design back on by hand. I didn't actually lose everything, but I had to hand paint the eyes, nose and some of the detail around the bones.
5. Let cure for 24 hours
6. Bake glass at 300 degrees F for 35 min. (follow the directions on your paint) Once baked your glass will be waterproof.
7. Modge podge some fabric on the top of your lid.
8. Spray paint the rim of your lid black. I did a really crappy paint job and had a bunch of silver showing through, so I just scratched it up so it would look intentional.
9. Top with a cute bow
Like I said, I'm happy with the final result. I think making a bunch of smaller ones to give as gifts would be a lot of fun. Especially with a cute tag saying to use as a candle holder once the candy was gone. Maybe for Christmas, but I'm done painting glass for now. Here are a few more pics.


Now if I could do something with all the cookies in my house....
P.S. Just so you all know, not everything lives on my front steps. But for the life if me I can't get a decent picture inside so its just easier to have outside photo shoots.
I will be linking to these parties and these events:

Now for my story. I have had a bowl of candy corn sitting on my kitchen counter for the last few weeks. My kids LOVE candy corn and since its a seasonal treat, we take advantage this time of year. But the problem was every time I walked past that bowl, I grabbed a few. I was having serious sugar shock and next thing I new I was chewing more candy corn. Tell me I'm not the only one who eats without thinking?!? I decided I had to move my candy into something with a lid. That way I had to make the decision to take the lid off if I wanted candy, and would quite eating without thought.
My idea was to take a mason jar and use a stencil and frost the glass. I did this and it turned out really cute, but it was subtle. You had to look really close to see the design, not quite what I had in mind. While I was making this first jar, I also made a few jar votive holders with the same technique. They actually look cute.

.JPG)
Here's how I did it:
1. Cut out a design with contact paper and place it on your jar.
2. Paint your jar with glass paint. It will take many many thin coats.
3. Once dry to the touch, remove your stencil and watch half the paint come off with it.
4. Paint the design back on by hand. I didn't actually lose everything, but I had to hand paint the eyes, nose and some of the detail around the bones.
5. Let cure for 24 hours
6. Bake glass at 300 degrees F for 35 min. (follow the directions on your paint) Once baked your glass will be waterproof.
7. Modge podge some fabric on the top of your lid.
8. Spray paint the rim of your lid black. I did a really crappy paint job and had a bunch of silver showing through, so I just scratched it up so it would look intentional.
9. Top with a cute bow
Like I said, I'm happy with the final result. I think making a bunch of smaller ones to give as gifts would be a lot of fun. Especially with a cute tag saying to use as a candle holder once the candy was gone. Maybe for Christmas, but I'm done painting glass for now. Here are a few more pics.


Now if I could do something with all the cookies in my house....
P.S. Just so you all know, not everything lives on my front steps. But for the life if me I can't get a decent picture inside so its just easier to have outside photo shoots.
I will be linking to these parties and these events:
Friday, October 08, 2010
Inspiration File
Just a few things to share this week.
First off, Crafty Sisters made this adorable haunted village. Isn't that SO fun?!? She used an assortment of bird houses from the craft store, painted them black and then embellished with Halloween scrapbook paper. I love this idea. While I may not make a whole village, I'm totally going to add at least one haunted house to my Halloween decor.


First off, Crafty Sisters made this adorable haunted village. Isn't that SO fun?!? She used an assortment of bird houses from the craft store, painted them black and then embellished with Halloween scrapbook paper. I love this idea. While I may not make a whole village, I'm totally going to add at least one haunted house to my Halloween decor.

I am Momma, Hear me Roar showed us how to make this adorable petal pillow. I think this is seriously amazing. Now I'm not much of a seamstress, but I want to attempt this pillow. It is just too pretty and would be a great addition to any bed.

And speaking of pillows, look at this one made by Not Just a Housewife. She painted that fabric BY HAND! Amazing job! I totally feel her pain when it comes to trying to find the fabric that matches the image in my head, but next time I'll be brave and make my own like she did. Great Job!
Well, that's all for now. The project I've been working on this week hasn't turned out like I envisioned so I'm off for round two.
If you've been featured on this blog, you can grab a featured button on my sidebar.
Saturday, October 02, 2010
Inspiration File
What a week in the blog world! I found a ton of great projects to show off to you today. Once again we'll start with seasonal projects.
Tiffany at Simply Complicated made these adorable witch legs. Aren't those the cutest things? I thought this was so funny, probably because the last few weeks the shoe has definitely fit! Go check out her tutorial!


![[luml.jpg]](https://blogger.googleusercontent.com/img/b/R29vZ2xl/AVvXsEiRKXuzirmIEst4WSq9xAjZsrgkGQFq5sXKerY7ZjJXSX-K2C2qCSr3i4-NSMukwoDTKg4U6AVZ_q2Bz6jCzhzSzGWHqMR0CxCpSPIxMBVtNudcE7Jac0D1x3FkK9CzKSwBBlL6SoqR-kM/s640/luml.jpg)

This week I discovered the blog How Does She and oh my word, where have you been my whole life? This blog is amazing and full of amazing ideas. I got lost on there for hours...One project I really like, while not a new post, was their chore chart. My kiddos are still a little young for chores but it won't be long. When the time comes, this is the system I'm going to use.

And finally, Miss Mustard Seed. If you don't already read her blog, YOU MUST! I want to be her. Everything she does is simply beautiful and her style is flawless. One of my favorite things she makes are incredible signs. This week she gave some great tips on making and designing our own signs. Be sure to check it out, I can't wait to try my hand at one of my own.

Tiffany at Simply Complicated made these adorable witch legs. Aren't those the cutest things? I thought this was so funny, probably because the last few weeks the shoe has definitely fit! Go check out her tutorial!
And along those same lines, check out the "girl's night out pillow" from Just Another Hang Up. The talent here just amazes me. This pillow is completely adorable. Love it and want it!

Now the Pennant Banner made by Crafty Sisters is such a cute idea and so doable. I love all the banners all over blogs right now and I think this technique is particularly cute. Plus I love how it would hold up over many seasons. The possibilities are endless and the same idea can be used for any holiday or special occasion. Be sure to check them out!

Next up are the painted luminaries by Crafts by Amanda. She made a whole bunch of these out of mason jars and they turned out super cute. My favorite are the ghosts. I could totally see a whole bunch lined up on the sidewalk Halloween night. Great idea!
Under My Umbrella was getting ready for a Super Saturday craft day and listed a bunch of projects that her group could make. I loved this post because, even though there aren't tutorials, most crafters could recreate these projects and this post is chuck full of great ideas, check them out! Here is one of my favorites, which inspired the project that I'm going to show you Monday. Can't wait!

This week I discovered the blog How Does She and oh my word, where have you been my whole life? This blog is amazing and full of amazing ideas. I got lost on there for hours...One project I really like, while not a new post, was their chore chart. My kiddos are still a little young for chores but it won't be long. When the time comes, this is the system I'm going to use.
And finally, Miss Mustard Seed. If you don't already read her blog, YOU MUST! I want to be her. Everything she does is simply beautiful and her style is flawless. One of my favorite things she makes are incredible signs. This week she gave some great tips on making and designing our own signs. Be sure to check it out, I can't wait to try my hand at one of my own.

And that's a wrap! Have a great weekend!
P.S. You may have noticed my blog got a face lift. I'm really happy with how it turned out. I also have new and improved buttons so be sure to grab one if you've been featured on this blog.
Subscribe to:
Posts (Atom)