

Showing posts with label thanksgiving. Show all posts
Showing posts with label thanksgiving. Show all posts
Friday, November 15, 2013
WYLTC- Thanksgiving crafts!
I'm posting which can only mean one thing, its WYLTC week! I'm actually finishing this week off with a set of candlestick pilgrims. Go HERE to get all the details and the tutorial. But all the other ladies made some seriously adorable turkeys this week. You don't want to miss any of them. So go check them all out HERE. :)


Friday, November 19, 2010
Inspiration File
Only a couple things to share this week. To be honest, this week has been SO busy that I have barely had time to go through my blog roll!
Frist of all, did everyone see the corn husk table runner over at It's always a party at the Parkers? Holy Gorgeousness!!!! Okay, so the whole table is pretty amazing. I know where I'm going for Thanksgiving Dinner! (sorry Mom)

I also found a new blog to follow, Vintage Wanna Bee. Everything over there is seriously adorable but I'm loving her princess inspired accessories. She's done a bunch of princesses but my favorite (I think) is the "Giselle." But be sure to hope on over and check them all out. You'll have a hard time deciding which your going to make first!

Well, ta ta for now. Be sure to grab a button if you were featured.
Frist of all, did everyone see the corn husk table runner over at It's always a party at the Parkers? Holy Gorgeousness!!!! Okay, so the whole table is pretty amazing. I know where I'm going for Thanksgiving Dinner! (sorry Mom)
I also found a new blog to follow, Vintage Wanna Bee. Everything over there is seriously adorable but I'm loving her princess inspired accessories. She's done a bunch of princesses but my favorite (I think) is the "Giselle." But be sure to hope on over and check them all out. You'll have a hard time deciding which your going to make first!

Well, ta ta for now. Be sure to grab a button if you were featured.
Friday, November 12, 2010
Inspiration File
Once again, I have a lot to show off this week. You guys are clever! I'm starting with Thanksgiving ideas and then will move on to Christmas.
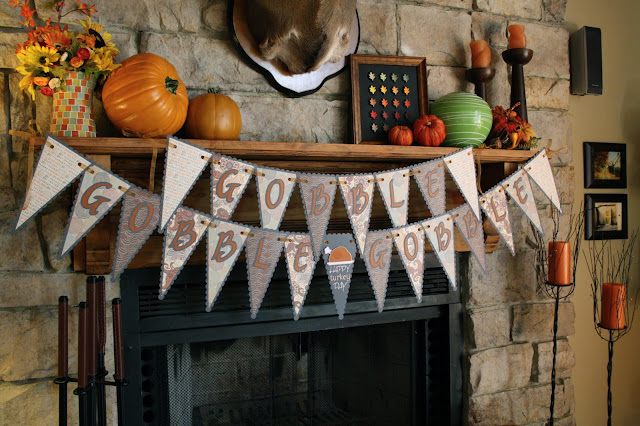
First up, The Magic of Ordinary Things made her own bunting banner, and it is SO SO pretty! Her whole mantle is to die for in fact. I just love it!


And then last, but not least, Kristi from Life through the Lens guest posted on Tatertots and Jello and shared the tutorial on this amazing yarn ball wreath. I think it is such a cool and neat wreath idea. Great job!

Once again, you guys rock. I love browsing through blogland and seeing all the fun and inspiring ideas. It's what keeps me creating.
If you were featured, feel free to grab a button.
First up, The Magic of Ordinary Things made her own bunting banner, and it is SO SO pretty! Her whole mantle is to die for in fact. I just love it!

Then, Craft Goodies made these adorable 2x4 turkeys. They are really cute and would be a ton of fun to make. I have a fondness for 2x4 crafts. I think they are just a lot of fun.

And speaking of 2x4's. Young and Crafty made these adorable Christmas trees. These are definitely going on my to do list.

And then last, but not least, Kristi from Life through the Lens guest posted on Tatertots and Jello and shared the tutorial on this amazing yarn ball wreath. I think it is such a cool and neat wreath idea. Great job!

Once again, you guys rock. I love browsing through blogland and seeing all the fun and inspiring ideas. It's what keeps me creating.
If you were featured, feel free to grab a button.
Monday, November 01, 2010
Reversible Bunting Banner
Okay guys, I finally jumped on the bunting banner wagon and made myself an adorable trick-or-treat banner.

Isn't it fun?! Now I know what your thinking, your thinking "uhh, Krystal, Halloween was yesterday so we really don't care about your trick-or-treat banner. Yeah its cute, but that information would have been nice LAST WEEK!" Well, never fear.....this banner is reversible!

I love it so much! I'm over here doing the happy dance because I am REALLY proud of myself on this one! Its not your typical bunting either. I wanted to make something with some substance that would hold up and use materials I felt comfortable working with. That's why the typical paper (to weak) and fabric (I'm just not that talented of a seamstress) banner was out. So this one is made with craft foam and scrapbook paper.
Do you want to see how its done? Okay fine, you twisted my arm.

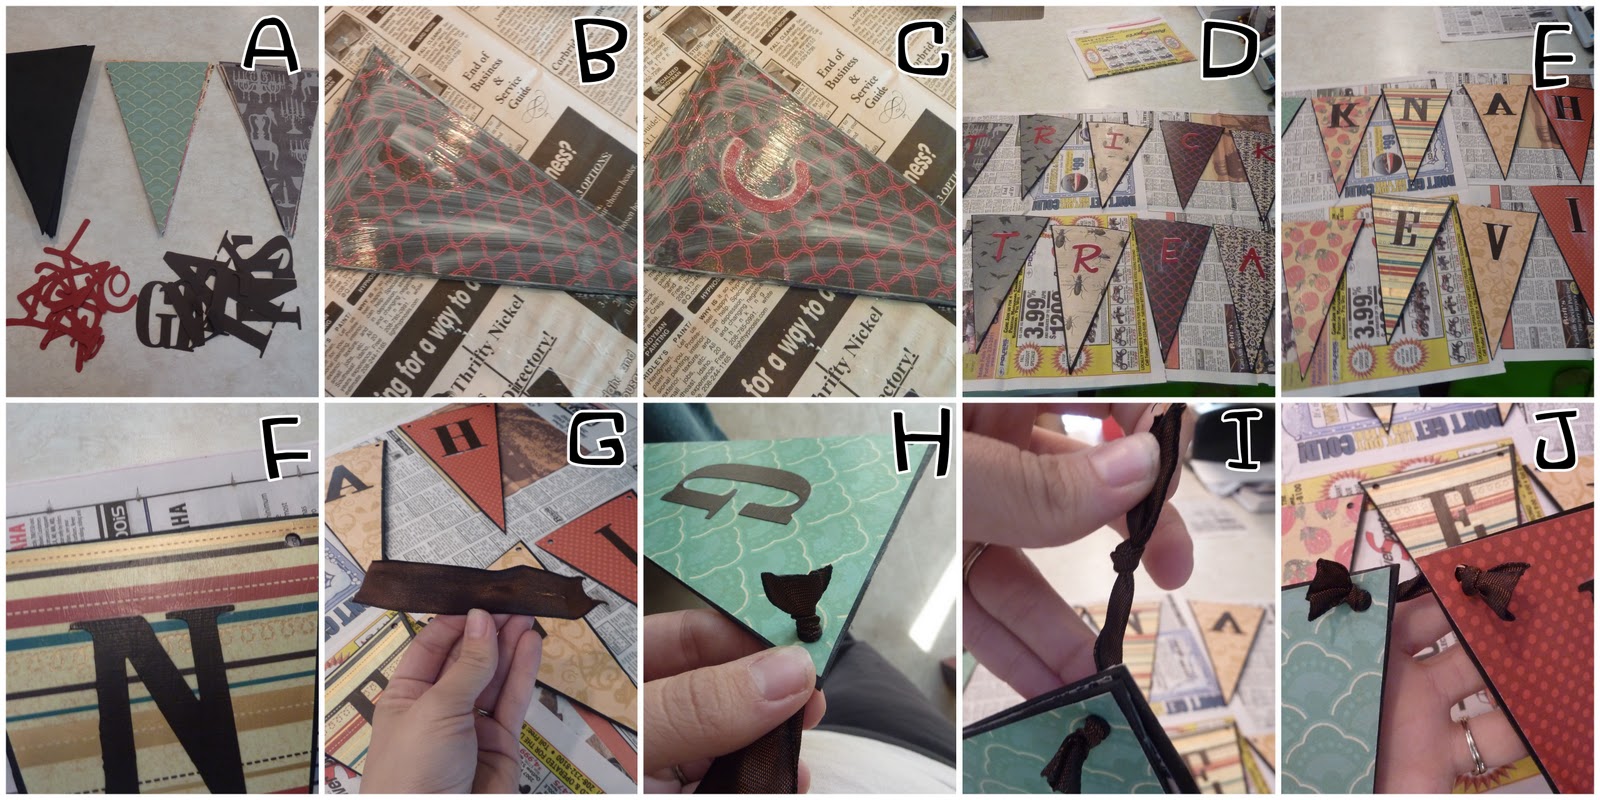
Step 1: Prep. Cut out 11 triangles from your craft foam. I used 2 sheets of black. I recommend making a pattern out of paper. Cut out 11 more slightly smaller ones from various Halloween papers and 11 from various Fall/ Thanksgiving papers. Also cut out paper letters to say "TRICK or TREAT" and "GIVE THANKS" (see image A) Note: the "or" will be on one pennant and there will be one blank pennant between give and thanks.
Step 2: Make an assembly line and modge podge a paper onto the foam. Pick one side first and just go with it. You can immediately add the letter and then set aside to dry. (see images B and C) When you set them aside, line them up as they would appear when hung. This will keep you from getting confused. (see image D)
Step 3: Once that side is dry, you can begin the other side. Repeat the same process but remember the first letter will be on the last pennant of the side you just finished. So work from the back to the front. (See image E)
Step 4: Once everything is dry, take a hole punch and punch a hole into each top corner. (see image F) Then take a piece of ribbon about 6 inches long, thread thru the hole and tie a knot. I trimmed the ribbon and seared the edge with a lighter to give it a finished look. (see image G) Then add a pennant to the ribbon and tie a second knot as far apart as you want your pennant. Finish that edge like you did before. (see images H and I) You want to be sure that your knots all end up on the same side of the banner. I did them on the "give thanks" side, but it doesn't really matter as long as you are consistent. (see image J) Do this for all the pennants leaving extra ribbon at the ends to hang with. Enjoy!
Now, if you want to make a Thanksgiving and Christmas banner instead, you can still do "give thanks" on one side and "Christmas" on the other with the first and last pennant being blank...OR...wait for it..... the Christmas side can say "Let it Snow." I know, I'm good.
Now for some more pictures of my adorable two-sided banner!


Now go make one! And if you do a Thanksgiving/Christmas one, promise to send me a link. I'm dying to see one done!


Isn't it fun?! Now I know what your thinking, your thinking "uhh, Krystal, Halloween was yesterday so we really don't care about your trick-or-treat banner. Yeah its cute, but that information would have been nice LAST WEEK!" Well, never fear.....this banner is reversible!

I love it so much! I'm over here doing the happy dance because I am REALLY proud of myself on this one! Its not your typical bunting either. I wanted to make something with some substance that would hold up and use materials I felt comfortable working with. That's why the typical paper (to weak) and fabric (I'm just not that talented of a seamstress) banner was out. So this one is made with craft foam and scrapbook paper.
Do you want to see how its done? Okay fine, you twisted my arm.
Step 1: Prep. Cut out 11 triangles from your craft foam. I used 2 sheets of black. I recommend making a pattern out of paper. Cut out 11 more slightly smaller ones from various Halloween papers and 11 from various Fall/ Thanksgiving papers. Also cut out paper letters to say "TRICK or TREAT" and "GIVE THANKS" (see image A) Note: the "or" will be on one pennant and there will be one blank pennant between give and thanks.
Step 2: Make an assembly line and modge podge a paper onto the foam. Pick one side first and just go with it. You can immediately add the letter and then set aside to dry. (see images B and C) When you set them aside, line them up as they would appear when hung. This will keep you from getting confused. (see image D)
Step 3: Once that side is dry, you can begin the other side. Repeat the same process but remember the first letter will be on the last pennant of the side you just finished. So work from the back to the front. (See image E)
Step 4: Once everything is dry, take a hole punch and punch a hole into each top corner. (see image F) Then take a piece of ribbon about 6 inches long, thread thru the hole and tie a knot. I trimmed the ribbon and seared the edge with a lighter to give it a finished look. (see image G) Then add a pennant to the ribbon and tie a second knot as far apart as you want your pennant. Finish that edge like you did before. (see images H and I) You want to be sure that your knots all end up on the same side of the banner. I did them on the "give thanks" side, but it doesn't really matter as long as you are consistent. (see image J) Do this for all the pennants leaving extra ribbon at the ends to hang with. Enjoy!
Now, if you want to make a Thanksgiving and Christmas banner instead, you can still do "give thanks" on one side and "Christmas" on the other with the first and last pennant being blank...OR...wait for it..... the Christmas side can say "Let it Snow." I know, I'm good.
Now for some more pictures of my adorable two-sided banner!


Now go make one! And if you do a Thanksgiving/Christmas one, promise to send me a link. I'm dying to see one done!

Friday, October 29, 2010
Inspiration File
Just a couple things to share with you today. Jen over at Tatertots and Jello did it again and completely blew me away with her chalk board chargers. She took cheap plastic charges, primed them, and sprayed them with chalkboard paint. So easy and smart. Now she can decorate them for any holiday or occasion. Love this idea. A set of these would make a FAB gift!

And then Miss Mustard Seed showed off her Christmas ornament line. WOW. I adore Miss Mustard Seed and kinda want to be her.... except she works way to hard. I wouldn't like that part. But I would love to have half her talent and inspiration. And making my own Christmas line.....wow. All I can say is WOW.

Well, that all. Have a fab weekend and holiday!
Friday, October 22, 2010
Inspiration File
Wow, my inspiration file is full this week! So many fun things out there in blog land. I hope you guys aren't getting tired of Halloween yet because most my features are Halloween related this week. I love Halloween so I don't really mind. However, I will admit my mind has started to shift to Thanksgiving and even (gasp) Christmas. I got Pottery Barn's holiday catalog in the mail this week, and oh boy, do I have plans! I'm really excited but am refusing to allow myself to start crafting for Christmas until after Halloween at least.
Anyway, on to the features. First off I was excited to get a note from Megan at The Barefoot Copy Cat telling my that she followed my rag wreath tutorial and made not one but two adorable wreaths. I have to admit, I'm a little jealous. I can tell she found a larger frame then the one I used and I just love the size. Too cute, great job Megan.

Next up is this advent calender from Something From Cassie. I think this idea is BRILLIANT! She made adorable magnetic squares using scrap papers and then put them on a muffin pan filled with treats. I'm so going to make a bunch of different covers for all kinds of count downs. Great idea, thanks Cassie!

Now the next three are all from Tatertots and Jello. Jen sure had a great blog week! I figure most of my readers probably read Jen's blog so this will probably be a repeat for most of you, but I still want to document all these great ideas so I don't forget about them.
Jessica, who blogs at Craftily Ever After, made these adorable beaded spiders for a guest post. Aren't they too cool? She has some great ideas on how to use them two, like magnets for your fridge and on a headband. Love them!

Then Jen showed us her Christmas version of her painted pillows. These are SO cute! I love all the embellishments she used to really make the ornaments special. Great idea!

And finally, Jen showed us her adorable Thanksgiving garland. I love that you can clip all the things to be thankful for on it and get the family involved. Plus it is simply BEAUTIFUL! Gotta make one of these for sure.

And last, Layla Grace showed this adorable Halloween Cake. Its an old Martha Stewart cake and recipe but such a cute idea. Plus, its looks easy enough that even I could do it! Love that!

Anyway, on to the features. First off I was excited to get a note from Megan at The Barefoot Copy Cat telling my that she followed my rag wreath tutorial and made not one but two adorable wreaths. I have to admit, I'm a little jealous. I can tell she found a larger frame then the one I used and I just love the size. Too cute, great job Megan.
Next up is this advent calender from Something From Cassie. I think this idea is BRILLIANT! She made adorable magnetic squares using scrap papers and then put them on a muffin pan filled with treats. I'm so going to make a bunch of different covers for all kinds of count downs. Great idea, thanks Cassie!

Now the next three are all from Tatertots and Jello. Jen sure had a great blog week! I figure most of my readers probably read Jen's blog so this will probably be a repeat for most of you, but I still want to document all these great ideas so I don't forget about them.
Jessica, who blogs at Craftily Ever After, made these adorable beaded spiders for a guest post. Aren't they too cool? She has some great ideas on how to use them two, like magnets for your fridge and on a headband. Love them!

Then Jen showed us her Christmas version of her painted pillows. These are SO cute! I love all the embellishments she used to really make the ornaments special. Great idea!

And finally, Jen showed us her adorable Thanksgiving garland. I love that you can clip all the things to be thankful for on it and get the family involved. Plus it is simply BEAUTIFUL! Gotta make one of these for sure.

And last, Layla Grace showed this adorable Halloween Cake. Its an old Martha Stewart cake and recipe but such a cute idea. Plus, its looks easy enough that even I could do it! Love that!
Well, that's all for now. If you were featured remember to grab a button. See ya soon!
Subscribe to:
Posts (Atom)