Showing posts with label craft. Show all posts

Monday, April 01, 2013

Flower Dry Erase Board- Guest Posting for the Wood Connection

Hello Everyone!  I'm so excited to be guest posting for The Wood Connection again today.  They have the cutest stuff!!!

Now, I have been dying to get my hands on dry erase paint.  Have you heard of the stuff?  Well a trip to the Wood Connection was the perfect excuses to try it out on something. It looks like this...


You can get it at Home Depot or Walmart, for about $20.  Then take a trip to the Wood Connection and get all the rest of your supplies and you'll end up with something like this....


How fun is that?!  My 4 year old daughter about went nuts when she saw it.  In hind sight I should have made it to match her room, but I didn't so it lives in my hallway.  Its the perfect place to write notes to your family...


Or keep a weekday calendar...


And it even looks great just wiped clean...


So are you sold and want to make one of your own?  Head on over to the Wood Connection's blog to get the Full Tutorial.


But thats not all!

GIVEAWAY TIME

The Wood Connection has so kindly offered to give one of YOU a $25 gift certificate to their store! They are located in Salt Lake City, Utah so whoever wins will have to be able to get to their store to use it. They have some of the cutest wood craft kits and everything is all ready to go, making it super fun and easy to spit out some cute creations!

 To enter leave me a comment on this post!
Good Luck!!!

Wednesday, October 03, 2012

A Black Cat

Hello everyone!  Yes,  I'm still here and I'm still alive.  :)  We have about 6 more weeks till baby comes so I'm not moving very fast these days but I did manage to get in a Halloween craft!  It was my Mom's birthday a couple weeks ago so I used the push to make us both a cute Halloween kitty for our front doors.


And I just love him to bits!

He was a ton of fun to make too.

I started out making a paper template, transferring the template to a piece of plywood, and cutting the pieces out with my jig saw.  I glued him together using gorilla glue.  (crazy good stuff... just dont use to much!)  Then I taped off his eyes and painted him black.  After he was dry I hit the edges with the sander to bring out the detail and painted on the eyes.  Give him a coat of sealer and the finish him off with a Halloween ribbon and some wire whiskers.  (just drill little holes in the side of his face and stick some wire in.)

Easy peasy and oh so cute!!

As always I'm linking to these great parties and events

Monday, September 17, 2012

Fall Yarn Wreath

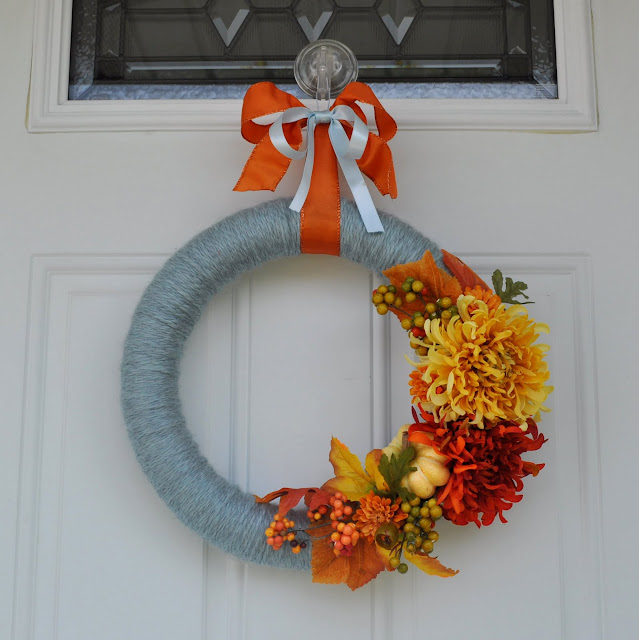
So the other day I woke up with the overwhelming desire to make a wreath.  (We all have overwhelming wreath making desires, right?!)  So I set off to make a new fall wreath.  I knew I wanted something simple that I could do in a couple hours.  This is what I came up with.


Cute right?!

All I did was take a foam wreath form and wrap it with yarn.  Then I hot glued a fall floral sprig and a couple fall silk flowers to one side.   I finished it off with a big ole bow.  All the supplies were from Micheal's.   I think it turned out pretty fun.


Oh, and one more tip.  Since I had all the floral embellishments on one side it wouldn't hang straight.  So I just slipped a few coins under the yarn on the opposite backside to balance everything out.  It worked great!


As always I'm linking to these great parties and events:

Tuesday, August 28, 2012

Picture Frame Growth Chart

I just realized I never posted my WYLTC growth chart from earlier this month.  In case you missed it here it is.  And if you never checked out all the other growth charts be sure to head on over and take a look.  They all turned out so cute!
_______________________________________________________________

Hey everyone!  Krystal from Sassy Sanctuary here today.  I'm so excited about this months theme!  With a  new baby on the way a growth chart was the perfect way to get started on my nursery design.  The babies room is in the very preliminary stages... I have to move my older son out first, which means we have to finish a room downstairs.  So yeah, VERY preliminary stage!

I know I am doing a woodland theme in there and I'm keeping the current wall color.  The only thing I have bought for the room is this adorable owl clock.


Isn't he cute!?  I have also order a sample of this cute fabric to use somewhere in the bedding...


I love it and can't wait to see it in person!  It's called "Wonderland in Blue" from the Fox Hollow line by Monaluna.  The whole line is adorable!

Anyway... you can kinda see where I'm going in there and my idea for his growth chart was something rustic that could also display pictures.  Here is what I came up with.


Obviously it will hang on the wall and the white squares will be filled with pictures.  I'm thinking I will start out by filling it with baby pictures and then updating them as he grows so that eventually the pictures will show the progression of his growth.  Fun!


The markings for the ruler on the side are done in vinyl and the big numbers are actually house numbers from Lowes.

The picture frames I got unfinished from Micheals.  It would have been pretty easy to make my own but I really wanted glass so it was just more convenient to buy.

The process was pretty simple.


I started out with a 6ft long board.  I measured up 6" and that is where I put my 1 foot mark.  (So I will hang it 6" off the ground once I know where it is going) and figured out the spacing of my frames.  It worked well to make a paper template.  Then I used a jig saw to cut out holes for the frames.  You just want the holes big enough that you can get to the backs of the frames, but that the cuts are covered by the frames.  I used wood glue and nails to tack the frames down.  And then finish however you want!  I painted my frames and stained the body.


Anyway.... that's it!  I may have to repaint the blue frames a little lighter blue once I get the fabric in there but I'm excited to see how it looks in the actual space once its done.


And I'm super excited to fill those frames with cute little baby faces!

Thanks for reading!

As always I'm linking to these great parties and events:

Thursday, April 19, 2012

Ba'bee' Shower Week- A Wishing Tree

I have one last thing to share with you guys from my sister's shower.  Her gift!  While I did go in with another sister and bought a swing, I wanted to make something special for Baby Kendal's nursery.  I was inspired by an idea from Pinterest, you can check out the original source HERE.

So my thought was I would create a piece of art that also served as a guest book. 

I started with an 11x14 piece of canvas.  I cut strips of scrapbook paper (that I knew would go with the look of the nursery) and modge podged them to the canvas.  Then I took some wood grain paper and made a basic tree silhouette.  Finally I added a "wishes for Kendal" banner.  (the banner is just attached with foam tape.)


Pop it in a frame and you have this...


Then I cut a bunch of leaves out of green card stock.  At the shower I set up a table right as you walked in and asked all the guests to write a wish for baby Kendal on a leaf.


As they wrote them, I attached the leaves with more foam tape.

It was really neat to see what everyone wrote.


Once it was done, I popped the glass in the frame and gave it to my sister.  She now has a really special piece of art for her baby and a great keep sake from her shower... all in one. 


I hope Kendal loves it as much as I do!

So that's it guys.  I hope you enjoyed seeing all the fun things we did for the shower and have some ideas for any showers you may host in the future.

As always I'm linking to these great parties and events:

Monday, October 10, 2011

Halloween Advent Picture Tree

Did you all follow Wood you like to craft? last week?  It was awesome!  We had a blast sharing our Halloween advent displays.  The link party is going on now and we want to see all Halloween wood crafts, so be sure to link up!  In the meantime I wanted to share my project from last week in case you missed it.  Enjoy!
-----------------------------------------------------------------------

Hello wood crafting friends!  Its Krystal from Sassy Sanctuary here and I am SO excited to share my project  with you today!  I know I've said it before, but I love WYLTC!  Each month it pushes me to create something that I never would have otherwise.  Some of my most prized creations (besides my children) are WYLTC projects.  But I think this one is my all time favorite.

When the Crafty Sisters first shared this month's project I was so excited.  I  loved the idea of an advent tree, but the last thing my kids need in October is more candy.  I also had been brainstorming ideas on how to display pictures of Halloween's past so I knew I would kill two birds with one stone and create a count down tree with a photo display.

Ready to see it?


I just love it!

The base is magnetic so I can change out the number tiles while we count down to the big day.  And the tree itself hangs little pictures of my kiddos in their costumes.  So cute!  I just love looking back on all those fun memories!

  
So if you want to make your own, here is the method to my madness.  (its easy... promise!)

First I drew the tree silhouette onto a piece of 1/8" plywood and cut it out with my scroll saw.


If you are a newbie with a scroll saw, then a tree is perfect! If your cuts get crazy it just adds to the look!  Then for the base I simply glued (gorilla glue) some 2x4's together, becuase its cheaper then a post and I had it in the garage.  :)


Time to break out that magnetic primer I've been promising myself I'd use again!  I did a liberal (you want it thick!) application of the primer and let that dry.  Sand it smooth.


Time to paint!  You want to paint your tree, a dowel, and a pack of small screw hole buttons black.  You also want to paint the small wood tiles orange.  And of course distress to bring out the detail!


Then to assemble, drill a hole in your post and push your dowel into it.  Hot glue your buttons all over the tree to hang your pictures from, and then hot-glue the tree to the dowel.

Finish it off by using vinyl (or paint) to add your text and numbers.  I cut white vinyl using my beloved silhouette.  Oh, and add magnets to the number tiles of course!


Then just hang your pictures and enjoy!  I used little picture pendant from the jewlery section of the craft store for my mini frames.


Everything is cuter in miniature!  I put nine frames on so I had room to grow and just filled the empty frames with scrapbook paper.

I love it!


But I've already said that.  :)

Thanks for the inspiration everyone!  This week has been amazing.  You ladies always blow me away.  I can't wait to see all the great Halloween wood crafts the rest of you are going to share!  See ya soon!

Krystal As always I'm linking to these great parties and events:
Visit thecsiproject.com

LinkWithin

Related Posts with Thumbnails
Don't stop there! Click "older posts" to keep reading!