Wednesday, December 12, 2012

Meet Jonah!

Jonah Milton
November 13th 2012
7lbs 7oz, 21 inches long

We are in LOVE!


Jonah has been an absolute delight.  He is the sweetest, mellow little baby and has his older siblings (and Mom and Dad) wrapped around his finger. 


And yes, he is already a month old and its taken me this long to introduce him to the world.  What can I say, I've spent the last month soaking in the snuggles... 


and sleeping.  :)
 
 And while I'm showing off my family, you have to see these amazing pictures of big brother Ezra...


And big sister Ava.


Yes, I have beautiful children.  :)
I'm a little proud.

Thanks so much to Harlow Moon Photography!  I knew I wanted to do professional newborn pictures and couldn't be more pleased.  Ashleigh came to my house and spent over 3 hours capturing these beautiful images.  It was amazing to watch!  Newborn photography is truly an art!  So if any of you are in the Salt Lake City area and looking for a newborn, child, or family photographer, I would highly recommend her!
 AND
Thank you for your patience while I sadly neglected this blog over the past several months.  Turns out pregnancy and blogging didn't mesh well for me.  But I have SO much to share with you guys!  Like Jonahs nursery, our big boy's new room, my basement remodel, our backyard, my sisters house that we've remodeled...and the list goes on.  So even though its been silent here I have still been busy working away.  I hope to start getting caught up after the first of the year and get back into a regular blogging schedule.  I really have missed it!

But in the meantime, I'll be kissing on these cheeks!


Saturday, October 13, 2012

Wood Connection Winner

Thanks to everyone for entering The Wood Connection giveaway and for your kind comments on the alphabet banner.  Time for the prize!  The winner of the $25 gift certificate to The Wood Connection is....

Lucky #5!


Who happens to be....


Congrats!   Email me with your contact information and I'll get that gift certificate headed your way.

Thanks!

Monday, October 08, 2012

Alphabet Banner- Guest posting for The Wood Connection and a GIVEAWAY!

Hey everyone!  I'm over at The Wood Connection today sharing the alphabet banner I made for the baby's room!
woodconnection

Last time I guest posted I was 22 weeks pregnant and on an organization kick,  now I am 33 weeks and its crunch time getting the baby's room done.  I headed over to The Wood Connection knowing I wanted to make something cute for the nursery.  I was immediately drawn to their cute pennants for banners.  The only problem is that this baby doesn't have a name yet.  (We are having a really hard time in the name department this go around!)  So what else can you have a banner say?  The alphabet!  I collected 26 of their pennants and headed home to get to work.

Wanna see how it turned out?


So much fun!

And now, thanks to The Wood Connection, I have the first corner of the nursery officially done!


For more details head on over to The Wood Connection and check it out!

But that's not all!!!

 GIVEAWAY  TIME

This giveaway is now closed.

The Wood Connection has so kindly offered to give one of YOU a $25 gift certificate to their store! They are located in Salt Lake City, Utah so whoever wins will have to be able to get to their store to use it. They have some of the cutest wood craft kits and everything is all ready to go, making it super fun and easy to spit out some cute creations!

 To Enter Leave me a comment on this post! 
 (that's it, super easy right?!)

 Extra Entries
 (leave a comment here for each one you do)

 -Visit The Wood Connection Blog, look around, and let me know one of their crafts that you would love to make.
 -Be a public follower of Sassy Sanctuary

 Good Luck!!!

Wednesday, October 03, 2012

A Black Cat

Hello everyone!  Yes,  I'm still here and I'm still alive.  :)  We have about 6 more weeks till baby comes so I'm not moving very fast these days but I did manage to get in a Halloween craft!  It was my Mom's birthday a couple weeks ago so I used the push to make us both a cute Halloween kitty for our front doors.


And I just love him to bits!

He was a ton of fun to make too.

I started out making a paper template, transferring the template to a piece of plywood, and cutting the pieces out with my jig saw.  I glued him together using gorilla glue.  (crazy good stuff... just dont use to much!)  Then I taped off his eyes and painted him black.  After he was dry I hit the edges with the sander to bring out the detail and painted on the eyes.  Give him a coat of sealer and the finish him off with a Halloween ribbon and some wire whiskers.  (just drill little holes in the side of his face and stick some wire in.)

Easy peasy and oh so cute!!

As always I'm linking to these great parties and events

Monday, September 17, 2012

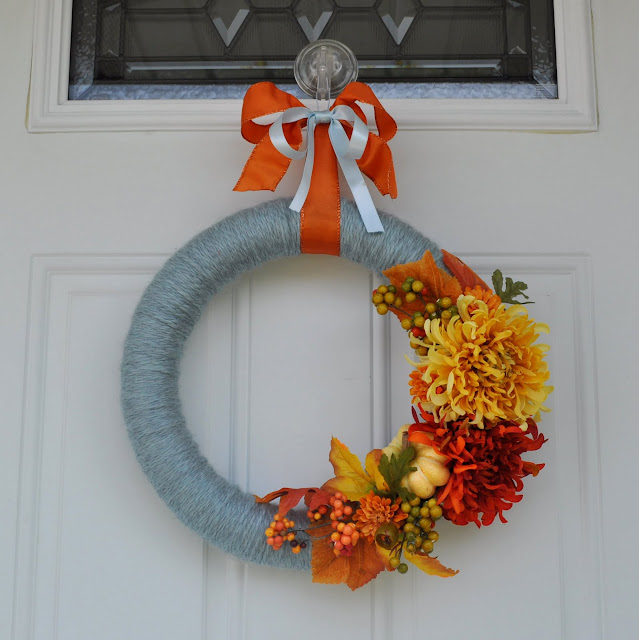
Fall Yarn Wreath

So the other day I woke up with the overwhelming desire to make a wreath.  (We all have overwhelming wreath making desires, right?!)  So I set off to make a new fall wreath.  I knew I wanted something simple that I could do in a couple hours.  This is what I came up with.


Cute right?!

All I did was take a foam wreath form and wrap it with yarn.  Then I hot glued a fall floral sprig and a couple fall silk flowers to one side.   I finished it off with a big ole bow.  All the supplies were from Micheal's.   I think it turned out pretty fun.


Oh, and one more tip.  Since I had all the floral embellishments on one side it wouldn't hang straight.  So I just slipped a few coins under the yarn on the opposite backside to balance everything out.  It worked great!


As always I'm linking to these great parties and events:

Monday, September 10, 2012

Woodland Baby Mobile

In case you missed it, I wanted to share my DIY baby mobile that I made for "crafting with/for kids" week over at Wood You Like to Craft.  Enjoy!

________________________________________________

Hello everyone! Krystal from Sassy Sanctuary here today to share my take on this month's "crafting with/for kids" theme. With a baby on the way I had use this as an excuse to cross off another thing from my nursery to-do list. So I went more with the crafting "for" kids route. Also, I have to confess that while there is a wood element, this is not an entirely wood project. Hope no one minds!

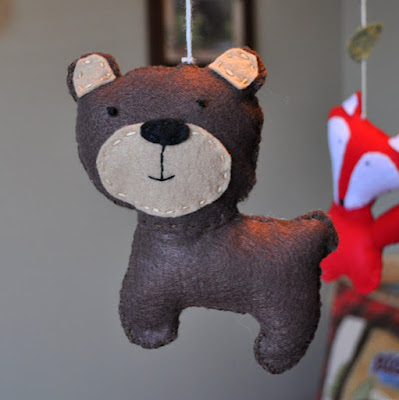
Anyway, if you go on Etsy and search "woodland mobile" you will find a bunch of adorable mobiles with little felt animals.  It took one look and I knew I had to have one for my woodland nursery, but since most range upwards of $70, I also knew I would have to DIY it.


So I went and gathered some felt and embroidery floss, found my favorite little animals from Etsy to shamelessly copy, and set to work.  Here is how it turned out.


I am so happy with it!  I really wish everyone could come over and see it in person since it was really hard to photograph and the pictures just don't do it justice.  But hopefully you get the idea!

We have an "elf house" (which I copied off the fabric I'm using in there)


An Owl...

 A Bear...


A Fox...

A Hedgehog...


And my favorite, the Raccoon.


And now where the wood comes in.  All these little guys needed a place to hang so I made a simple wooden mobile frame.


All you do is take a wooden block, drill holes in the four sides and insert dowels (add some glue to the holes).  I then capped the dowels with dowel caps.  All the supplies were found at Micheal's.  Then just stain or paint however you please.  There are also eye-hooks on the top and bottom of the block to hang from.

So that's it.  My DIY woodland baby mobile.


And just so you don't feel too bad for my kids, let me show you what my 6 year old son did while I sewed.


I cut him squares of felt, armed him with a needle and some thread, showed him how to do a simple whip stitch, and let him go to town.  He spent hours making this little "blanket" and is so proud of it.  And I love how entertained it kept him!  So yeah, no matter what you are crafting on, give your kids some of your scrap supplies and see what they can do.  Their creativity might amaze you!


As always I'm linking to these great parties and events:

Thursday, September 06, 2012

Crafting for Kids

It's Wood You Like to Craft week again!  This month we have been crafting with/for our kids.  There has been some fabulous and adorable ideas so far so be sure to head on over and check them all out.  I'm there today finishing the week off with a DIY baby mobile.  So don't miss it!

(Here is a sneak peek!)


Tuesday, August 28, 2012

Picture Frame Growth Chart

I just realized I never posted my WYLTC growth chart from earlier this month.  In case you missed it here it is.  And if you never checked out all the other growth charts be sure to head on over and take a look.  They all turned out so cute!
_______________________________________________________________

Hey everyone!  Krystal from Sassy Sanctuary here today.  I'm so excited about this months theme!  With a  new baby on the way a growth chart was the perfect way to get started on my nursery design.  The babies room is in the very preliminary stages... I have to move my older son out first, which means we have to finish a room downstairs.  So yeah, VERY preliminary stage!

I know I am doing a woodland theme in there and I'm keeping the current wall color.  The only thing I have bought for the room is this adorable owl clock.


Isn't he cute!?  I have also order a sample of this cute fabric to use somewhere in the bedding...


I love it and can't wait to see it in person!  It's called "Wonderland in Blue" from the Fox Hollow line by Monaluna.  The whole line is adorable!

Anyway... you can kinda see where I'm going in there and my idea for his growth chart was something rustic that could also display pictures.  Here is what I came up with.


Obviously it will hang on the wall and the white squares will be filled with pictures.  I'm thinking I will start out by filling it with baby pictures and then updating them as he grows so that eventually the pictures will show the progression of his growth.  Fun!


The markings for the ruler on the side are done in vinyl and the big numbers are actually house numbers from Lowes.

The picture frames I got unfinished from Micheals.  It would have been pretty easy to make my own but I really wanted glass so it was just more convenient to buy.

The process was pretty simple.


I started out with a 6ft long board.  I measured up 6" and that is where I put my 1 foot mark.  (So I will hang it 6" off the ground once I know where it is going) and figured out the spacing of my frames.  It worked well to make a paper template.  Then I used a jig saw to cut out holes for the frames.  You just want the holes big enough that you can get to the backs of the frames, but that the cuts are covered by the frames.  I used wood glue and nails to tack the frames down.  And then finish however you want!  I painted my frames and stained the body.


Anyway.... that's it!  I may have to repaint the blue frames a little lighter blue once I get the fabric in there but I'm excited to see how it looks in the actual space once its done.


And I'm super excited to fill those frames with cute little baby faces!

Thanks for reading!

As always I'm linking to these great parties and events:

Wednesday, August 15, 2012

Growth Charts!

It's Wood You Like To Craft week again!  This month we are making growth charts, and I'm super excited about my latest creation.  Be sure to head on over and check it out!

Friday, July 27, 2012

The Wood Connection WINNER!!!

Thanks to all those who entered the giveaway for The Wood Connection gift certificate and for all your kind comments on my mail organizer.   I hope you all have a chance to make it to The Wood Connection and make something fabulous for yourself.  But we can only have one winner so without further ado, the winner is....

 Which is....

Blogger The Allen Family  who said...
"I like you on FB."

Congratulations!  I will be contacting you right now to get your information.

Thanks again everyone!

Monday, July 23, 2012

Mail Orgainizer (Guest posting for the Wood Connection) and a GIVEAWAY!!!!

Hey Everyone!  I'm so excited today because I am guest posting for The Wood Connection!


When I was asked to guest post it didn't take me long to figure out what I wanted to do.  You see, I am about 22 weeks preggo now and I'm on a bit of an organization kick.  I'm trying to taking advantage of the desire while it lasts!  So I looked around my home and my eyes found the pile of bills that always sits on the counter and I knew that was it.  My mail needed a home!

So I headed over to The Wood Connection and explained what I had in mind.  These people are amazing!  Within 15 minutes I was headed home with exactly what I had envisioned.  I also had to take a trip to Joann's to pick out some fabric but that part is always super fun!

A few hours later I had this.....  it turned out just as I had envisioned and is just what I needed!


I just love it!  The top pocket is sized to fit bills and letters, and the lower one is for a few magazines or catalogs.  It hangs on the back of my door so that I can stash the mail as I walk it.

It was a lot of fun to make and was really easy.  You can go here for the full tutorial.

But that's not it!  We are doing a GIVEAWAY!!!

The Wood Connection has so kindly offered to give one of YOU a $25 gift certificate to their store!  They are located in Salt Lake City, Utah so whoever wins will have to be able to get to their store to use it.  They have some of the cutest wood craft kits and everything is all ready to go, making it super fun and easy to spit out some cute creations!

GIVEAWAY NOW CLOSED


To Enter

 Leave me a comment on this post!  (that's it, super easy right?!)


Extra Entries  (leave a comment here for each one you do)

-Visit The Wood Connection Blog, look around, and let me know one of their crafts that you would love to make.

-Be a public follower of Sassy Sanctuary

-"Like" Sassy Sanctuary on Facebook.


Good Luck!!!


Thursday, July 19, 2012

My Broom Cabinet

In case you missed it, here is my post for Wood You Like To Craft this month.  Our theme was "organization" and there was a bunch of awesome stuff so head over and check them all out!

-----------------------------------------------------------------------

Hello there all my wood crafty friends!  It's Krystal from Sassy Sanctuary here today to kick off another week of Wood You Like to Craft!!  If you follow my blog you already know that I am expecting another baby in November, well one of the best things about being pregnant is the overwhelming desire to get your house in order. I decided to take advantage of the insanity and am declaring this organization week!  I'm so excited to see what clever things everyone comes up with!

For my project I decided to take care of a little problem that had been bugging me for months.... my mop and broom.  You see, we live in a split level house and the main level is all dark hardwood floor.  Because its dark it has to be mopped basically everyday.  Unfortunately there is no place to keep the broom or mop on the main level and I never would take the time to take it downstairs and put it away.  So they have been living in the corner of the kitchen.  But not anymore!  I took the only spare section of long wall in my kitchen and made a cabinet to custom fit my mop and broom!  I love it!


Its basically a glorified box with a door hung on the wall, but I love that everything now has a home!


And the front of the cabinet is chalkboard paint so it also serves a double purpose of being a place to write lists, notes, reminders, or menu plans.


Now I didn't take pictures for a step by step tutorial because if you want to make one you'll need to figure out what size works for your space and your stuff, and also because I had no idea what I was doing.  :)  But  I'll explain the process.

First you need to figure out what size you want your cabinet.  I knew I had a small space to hang it so I basically made mine as small as I could get away with.  Its about 5 feet tall, 14 inches wide, and about 6.5 inches deep, including the door.

Once you figure out your sizes then you basically build a box with an extra pieces on the back and an extra peice on the front.  Do this on both the top and bottom.

 
Then I added some molding to the top to give it a little extra something.


The door is also just a box with a piece off wood screwed to the back.  It is attached with simple hinges and has a knob and a "hook and eye" to keep it closed.


So that's the basic construction and then you can finish it however you like!


So that's my broom cabinet.  I have to admit to being really proud of it!  :)

Stay tuned for the rest of the great organization projects from the other members of the WYLTC team.  They always do amazing stuff so I'm sure it will be fantastic!

Thanks for reading!

As always I'm linking to these great parties and events:

Monday, July 09, 2012

It's a blog post!

Except it's not here... it's over at WYLTC.  So head on over and check it out.  I'm kicking this week off with a custom broom cabinet, and the whole week is going to be filled with organization ideas.  So don't miss it!


LinkWithin

Related Posts with Thumbnails
Don't stop there! Click "older posts" to keep reading!