Showing posts with label sewing. Show all posts

Monday, September 10, 2012

Woodland Baby Mobile

In case you missed it, I wanted to share my DIY baby mobile that I made for "crafting with/for kids" week over at Wood You Like to Craft.  Enjoy!

________________________________________________

Hello everyone! Krystal from Sassy Sanctuary here today to share my take on this month's "crafting with/for kids" theme. With a baby on the way I had use this as an excuse to cross off another thing from my nursery to-do list. So I went more with the crafting "for" kids route. Also, I have to confess that while there is a wood element, this is not an entirely wood project. Hope no one minds!

Anyway, if you go on Etsy and search "woodland mobile" you will find a bunch of adorable mobiles with little felt animals.  It took one look and I knew I had to have one for my woodland nursery, but since most range upwards of $70, I also knew I would have to DIY it.


So I went and gathered some felt and embroidery floss, found my favorite little animals from Etsy to shamelessly copy, and set to work.  Here is how it turned out.


I am so happy with it!  I really wish everyone could come over and see it in person since it was really hard to photograph and the pictures just don't do it justice.  But hopefully you get the idea!

We have an "elf house" (which I copied off the fabric I'm using in there)


An Owl...

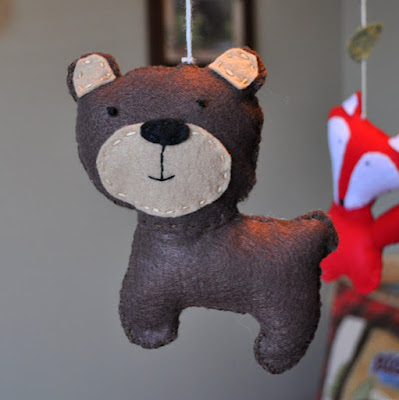
 A Bear...


A Fox...

A Hedgehog...


And my favorite, the Raccoon.


And now where the wood comes in.  All these little guys needed a place to hang so I made a simple wooden mobile frame.


All you do is take a wooden block, drill holes in the four sides and insert dowels (add some glue to the holes).  I then capped the dowels with dowel caps.  All the supplies were found at Micheal's.  Then just stain or paint however you please.  There are also eye-hooks on the top and bottom of the block to hang from.

So that's it.  My DIY woodland baby mobile.


And just so you don't feel too bad for my kids, let me show you what my 6 year old son did while I sewed.


I cut him squares of felt, armed him with a needle and some thread, showed him how to do a simple whip stitch, and let him go to town.  He spent hours making this little "blanket" and is so proud of it.  And I love how entertained it kept him!  So yeah, no matter what you are crafting on, give your kids some of your scrap supplies and see what they can do.  Their creativity might amaze you!


As always I'm linking to these great parties and events:

Monday, January 10, 2011

Dish Towel Belts

So about this time last year I got fed up with my dish towels being on the floor and came up with a solution.  While I loved them intensely over the past year, I was ready for a change.  So I came up with this instead.  The dish towel belt.


I think they turned out SO cute and I am really happy with them.  I just paired them with a white towel because I wanted the belt to be the focus.  But you could make a more neutral belt and pair it with a cute towel too.

But of course I couldn't just make one. I had to make four!


So do you want to make your own?  They are super easy and you can bang out a bunch in an afternoon.  Great way to use up those scraps too!


You start with a piece of fabric that is 12" x 6".... or what ever size you want.  The narrower one was 12" x 4".


Fold it in half  right sides together and sew along the long edge so that you make a tube.


Turn right side out and press.  (yes I said press.  Normally I would skip this step but it really makes a big difference. )  Fold the ends over and pin.


Then do a top stitch around the entire thing.  This will sew down the two edges and make the whole thing more stable.


Then add a few pieces of Velcro.  You can use any kind of closure you like but Velcro is easy.  I used an iron-on type that is supposedly permanent and machine washable.  Follow the package directions but for mine you just peeled of the backing, stuck it on, and then heat set it for 90 seconds.


Embellish however you wish.  On this particular one I made a simple ribbon bow and just hot glued it on.  It would probably be a good idea to attach your embellishments to a safety pin and attach them that way, but I didn't have any on hand and was being lazy.

You can also embellish with some rag flowers.
There are a ton of ways to make fabric flowers, but for mine I took a length of fabric and tied knots all down it leaving a little untied at the end.  Then starting at one end you roll it up, hot gluing as needed to keep it together.  I opened the untied end and hot glued it to the back to help secure everything.  Yes, I totally made that up as I went, but I think it turned out kinda fun.

The other way I embellished was with a ruffle.  Basically make a tube the same way you did before and then run a long straight stitch down the middle.  Gather it and then sew it onto the belt.

Wrap them around the towel and enjoy!  Here are how all the variations look hung.


They are a really simple solution for keeping that dish towel off the floor and I love how they look.  I'm so proud!

As always I'm linking to these great parties and events:

Today's Creative Blog
WhisperWood Cottage
Creations by Kara

LinkWithin

Related Posts with Thumbnails
Don't stop there! Click "older posts" to keep reading!