Showing posts with label crafts. Show all posts

Monday, September 10, 2012

Woodland Baby Mobile

In case you missed it, I wanted to share my DIY baby mobile that I made for "crafting with/for kids" week over at Wood You Like to Craft.  Enjoy!

________________________________________________

Hello everyone! Krystal from Sassy Sanctuary here today to share my take on this month's "crafting with/for kids" theme. With a baby on the way I had use this as an excuse to cross off another thing from my nursery to-do list. So I went more with the crafting "for" kids route. Also, I have to confess that while there is a wood element, this is not an entirely wood project. Hope no one minds!

Anyway, if you go on Etsy and search "woodland mobile" you will find a bunch of adorable mobiles with little felt animals.  It took one look and I knew I had to have one for my woodland nursery, but since most range upwards of $70, I also knew I would have to DIY it.


So I went and gathered some felt and embroidery floss, found my favorite little animals from Etsy to shamelessly copy, and set to work.  Here is how it turned out.


I am so happy with it!  I really wish everyone could come over and see it in person since it was really hard to photograph and the pictures just don't do it justice.  But hopefully you get the idea!

We have an "elf house" (which I copied off the fabric I'm using in there)


An Owl...

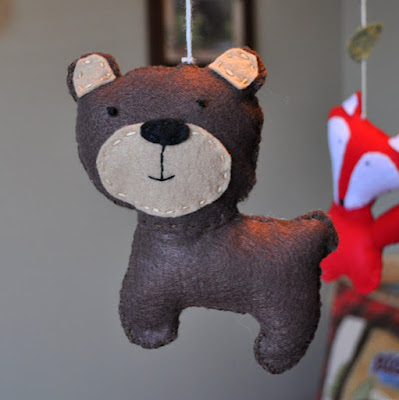
 A Bear...


A Fox...

A Hedgehog...


And my favorite, the Raccoon.


And now where the wood comes in.  All these little guys needed a place to hang so I made a simple wooden mobile frame.


All you do is take a wooden block, drill holes in the four sides and insert dowels (add some glue to the holes).  I then capped the dowels with dowel caps.  All the supplies were found at Micheal's.  Then just stain or paint however you please.  There are also eye-hooks on the top and bottom of the block to hang from.

So that's it.  My DIY woodland baby mobile.


And just so you don't feel too bad for my kids, let me show you what my 6 year old son did while I sewed.


I cut him squares of felt, armed him with a needle and some thread, showed him how to do a simple whip stitch, and let him go to town.  He spent hours making this little "blanket" and is so proud of it.  And I love how entertained it kept him!  So yeah, no matter what you are crafting on, give your kids some of your scrap supplies and see what they can do.  Their creativity might amaze you!


As always I'm linking to these great parties and events:

Monday, July 23, 2012

Mail Orgainizer (Guest posting for the Wood Connection) and a GIVEAWAY!!!!

Hey Everyone!  I'm so excited today because I am guest posting for The Wood Connection!


When I was asked to guest post it didn't take me long to figure out what I wanted to do.  You see, I am about 22 weeks preggo now and I'm on a bit of an organization kick.  I'm trying to taking advantage of the desire while it lasts!  So I looked around my home and my eyes found the pile of bills that always sits on the counter and I knew that was it.  My mail needed a home!

So I headed over to The Wood Connection and explained what I had in mind.  These people are amazing!  Within 15 minutes I was headed home with exactly what I had envisioned.  I also had to take a trip to Joann's to pick out some fabric but that part is always super fun!

A few hours later I had this.....  it turned out just as I had envisioned and is just what I needed!


I just love it!  The top pocket is sized to fit bills and letters, and the lower one is for a few magazines or catalogs.  It hangs on the back of my door so that I can stash the mail as I walk it.

It was a lot of fun to make and was really easy.  You can go here for the full tutorial.

But that's not it!  We are doing a GIVEAWAY!!!

The Wood Connection has so kindly offered to give one of YOU a $25 gift certificate to their store!  They are located in Salt Lake City, Utah so whoever wins will have to be able to get to their store to use it.  They have some of the cutest wood craft kits and everything is all ready to go, making it super fun and easy to spit out some cute creations!

GIVEAWAY NOW CLOSED


To Enter

 Leave me a comment on this post!  (that's it, super easy right?!)


Extra Entries  (leave a comment here for each one you do)

-Visit The Wood Connection Blog, look around, and let me know one of their crafts that you would love to make.

-Be a public follower of Sassy Sanctuary

-"Like" Sassy Sanctuary on Facebook.


Good Luck!!!


Tuesday, May 22, 2012

Forget Me Not

Has everyone heard of The Wood Connection?  Its a super fun blog full a great wood craft inspiration AND for those who are lucky enough to live nearby, its also a fantastic shop where you can buy all kinds of unfinished wood kits.  Well, last week we had our monthly neighborhood craft night and I was asked to pick the theme.  Of course I picked wood crafts!  And since I had heard so many great things about The Wood Connection's Shop, I decided I better check it out.

Oh my word... Died and gone to heaven!!!

They have the cutest stuff and it is so nice to be able to just buy the kits all ready to go and just put your own spin on them.  And I was pleasantly surprised with their prices.   It was a really good day!

I ended up buying the "Forget me not" kit.  It's this sweet pot of little blue "forget-me-not" flowers to help us remember the beautiful talk by President Uchtdorf.  I particularly love this talk and wanted the oh-so-cute reminder in my home. 

Here is how it turned out.


I completely adore it!

I found a perfect blue paper with some texture to modge podge on the flowers, and then added the button in the center for that extra fun touch.


And I'm loving the double ribbon I found.  The ribbon was the perfect way of adding that bit of aqua to the other truer blue, which helps it relate with the colors of my house.


But I think the barn wood paper on the pot is the best part of all! 


The vinyl was already cut and I purchased it from The Wood Connection also.  What a time saver!

So... what do you think?!  Turned out pretty fun huh!

Well... I wasn't able to get out of there with only one kit so I'll be back in as few days with the other thing I made.  Stay tuned!


Tuesday, May 15, 2012

Glittered Watermelon

Just in case you missed it, here is my glittered watermelon post from WYLTC last week.  It was a ton of fun to make... Enjoy!

___________________________________________________

Hello everyone!  Krystal from Sassy Sanctuary here again today!  I'm so excited about this months theme.  Melinda's bedazzled "summer" is beyond wonderful don't ya think!?  I'm definitely going to have to break out some sequins on some future project!

When I was told our theme for this month was "summer bling" the first thing I though of was a watermelon.  Don't watermelons just scream summer?!  I know I'm not the first person to ever make a wooden watermelon, but it was still fun putting my sparkly spin on it!

So are you ready to see?


It was a ton of fun to make and looks so cute mixed into my little summer display!


I wish pictures did the sparkle justice.  It really does just glimmer in the light.  It's wonderful!

Its hard to say what my favorite part is... it was so much fun adding the glitter to the scrapbook paper patterns, but the black rhinestone "seeds" I found are pretty fun too!


Anyway, if you want to make your own, here is the method to my madness.  :)


A-  I made my cuts using my scroll saw.  You want to use a piece of wood that is thick enough that it can stand up by itself.  I just used scraps I had laying around and actually have two pieces glued together to get it thick enough.  I just free handed a pattern on some paper before transferring it to the wood.  I used a thinner piece of wood to make the slightly smaller "fruit" piece.

B- The fabulous black rhinestones I found in the scrapbook section at Micheal's.  They actually were part of a scrapbook boarder embellishment, and I just picked the black ones off. 

C-  Once you have you supplies, you can paint.  Since I was adding scrapbook paper to the fronts, I only painted the edges.

D- But I did paint the back of the big piece just so it would look okay from the backside.

E-  Then you add your paper!  I found a fun red polka-dot for the center, and a great green strip for the outside.  I used modge-podge to adhere it to the wood.

F-  Once its completely dry, then you can add the glitter!!!  I used the backside of a paint brush to make dots with modge-podge and added the glitter.  Work in small sections so that your glue doesn't dry.  I also painted on the stripes with a fine paintbrush.  My kids were fascinated with the glittering process!

A tip for glittering, once its dry give your glittered piece a light coat of finish spray.  It really helps seal the glitter in.  Just be sure to use really light coats so the glitter doesn't get dull.

Once everything is dry, then you can hot glue your pieces together and hot glue on the seeds.

Now just stand back and enjoy the glimmer!


Can't wait to see what everyone else has come up with!

Thanks for reading!


As always I'm linking to these great parties and events:

Saturday, April 14, 2012

Umbrella Garden Stake

In case you missed it, here is my Wood You Like To Craft post for this month.  Our theme this month was "April Showers."  It was fun.  :)

---------------------------------------------------------------------------------------

Hello everyone!  Krystal from Sassy Sanctuary here today!  I'm so excited to show you my take on Wendy's fun theme.  I have always loved the phrase "April Showers bring May flowers" because it reminds us that there is always beauty after the storm.   And I just adore Spring!  Whats not to love about warmer days and new life?!

Anyway, I so excited to craft for spring and wanted to make something for my flower beds.  Sadly though, we don't currently have a flowers bed... we have a weed bed.  Remember we moved into a new (to us) house in December that was banked owned.  So the yard has been very neglected.  Once its safe to plant we plan on redoing the beds but for now I have to be happy with a few potted plants.

But even my pots can use some spring love!  So I made an umbrella garden stake.  It looks super cute in with all my happy flowers and just screams "April showers!"
 
It was such a fun and quick project.  All I did was cut out the umbrella shape from 1/2" plywood and glue (I used wood glue) it to a yard stake.  Stain the whole thing, add some scrapbook paper, and then give it several good coats of finish.


But my favorite part is the raindrops!  I got some crystal scrapbook embellishments and sandwiched a piece of thread between them to create little crystal droplets to hang from each peak.  They sparkle in the sun and dance in the breeze and I just adore it!


They are attached to the back of the umbrella with a tiny bead of hot glue.


And that's it!


It is such a happy addition to the front of my house and helps draw your attention from the weed beds. (or at least that's what I'm telling myself) 

Thanks for the inspiration Wendy!

As always I'm linking to these great parties and events:

Tuesday, March 20, 2012

A Basket Wreath

A tisket, a tasket, I made an Easter Basket!


 Isn't it fun?!

I wanted to make an Easter wreath that would last all spring.  I had in mind something that looked like a basket full of flowers.  So I had the idea of taking a wire wreath form and wrapping it in burlap to mimic the basket shape and adding a whole bunch of flowers.

I love how it turned out!


 I think it still has that Easter feel with the basket, but it'll look good until I get around to replacing it.  Love that!

The bow tucked into the corner is probably my favorite part.


The day I made this I met with a few friends from my neighborhood and we all made wreaths, but I forgot to bring my camera.  So I don't have picture instructions, but I'll do my best to describe the process.

You start out with a wire wreath form.... one kinda like this.


Then get some burlap ribbon or strips of burlap.  I couldn't find ribbon so I ended up getting some burlap fabric and cutting it into strips.  Start by wrapping half the form to make the handle of the basket.  Then take strips of burlap and wrap the burlap all the way across the front of the  frame and hot glue on the back.  Continue down the second half of the wreath to create the basket.


So now you have the basic basket.  You can now add your flowers and embellishments!  I just tucked the flowers into the different strips of burlap, hot-gluing and/or tying it to the back. 


I hope that made sense!

Anyway... It took me about an hour from start to finish and I love it! I hope you'll give it a try!


As always I'm linking to these great parties and events:

Thursday, February 23, 2012

Lucky Yarn Wreath

Yesterday I was in the mood for a quick craft so I decided to make a new wreath for St. Patrick's day.  It was super easy and turned out pretty dang cute if I do say so myself.


All I did was take a straw wreath form (or you could use foam... whichever is cheaper) and wrap it with green yarn.


And wrap and wrap and wrap.  I enlisted the help of my five year old for this.  He held the ball of yarn and did the wrapping while I adjusted the spacing and kept everything tight.  With his help we had it done in about 30 minutes or so.

Then I hot glued a great big green and white bow on the top.


My secret to perfect bows is wired ribbon.  It makes all the difference!!!

The letters for the word "lucky" I found at Micheal's already painted white and glittered.  As much as I love painting its sometimes nice to find stuff already done!


I just hot glued the letters down another piece of the green ribbon and secured it to my wreath with a few sewing pins.  Like this...


That way if i ever want to remove the lucky banner and use the wreath for something else I can.  I'm not sure I ever will but its nice to have options!

And that's it!


A super cute new wreath for my front door in a little over an hour. I love crafts like that! 


As always I'm linking to these great parties and events:

Thursday, December 29, 2011

Oh My Crafts Vinyl: Product Review

Disclosure:  I was sent free product from Oh My Crafts in exchange for a review, but all opinions are my own.

I'm so excited to tell you guys about Oh My Crafts!  OMC is a great website full of crafts supplies.  They carry everything from paper to craft cutters to home decor.  Well, about a month ago they offered to send me some vinyl to review.  I couldn't say yes fast enough!

I love crafting with vinyl because there is so much you can do with it!  When my package came in the mail it was like an early Christmas morning.  They have such fun colors and even some specialty vinyl, like glitter and chalkboard.  Right off the bat I could tell that OMC vinyl felt thicker then other vinyl I have used.  It came in 12 x 24 sheets and was nicely packaged without any bends or creases.  I have used rolls of vinyl in the past and have often had air bubbles in the vinyl that has caused problems during cutting, but not the case here!

I wanted to give this stuff a good test run so I decided to use it in the 3 ways I most often use vinyl...while crafting, on the wall, and as a stencil.

The first project I used it in was my Christmas Quote Tree.  (You can read more about it HERE)


I was actually having a series of problems with this project when my OMC package came in the mail.  It was a God send!  When I sent the vinyl through my silhouette machine I was impressed with how clean it cut.  Often times with other vinyl I will have parts lift while its cutting, but this stuff stayed in place really well.  I also noticed it was easier to weed out the negative area for the same reason.  And it stuck like a dream!

For my next test I wanted to try it on a wall.  I really like using vinyl on a wall in theory.  I love that it is removable without damaging walls but I've actually never had much luck with it.  I've tried several brands and I've always had trouble getting my vinyl to stick without bubbling or lifting over time.  So for me, this was a big test.

I decided to do a cute little princess saying for my daughters room.


I decided on "Little Miss Princess" because we call our daughter "little miss" all the time.  I designed the text using the Silhouette software and got the crown from the Silhouette store.  Once again, the vinyl cut beautifully.  I used transfer tape with this application.  I avoid transfer tape whenever possible because I have a hard time with it, but this stuff didn't feel overly sticky so I was hopeful that it would let go again.  I still had a bit of trouble getting the vinyl off the tape and onto the wall, but nothing terrible.  It was defiantly better then other transfer tape Ive used.  And once the vinyl was off the tape and onto the wall, it stuck!  Not a single bubble or spot that has lifted.  I'm so pleased!

For my final test, I wanted to see how it did as a stencil.  This is actually what I do most often with vinyl.  I have been on a bit of a sign kick lately and I love the look of painted lettering that is distressed, so making a stencil is the way to go.  I found a great quote and made this sign for my new house.


I love how it turned out!  We are in a transition period right now and this great quote will remind us that life is what we make it. 

One of the things I love about the OMC vinyl is that it has a grid on the back.  This is really helpful when making a stencil because you can cut the stencil out straight. And a straight stencil is so much easier to get on correctly!  Once again this stuff stuck really well to my board.  I did have a little bit of bleeding under the vinyl but very little.  Because this stuff sticks so well it was a bit harder to remove the stencil then with other stuff I've used.  It just came off in pieces.  Not a big deal.

Overall I am REALLY impressed with the quality of OMC vinyl!  (and doubt I will ever buy vinyl from anywhere else again!) I'm sure you will hear a lot more about them in the future.  I can't wait to try out some chalkboard vinyl and to use the glitter vinyl!

Do you want to try some too?  Oh My Crafts has created the discount code OMCBLOG10 for 10% off your entire order!  They have great prices and awesome colors so be sure to check them out!  You'll be glad you did.  :)

Monday, November 21, 2011

Family Motto Picture Frame

In case you missed it last week, here is my post for WYLTC.  This month's theme was "family" and everyone shared some seriously cute stuff, so be sure to head on over and check them all out. Also, the "family" link party is going on now so be sure to play along and link up!  We can't wait to see what you made!
 ________________________________________________________________

Hello! Its Krystal from Sassy Sanctuary here today!  I'm so excited to show you guys my take on Wendy's adorable Family Rules Sign.

To be honest, I was a little nervous about this months project because we are in the process of moving to another state and my husband has packed up all the tools and moved them to our new house!  So I knew that whatever I made, I was going to have to take some help from the craft store. There is nothing wrong in that right?!

So I went to one of my favorite local stores.  (It's called Porter's if any of you have one near you) and found a 12x12 unfinished MDF frame that had a 4x4 opening.  I grabbed that and went to see if I could find some scrapbook paper inspiration and found one of those 5x7 paper packs in adorable prints.  Then a light bulb went off in my head! 

I wanted to make 4x4 compartments and use each square to place a quote.  Then thanks to pinterest I found the PERFECT family motto to put in my frame. 

Here is the final result.


Ahhhh!!!! I love it!  Seriously this is one of my favorite things I have ever made! (I swear I say that about every WYLTC project, but this time I mean it!)

So, do you want to make your own?  This is how I did it.


A- First get a 12x12 frame with a 4x4 opening.
B- Paint it a base color that goes with all your papers
C- Cut your papers to 4x4 squares and arrange them how you would like them on your frame.
D- Modge Podge the paper on.  I found it best to do the corners first and then the middle squares.
E-  Once its good and dry, cut vinyl to make a stencil for your text. (if you don't have a craft cutter, you could use Wendy's transfer method too!)
F-  Paint your text.  I found it turned out better if I let my paint dry to the touch before removing my stencil.

And that's it!

Oh.... but you may have noticed that my frame has a good amount of distressing.


Funny story about that....

I walked away from this project to use the bathroom after doing the text in one square.... and left it and my paint sitting on the counter. (Do you see where this is going?)  When I came back my 3 year old daughter had painted brown paint all over it!

I screamed.

Then I got a rag and scrubbed the thing off.  Luckily the modge podge sealed it pretty well and most of the paint came off... Except for in a few spots where I scrubbed through the paper!

Then I cried.

Once I regained my composure I decided to just go with it.  I strategically scrapped up the surface of the paper (just using my fingernails) and rubbed brown paint into the scratches.   I actually LOVE the way it looks. So yay for happy accidents!

So anyway... thats it.  My family motto picture frame.


I hope you love it as much as I do!
I can't wait to see what everyone else does!


As always I'm linking to these great parties and events:
LinkWithin

Related Posts with Thumbnails
Don't stop there! Click "older posts" to keep reading!