Monday, December 13, 2010

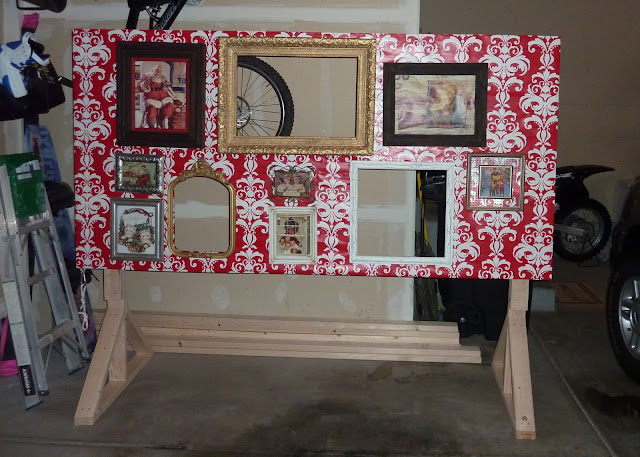
"Wall of Frames" Photo Booth

I am so FREAKIN excited to finally spill the beans on what I've been up to for the past few weeks.  I've been really hush hush about it, even to my family, because I wasn't sure we could pull it off.  But OMG, now that its done, it is unbelievably awesome.

It all started when my BFF Cola (you are going to hear more about her and her new blog soon) and I were having a play date and came upon this idea.  Cola, who is very entrepreneurial, saw this as a fun fresh idea with dollar signs in mind.  I saw it as seriously cute Christmas card potential.  So we decided to work together and make our own Christmas inspired "wall of frames" photo booth.  Before I show you all the how-to's and details, here is the finished product.  My 2010 Christmas Cards, coming soon to a mailbox near you!


Here is the final family photo minus all the card junk.


So fun right?!?  I love it and we are so impressed with ourselves.

Here is what we did.

We gathered a bunch of old frames from thrift and antique shops.  We wanted it to look like it could be a wall at your Grandmother's house so we went with a very eclectic "gathered over time" look.  We painted several of the frames that needed it.  We decided which three were going to be our openings (the three that were big enough for a person to stick their head through) and settled on a layout.  We then filled the rest of the frames with Christmas pictures printed from online images.  Cola was the mastermind behind finding and printing all the images.  We weren't concerned about our images having great quality since they'd only be viewed through a picture.

We then got a sheet of plywood, laid everything out and cut our openings.  We decided to wallpaper the board using wrapping paper.  It was a disaster!  So in the end we actually just wrapped the board with the paper like you would a gift and taped it in the back.  My wonderful, amazing, patient, talented husband (yes I'm sucking up here, he wasn't so thrilled about the whole thing)  was kind enough to build the actual structure for us.  He made the legs and did all the cutting.  The legs are easily detached with two screws for easier storage. Then we just hung all the frames and it was photo shoot time! Here are some pictures of the actual structure.


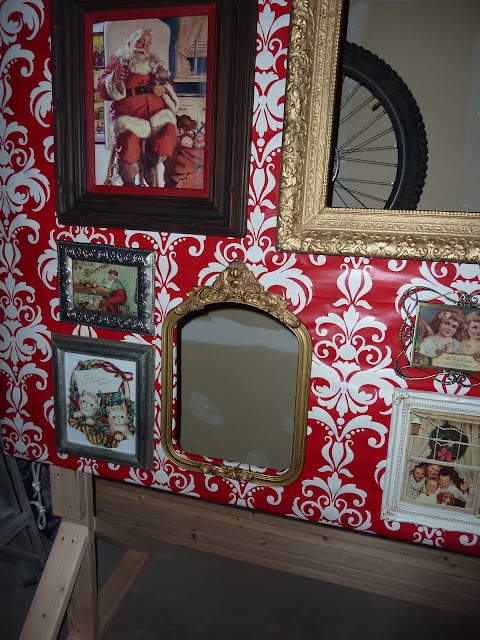
And a few closer looks at our frames.


(LOVE the crackle on this baby!  We achieved this look with nothing other then Elmer's glue and craft paint.  So proud!)


Cola was also our photographer.  She did a great job but REALLY impressed me when it came time to edit.  My son was being a pill and wouldn't cooperate.  We only got one decent shot of him, but not to fear, Cola was able to take the best one of the rest of us and just photoshopped my son into the shot.  Amazing, I know!  I am now convinced that I have to learn Photoshop.

So there you have it, that is how I came to have the coolest Christmas cards on the face of the planet.


Now if you are thinking "wow that's cool but seems like a lot of work for a Christmas card" then you are absolutely correct.  It was a lot of work.  But we are going to advertise it and try to rent it out for parties.  We can easily replace the background paper and images within the frames to fit any party theme, be it a wedding, office party, birthday bash, or school dance.  We may even try to take it to the State Fair next year so people can get a jump on their Christmas cards.  Who knows what will come of it, but the possibilities are endless.

Linking to THESE parties and events:
get-your-craft-on 

Friday, December 10, 2010

Inspiration File

A few fun things to share this week.

First up, How Does She did again and blew me away with a 2x4 craft.  I don't know why I am so drawn to a 2x4 but I just love the idea of taking something so basic and ending up with something amazing... and this one is!  Check out this 2x4 snowman.  Cutest thing ever!  I love the none traditional colors... I love the nose and the paper buttons... I just love the whole thing!


Next up, Sugar Bee showed us how to make these adorable Christmas tree hair clips.  They are SO cute and look really easy to do.  I'm going to have to make some.  Plus this is a fun and affordable gift idea, love that!

And finally, Crazy Domestic made these melted snowman cookies.  Maybe I have a thing for snowmen, but I think these are to die for cute!  How great would these be to give to neighbors or friends... or me?  I sure am going to hate when Christmas is over and I have to go back on a diet, but for now I'm making a whole bunch of these cuties!


Well, that's it for now.  If you were featured don't forget to grab a button. 

Wednesday, December 08, 2010

Yarn Cone Trees

I have seen so many adorable cone trees lately! So when I decided my mantle needed more height I jumped on the band wagon and made these!


Now, I didn't bother to take pictures along the way, but I will tell you how I did it....

I took some foam cones and wrapped them with yarn.  The End.

Seriously, it was that easy.  I did use a little hot glue to keep things in place along the bottom and the top.  A also stuck a couple star picks I got at Micheal's into the top.  These were the easiest project ever.


I just love the texture from the yarn!


They added the height and color I needed.  Love them!


So have you made any cone Christmas trees yet?  Well, what are you waiting for!? Get to it!

Monday, December 06, 2010

Frame Christmas Card Holder

When I got my Pottery Barn and Ballard Design Christmas catalogs in the mail, I immediately started scouring them for knock-off ideas.  I got a bunch of great ideas from both that you will see more of, but one was this awesome Frame Card Holder.  The best part, it was only $199.00! (gasp, choke, cough)

Gilt Frame Card Holder

All it is is a frame with some wire strung across it, good grief! I love having a place to display all the cute cards we get each year (and actually keep all my old cards) so I knew this would be the perfect knock-off.  And guess what, mine was FREE!  (you saw a sneak peek when I showed off my mantle display)

Pretty cute!  Now, I did change things up from how pottery barn did theirs but that just makes it all the better right?!?

Here's what I did.  It all started with this picture I got for free at an antique store. A girl friend and I were scouting for frames for another project (more on that later) and the shop owner gave us two of these bad boys for free. Ahhh, love nice people!


Ain't she a beauty! 

All I did was remove the picture and paint the frame.  I did a red base coat, then a coat of white, then sanded that down to expose a bunch of the red.  Lived with it for a day and decided I hated it. (tell me you guys do that too!) So I decided to crackle it.  I painted a layer of Elmer's Glue on it, let that sit up till it was tacky, but not all the way dry, and then did a coat of blue.  Once everything dried I ended up with this lovely finish.  Love it!


I then took that same lovely picture I removed, turned it over and painted the back side a dark brown.  Once that was dry, I took some yarn and wrapped the board, taping it on the back to secure like so....


Then just pop it back in the frame, and there you have it!  You can either slide the cards between the strings like I did, or you could get little clips.  Either way its a super cute and fun way to display those Christmas cards!


These are actually cards form last year.  That's my adorable little nephew.  I can't believe how much he has grown from last year!

Well, there you have it! A frame Christmas card holder.


Take that Pottery Barn!

Linking to THESE parties and events:

Friday, December 03, 2010

Inspiration File

A few things to share this week.

First up, Eighteen25 made this adorable "Drummer Boy" shirt.  Isn't that so cute?!?  I have yet to try heat transfer, but now I'm inspired. Gotta try it!


Now, when I originally planned out the crafts I wanted to tackle for Christmas, I was planning on doing a knock-off of Pottery Barn's Noel Sign.  But in the end I decided I didn't have a place for it, nor the time to do it, so I scratched it off the list.  However, I was excited to find TWO knock-off's from fellow bloggers this week!  That's the best thing about blogging (and following other bloggers) is that you never have to buy name brand again!

The first is from Crafting in Cowtown.  She made hers with paper mache letters and bronze hammered spray paint.


And the second is from The Stories of A to Z.  Beth's sister Kim made hers out of mdf letters from Micheal's painted red and brown. So pretty!  Who needs Pottery Barn?!?


That's it for today, remember to grab a button if you were featured. 

Tuesday, November 30, 2010

Christmas Mantle

I had planned on showing a bunch of tutorials throughout December and then having a big reveal of "My Home for the Holidays,"  but then people started having fun linky parties that I want to participate in.  So, I guess I'll just play it by ear and show you guys things as they come up.  (Although I still may do a "home for the holidays" post at the end of the month.)

Anywho.... He is my mantle (okay fake mantle, whateve) all decked out for Christmas!


It's super fun and colorful.  I'll come back and share more detail of some of the things later.  If you want to feast your eyes on more mantle goodness, go check out the mantle party over at A Lettered Cottage.

The Lettered Cottage

Monday, November 29, 2010

Christmas Wreath

You can't decorate for Christmas without making a wreath!  Here's the one I made.


It so sparkly, I love it! Plus it was super easy to make, love that too.

Here's my method.

Supplies
A wreath form.  I used a vine wreath so I didn't have to worry about some of it showing, but whatever if fine. 
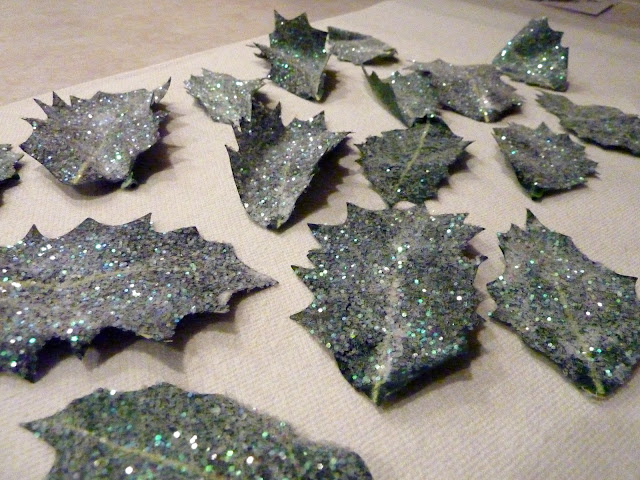
Leaves. Buy whatever is cheap because you are going to make them pretty later.  I used two sprigs of holly leaves. 
One bundle curly sprigs.  Not really sure what you actually call these, but here is a picture. (you can see my leaves too)

Glitter.  You can buy nice glitter or you can buy cheap glitter.  While the nice stuff would have been...well... nice, I am cheap and got the cheapest stuff I could find.
Glue.  You will need both hot glue and craft glue. (I actually used modge podge because it was easiest to find in my mess)
Ribbon

All you do it rip all the leaves off, paint them with glue and cover in glitter.


Once they are dry, arrange them around your wreath form however suits your fancy.  I made mine go all the same direction.  Hot glue into place.

Add your curlies...


Top with a bow...


Hang and enjoy!


I told you it was easy! 

As always, linking to these parties and events:

  Creations by Kara

Friday, November 26, 2010

Inspiration File

I hope everyone had a great Thanksgiving!!!  We had a fun (but short) trip to visit family and enjoyed some great food.  Now its time to brake out the Christmas storage bins, can't wait!

Here's what I'm loving this week...

Make It and Love It used her silhouette to cut some nativity vinyl and hung them on the wall with some empty frames.  I think this is such a cute and cleaver way to display a nativity.  Love it!


Bev from Flamingo Toe's guest posted on Tatertots and showed us how to use freezer paper stenciling to make this great sign.  I had no idea that freezer paper could be used on wood, oh the possibilities!! Awesome sign huh?!?


Craft Goodies had a great post showcasing a bunch of great crafts kits that she has in her shop.  You all must know by now that I love a good 2 x 4 craft, and this reindeer to too cute!


And finally, A Little Bit of This, A Little Bit of That shared her Christmas countdown.  I love the simplicity of this.  She painted a chalkboard circle, but another easy alternative would be to just have a paper circle behind the glass and use a dry erase marker to countdown with.  Great idea!


Well, gotta go.  I have a Christmas tree to put up!  If you were featured remember to grab a button. See ya next week for the start of a bunch of Christmas tutorials I have planned.  Its gonna be a busy weekend.

LinkWithin

Related Posts with Thumbnails
Don't stop there! Click "older posts" to keep reading!