Wednesday, September 14, 2011

Barn Door Shutters

 Awhile back I came across this photo on Pinterest.

 
(The photo isn't linked so I don't know the source.  If anyone knows, let me know!)
Update: source found, thanks Kelsey! Image above via Aunt Ruthie's Sugar Pie Farmhouse

And I thought to myself, "Wow, I love those shutters!  I should make some!" and then thought nothing more of it.  
Then last week Melinda shared her barn door shelf on WYLTC.


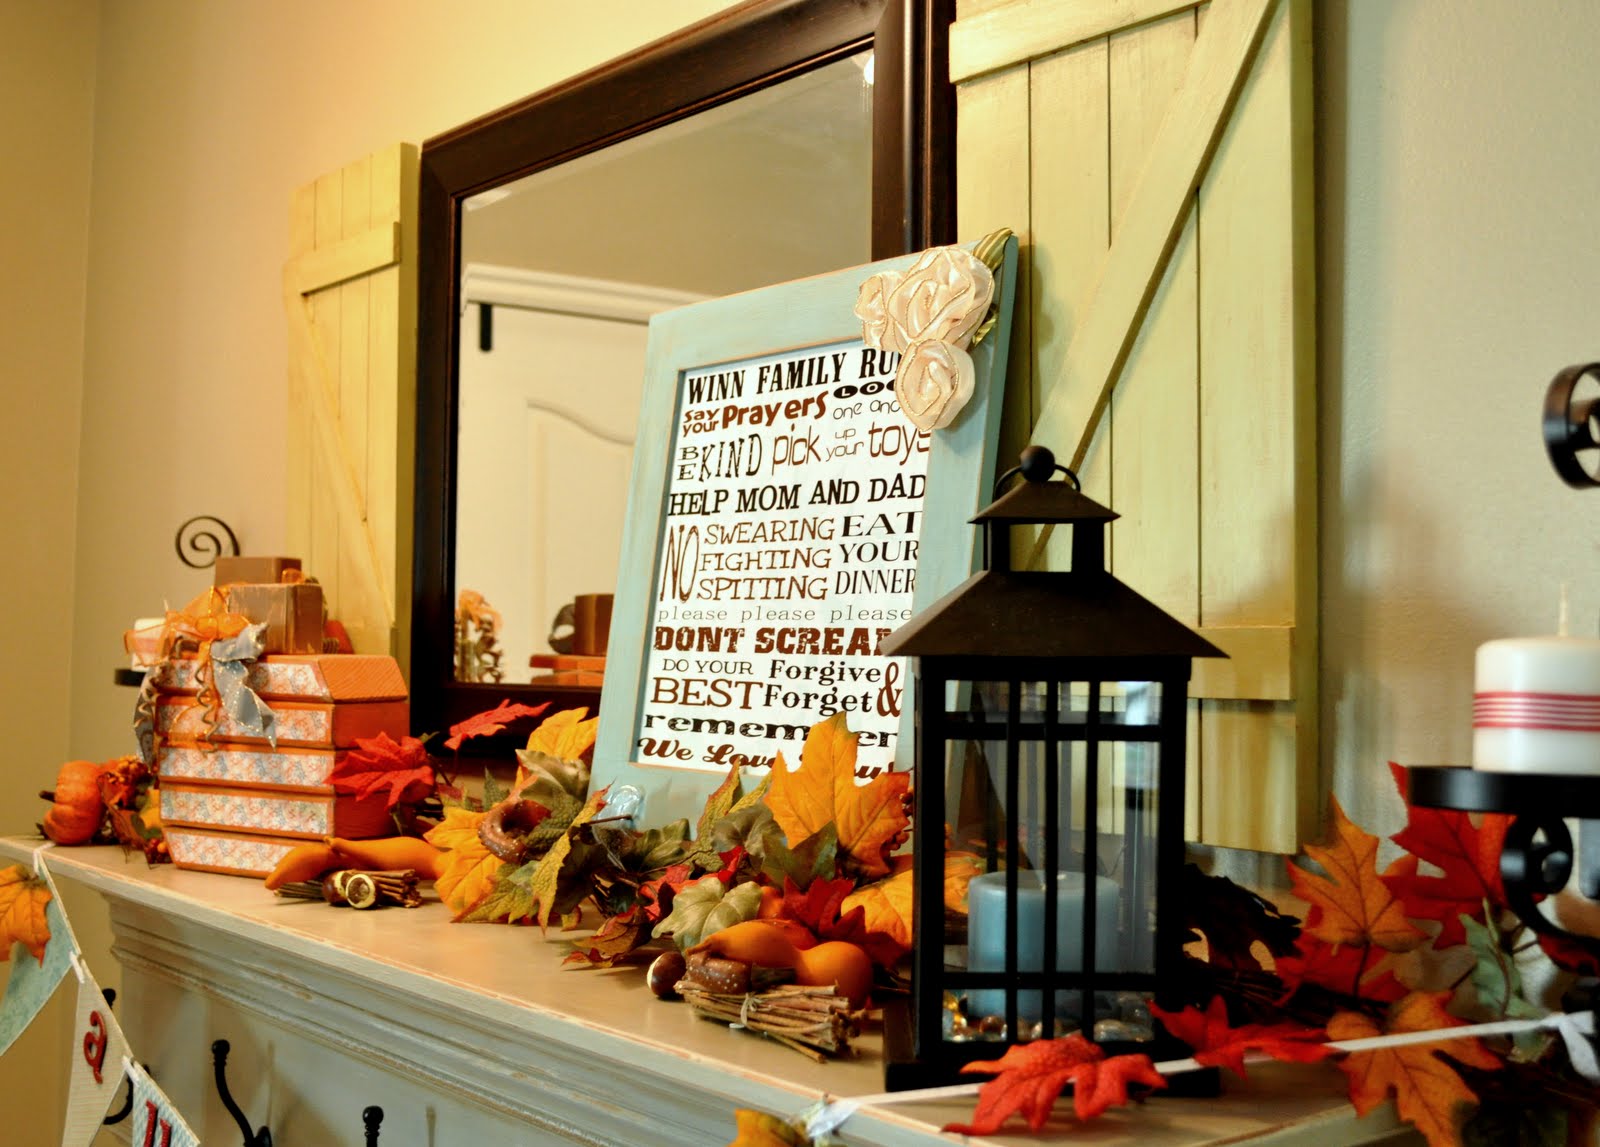
And that sealed the deal.  I went that afternoon to pick up supplies.  I whipped out a couple of barn door shutters and pulled out my fall decor, and now my mantle looks like this.


So fun!  

I love that I was able to make them custom for my space.  They are the same height as my mirror giving me a window look.

I went with a green color because 1) I wanted a fun color and 2) green would go good with any season.


I went out of my comfort zone on the finish of these and used a glaze instead of a stain over paint treatment.  It was a lot of fun trying something new and I love how it turned out!


If you want to make your own, they seriously couldn't be easier!
All you do is take a 1x3 board and cut it into your desired lengths.  Then take a 2x1/4 inch slat and make your Z.  My boards were 23" tall.  The two short slats were 10" long and the cross slat was about 16" long with a  31.62 degree angle cut.  Your measurements will depend on the size.


Then I just laid it on the ground and used gorilla glue to glue it together.  It worked like a charm!  This was my first time using Gorilla Glue too, and I will say I was impressed!

Then finish however you want.  Like I said, I used green paint and a brown glaze.


I love them!

As always I'm linking to these great parties and events:

Monday, September 12, 2011

Mason Jar Bathroom Shelf

In case you missed it on WYLTC last week, I wanted to share the tutorial for my mason jar bathroom shelf.  You saw a sneak peek of it when I shared my bathroom makeover.   The WYLTC link party is going on now and you have till Friday night to link up anything shelf related.  We hope you'll join in!

-------------------------------------------------------------------------------------------

We are back!

It's Krystal from Sassy Sanctuary here.  I hope everyone has had a fantastic summer.  Mine has been great but busy... and went by super fast!  I'm going to kick off this month's WYLTC and the theme is shelves.  I was inspired by all the fabulous mason jar shelves around Blog-land and Etsy.  I can't wait to see what every one comes up with!  Remember anything goes, whether you build a shelf, finish a craft store shelf or repurpose a shelf, we want to see it!

So here is my bathroom mason jar shelf!


It turned out being such a fun addition to the bathroom!  I love having a place to display soaps and bottles, keep the (always necessary) reading material, and the mason jar for some flowers is the perfect touch.  It was a lot of fun and actually a really simple build.  It can easily be customized to fit any space and finished to any taste.  I love how I was able to finish it to match my bathroom cabinet making it feel like an extension of the cabinetry.


And here is how I did it!

(Please note: all my measurements are approximate.  Please measure and double measure to be sure everything is lining up.)

The blue lines are 1x6 boards, the green are 1x2 boards, and the purple backing is 1/4" plywood.   The first step is cutting your wood.  I had Lowes cut my plywood to the correct width before bringing it home.  Then you need to cut your 1x6 into 2 (22 inch) lengths and 3 (15 inch) lengths.  Cut the 1x2 into 3 (15 inch) lengths.


Next I used my scroll saw to cut a scroll along the top.  If you don't have a way to cut this, just leave it square.  I made a paper template of the scroll to draw on the design before cutting it.

If you plan on having a mason jar in the shelf, you will need to get a circle drill bit the size of your (wide mouth) jar.  Drill a hole in one of the 15 inch 1x6 pieces.


Then you are ready to assemble the shelf.  I used wood glue and a nail gun to put it all together. Note that 2 of the 1x2's is for the slats of the magazine rack, but the other one goes along the back to give a sturdy place to screw through once its time to hang.  Don't worry if its not perfect.  I had to fill in a bunch of gaps with wood putty, but once it was sanded and painted, it looked great.

I finished the shelf the same way I did the bathroom cabinet.  (tutorial here)

Then to hang, just drill a couple holes through the back slat and attach with wall anchors.

Like I said, its been the perfect addition to my bathroom decor and I love it to bits!  You can check out more of the bathroom here, if you'd like.


So that's it.   I can't wait to see what everyone else comes up with this week! I'm sure we are going to be blown away!

As always I'm linking to these great parties and events:

Friday, September 09, 2011

Just a heads up, the WYLTC link party is going on now!  We saw some amazing shelf inspiration this week but now it's your turn to show us what you can do.  Remember, you can repurpose a shelf, finish a craft store shelf, or build a shelf.  If you can call it a shelf, it goes!  Head on over and check it out.  You won't want to miss it!

Monday, September 05, 2011

Ava's "Big Girl" Room

Just a heads up, Wood you like to craft? is back!  I'm hosting this month and we are making shelves!  To keep things simple we are keeping the whole event on the WYLTC blog.  Head on over for a tutorial on my mason jar bathroom shelf and be sure to check out what all the other ladies do this week.  I'm sure its going to be great!

------------------------------------------------------

Sorry about the crickets on the ole blog here the last couple of weeks.  To say I've been crazy busy is an understatement. Things should start to slow down here though so hopefully I'll get back on track.  As promised, I have the full tour of my daughters "big girl" room.  If you want to go back and see what it looked like as her nursery, check that out HERE.

I didn't re-do the whole thing, just refreshed it to make it more conducive for a little girl and got her a "big girl" bed.  I'll let the pictures do most the talking.


The bed is from Down East Home and is the Madeline Daybed from Pottery Barn in "blade."  The blade color is a beautiful soft green that has been discontinued.  Of course, since I bought it at Down East Home I paid a fraction of the PB price!  I got the bedding at TJ Maxx and the sheets are from Target. (Although I can't find the exact set from their site, sorry.) I bought an extra sheet and an extra sham to cut up and make throw pillows with.   The doll house is from Tuesday Morning and was a birthday gift from Grandma.    You can see the tutu table and how it was made HERE, the princess art HERE and the Ikea hack bookshelves HERE.  Everything else is left over from her baby days.

So that's it!  Ava's "big girl" room!

As always I'm linking to these great parties and events:

Wednesday, August 17, 2011

Tutu Table


So... the next thing that I added to Ava's "big girl room" is a tutu table.  She had a birthday last month and I wanted to get her a play table to have tea parties and such on.  Turns out kids tables can be pricey!  After scouring the internet I came upon the perfect table from Ikea.  We don't have an Ikea where I live so I had to plan a trip to Utah to get it.  When I got there, the table was on clearance for $29 and I grabbed the last one.  Soooo lucky!  They must have discontinued the particular one I bought because I can't find it on their website anymore.  Sorry folks!

Here is what it looked like before.


 I love that it was round, already white, and had shelves for all her junk things.

I knew that I wanted to "make it mine" though.  Here are my inspiration images.


I loved the idea of a tutu skirt and a painted top.  So that's what I did!  Here is the "after."


Isn't it SO fun?!

It turned out very dramatic and ultra girlie, but its just perfect for her room.

I love how the top turned out.


I painted it completely by hand and am really proud of myself!

The skirt was really easy to do,  although it took 50 yards of tulle.  (Yes, you read that correct, 50 yards! Thank goodness for coupons!)  All you do is take a length of tulle, fold it in half and twist a couple of times, and then staple it to the bottom of the table.  Repeat all around the table till its done.  I found that using about 3 staples on each piece gave me the right spacing.


I did have to give it a hair cut once it was done to get the ends all even.

This method worked great for producing a full skirt.  I'm sure you could get away with less fabric if you wanted it a little thinner.

Did you notice the chairs?


Those were princess folding chairs that we already owned.  The frames were already a perfect color so all I did was unscrew the cushions and replaced the fabric.  I just used hot glue to glue the fabric down.  It was SO easy and now they are custom for her room.  Love that!


So that's it.  She now has the most girlie play table in the history of mankind.  And I love it!


I have a few throw pillows to make and then I will give you a full tour of her bedroom next week.  So stay tuned!

As always I'm linking to these great parties and events:

LinkWithin

Related Posts with Thumbnails
Don't stop there! Click "older posts" to keep reading!