Okay peeps, I know this blog has seriously been lacking in anything creative for, oh, all summer. But guess what, summer is officially over. My son started preschool this past week and I timed it to be during my 2 year olds nap. This means I will get 2-3 three hours, 4 days a week to myself! (Hooray) While I can't promise that some of that time won't be spent cleaning my house... or more likely napping, I can promise that I'm pulling myself out of this creative rut.
So here is my plan for this little old blog we have here. 1) Every week I'm going to post some sort of creative project, be it big or small. I'm not limiting myself to a specific day, but I will try to post weekly. 2) I have a great blog roll and read some really awesome blogs. (And my hubby and kids will tell you that I spend a lot of time doing it!) There is always things I come across and think, "That is so smart, I'm totally doing that!" and then I forget all about it once the next great idea comes along. So I'm going to start doing a weekly feature post. That way I can document the things I don't want to forget about, and you guys can see what is inspiring me. 3) I am going to continue doing Scrumptious Sunday when I have a recipe that is worth sharing, but it probably wont be weekly.
So that's my plan, 2-3 posts a week. Hopefully it will be enough to be interesting but also manageable. And if I drop off the face of the blogging earth again, don't worry... I will be back!

Wednesday, September 01, 2010
Tuesday, August 31, 2010
All Season Blocks
For those who regularly read this blog, this will be a repeat post. The CSI Project's theme this week is Modge Podge and I thought I'd enter this project. (hence the re-post) This is my first time entering at the CSI Project and as far as Modge Podge projects go, this is pretty simple. But I think it is quite clever, so we'll see how it does.

If you want to see my first failed attempt at these blocks, you can see them HERE.

Wooden blocks are super cute and trendy right now and I love how they look mix into seasonal decor. The problem is that you have to have a set for every season or holiday, and then you have to store them somewhere when they are out of season. So when I came upon this fabulous idea HERE , I knew I wanted to make me some! All you do is make 10 blocks, each with 6 letters, and than you can spell out over 80 words! (The original post had four letters per block and could make about sixty words, so I'm proud to have discovered the extra letters to make some really great words, including Give Thanks, Be Mine, Christmas, and Let It Snow.)
Want to make your own? Here's how! (Sorry for the lack of pictures, I only stop for the camera a couple of times.)
Step 1: Get wooden blocks. I was shockingly surprised at how expensive blocks were at the craft store. So I went to Lowes were I found 3x3 posts. I (with the help of my hubby) was able to cut 13 blocks out of one post. I than sanded the cut edges "somewhat" smooth.
Step 2: Paint your blocks. I used acrylic craft paint and did a couple coats. You can use any color to match your decor. My one suggestion would be to keep them neutral enough that you can mix them with your other holiday decorations.
Step 3: Sand your blocks. I wanted a distressed look so I lightly sanded the surface and really went at it at on the edges. I actually used a palm sanded and it made my life a lot easier.
Step 4: Stain. I used a basic wood stain (minwax early american) slathered it on and then wiped away any excess. This will stain any areas that you exposed the bare wood and give a antiquing to your paint finish.

Step 5: Cut your letters. Using scrapbook paper cut out paper letters. For those who are lucky enough to own a craft cutter, this will be an easy task. For the rest of us it is a little less simple. I wrote the letters up in a photo editing program in a font I liked. I than mirrored the image so that after I printed and cut the letters out, the "right" side wouldn't have any computer ink. My program also allowed me to outline the letters so I didn't have a huge inky mess. I than cut them out with scissors, using an exacto knife in tight spaces.
Step 6: Apply the letters. I used Modge Podge to apply the letters to my blocks. I carefully made sure that all the letters were firmly down.
Step 7: Seal. Using a spray acrylic finish, spray all sides of your blocks. I chose a matte finish but a gloss would look nice too.

OPTION: Since I had extra blocks I decided to make 3 additional "decorative" blocks. I finished them the same as above just instead of putting on letters, I put on squares of seasonal scrap paper using Modge Podge. (Christmas, Easter, 4th of July, Thanksgiving, Fall, Summer...etc) They are fun to mix in with the other blocks or use as spacers between words. Here is a small sampling of some of my decorative options.

So here are the letters you need on your blocks:
Block 1: H Y E D A N
Block 2: A C R S N I
Block 3: R P E T U N
Block 4: V N L O A S
Block 5: E O M D S R
Block 6: S M K I A O
Block 7: T F B W Y E
Block 8: U A G L Y T
Block 9: P J I H O W
Block 10: F P S C U E
And with those letters you can spell (in no order what-so-ever)....
Birthday
Flake
Hearts
Christ
Jesus
Bloom
Flag
Irish
Sun
Sunny
Swim
Pool
Ghost(s)
Witch(es)
Peace
Bunny
Be Mine
Vampire
Fright
Thanks
Fairies
Jolly
Flowers
Wishes
Leaf
Treats
Turkey
Party
Heart
Smile
Wonder
Dance
Thankful
It’s a boy
Harvest
Welcome
Faith
Family
Spooky
Friends
Winter
Freedom
Blessed
Fall
Happy
Merry
Joy
Grace
Rainy
Country
It’s a girl
Fairy
Snow
Home
Hope
Monster
Mother
Dream
Easter
Lucky
Lucky You
Love
Love You
Santa
Garden
Let it Snow
Imagine
Halloween
Glory
Romance
Pumpkin
Frosty
School
Autumn
Spring
Spring Time
Summer
Father
America
Brrr
Believe
Christmas
Snowflake
New Year
Give Thanks
Kitchen
and I'm sure a ton more! (I keep finding other options)
As I mentioned before I decided to make four sets as mother's day gifts. My hubby wondered why we couldn't just get them some bath products but I insisted this would be "SO MUCH FUN!" Boy did I bite off more than I could chew. If you do the math, I made 52 blocks and cut out 240 letter by hand! I wasn't able to get them ready for Mother's Day but I'm sure they will love them and be well worth the wait.
I made a black set for my Mom,

the brown set is for my Mother-in-law,

the green set is for my step Mother-in-law,

and the grey set is for me!
 Sorry about the blurry pictures, photography isn't my strong point.
So which one is your favorite?


Sunday, August 15, 2010
Scruptious Sunday- Pink Lemonade Surprise
I figured it was high time I did another installment of Scrumptious Sunday, and boy do I have a good one! This recipe is brought to you by my awesome mother-in-law. (Love you Sharon!) Nothing is better than an yummy, easy dessert right? Well, what if its yummy, super easy, frozen, and has that perfect sweet and salty combo? HEAVEN!
Pink Lemonade Surprise
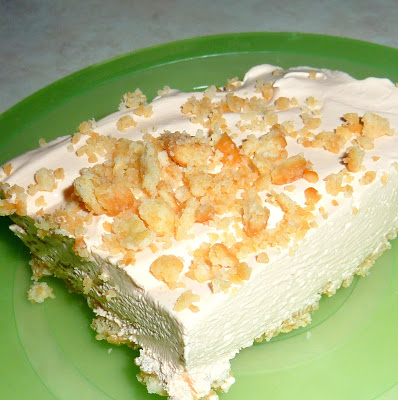
Crust
55 Ritz crackers (or about 2 rolls)
1/2 cup melted butter
1/3 cup powdered sugar
Combine ingredients in a large Ziploc bag and crush. Press into bottom of a 9 x 13 pan, reserving 1/8 cup or so to sprinkle on top. Chill
Filling
12oz whipped topping
14 oz can sweetened condensed milk
6oz pink lemonade concentrate
4-5 drops red food coloring
Combine ingredients in a large mixing bowl and fold till combined. Spread into crust and sprinkle with reserved crust. Freeze and serve frozen.
What I love about this recipe is that it is so versatile. When made as above it has a key-lime pie taste, but I have also made it using orange juice concentrate and it tasted like an orange creamsicle. You could use whatever flavor of concentrate floats your boat. And the Ritz Cracker crust adds that tiny bit of salt. Divine!
Friday, August 13, 2010
A Favorite Photo
The cleaver lady over at Women Who Do It All is starting a new linky party, but for photography. This being the first go around, the party doesn't have any theme, just post your favorite picture that you have taken. I thought this sounded fun and thought I'd join in.
I don't really have one favorite picture, so I thought I'd share which one I'm loving right now and sporting as my computer's wallpaper.

Sunday, August 08, 2010
No Soliciting
I don't know what it has been about this summer, but door to door solicitors are out in full force! Normally I don't really mind. I kindly decline whatever they are selling and that is that. However an incident from last summer keeps popping in my head. Some people that were selling door to door (or pretending to) barged into a house after a women opened the door for them, tied her up and ransacked her house. This happened about three streets away. Well this last week we had a particularly aggressive and rude solicitor come to the door. He was selling magazines, giving us this sob story about paying for school, and fishing for information. (Things like what are you interested in? Oh, motor sports? Do you have a motorcycle? What kind?) When my husband kindly declined his offer for any magazine subscriptions, he stomped away acting SO pissed off. Enough was enough. I decided to put a "no soliciting" sign on the door. I'm not sure it would stop real criminals, but I figure anyone ballsy enough to come to the door despite our sign, I can automatically be suspicious of.

Its a simple vinyl sticker that I cut using my new Silhouette Craft Cutter. Although I've done some practice cuts, this was my first actual project with it. So far I really like it. My favorite part is that you don't have cartridges. I simply found some clip art online, uploaded it to the software and added my own text. I think it turned out pretty cute!
And now that I got over the intimidation of using a new machine, I'm sure using my silhouette will come up in tons of new projects. Plus, school starts in two weeks and I might actually have time to do some crafting. Can't wait!
Thursday, July 15, 2010
Angels Among Us
I have a thing for angels... well, cherubs if I'm being accurate. I'm sure I inherited the trait from my mother as she loves all things angels as well, and there were always angels placed about our home growing up. And like many women, despite my best efforts, I am becoming my mother. (Love you Mom!)
It all started with this sweet guy. I bought him on a mass accessory shopping trip when we first bought our home. He was just too cute to pass up and he found his home on top of our entertainment center.

This one was soon to follow. He lives on the plant shelf in our kitchen and I love how it seem like he is just laying back, enjoying the chaos below.

When I was decorating my daughters nursery I stole this sweet guy from my Mom's house. I like to think he's a nod to the guardian angels that I'm sure watch over her.

And my latest addition was this adorable one that you saw on top of my new china hutch. I actually saw it several weeks before and couldn't get it out of my head. So when it came time to decorate the top of my hutch, I knew just what I wanted. I love how it looks all snuggled in.

I like using angels through my home for the whimsical yet formal feel they add, but most of all I like the gentle reminder that God and his angels are among us. They share in our troubles and joy, our sorrows and our triumphs.
What are your thoughts on angels in home decor? Love it or loath it? I 'd love to hear your thoughts but will continue to love mine. ;)
P.S. Seeing all these in one post seems like a lot. But I assure you, spread through out my home is not that crazy. Like any decorating theme, to many would be, well, to many!
Thursday, July 08, 2010
Christmas in July
I have been on the hunt for the perfect china hutch for SO long. It has been #1 on my wish list for couple years now but I had a hard time finding what I wanted, at a price I could afford. (Dang money!) I thought about going the refurbish route but couldn't convince my hubby to add another project to "the list." Everything store bought was either too expensive, too big, or just not right for our house. Finally I found this little baby online. It was affordable, the perfect size, and had the right lines to go with the rest of the furniture in our home. Since it also happened to be my birthday, I was able to get my Mom to contribute as a birthday gift and it became mine!

It was a ready to assemble piece and came to my door damaged. I was so bummed and worried, but the company I ordered from (Stacks and Stacks) was great about getting me a replacement. The replacement came and my hubby put it together for me while I was out of town. What a surprise to come home to! I was thrilled how well the top matched our table without the hutch being to matchy-matchy. (Although now the golden oak cabinetry, which has been bugging me forever, bugs me even more... so much for not adding to "the list"!)

And I just LOVE how all my pretty dishes look on display!


It's still a work in progress, I have to figure out what to do with the buffet top, which is in reach of my children so requires something durable. I also want to make a door to cover the open shelves on the bottom, which because of being in reach of my kids, is just not practical. (I'm seeing some etched glass in my future.) But so far I am thrilled!

What do you think? Do you enjoy having your dishes on display?
Monday, June 21, 2010
Fire Roasted Cilantro Lime Salsa
How can anything with a name like that NOT be good?!?! This is my version of fresh homemade salsa. It has been altered many time over the years but I can finally say that it is mastered... at least for now. ;)
Ingredients

10 Roma tomatoes
1 sm. yellow onion
1-2 jalapenos (depending on how large they are and how spicy you like it)
1 med. green pepper
2-3 tbs chopped cilantro (or 1/2 bundle)
juice of 2 limes
2 cloves garlic
Salt to taste

In a large skillet with a drizzle of olive oil, char up the onion, tomatoes, and peppers. They don't have to be cooked but you want a good amount of color on the skins. Then transfer everything into a food processor or blender and let it do all the work. Chill before serving.

This is the first time I've ever actually written the recipe down. A few things to note: You can help control the heat by removing the seeds and ribs from the jalapeno. Jalapenos can vary in heat throughout the year, so start small and add till its right for you. This particular batch had one, whole, large jalapeno and I would say it came out on the hot side of medium. I almost always use two limes, but if your lime is particularly large and juicy, you might get away with one. Add one first, taste it, and add the second if needed. Salt to taste but be prepared to add a lot of salt. Even though it tastes great right away, its even better after a day or two.
Enjoy!
Father's Day Coupon Book
Now I realize that Father's Day was yesterday, so this doesn't do anyone any good, but there is always next year right? Unfortunately I am a terrible procrastinator so I didn't actually make this till the afternoon of the big event, but our Daddy had to work all day (poor guy) so he didn't know any difference.
Father's Day Coupon Book

I made this little print out using my scrap booking software. (Thanks to Summertime Designs for the awesome FREE graphics!)

Then I printed it on yellow card stock, cut them out, wrote out what the coupons were for, and stapled the whole thing together.

Easy peasy, and with coupons for "dinner of your choice" "free back massage" "help washing the car" and "hugs and kisses" he was pleased as punch!
Hope everyone had a great Father's Day!
Saturday, June 05, 2010
Dry Erase/ Magnetic Memo Center
I've seen alot of memo boards lately and have been wanting to make one. I really liked the idea of having a glass front so you could use a dry erase marker on it, but I also really liked the idea of a metal memo board that you could stick notes on with magnets. So I combined the idea and made mine do both.

I found a frame with glass that I liked, used scrapbook paper for the backing, drew the grid for the calender right on the paper, and lined the back with a sheet of metal. I glued magnets on some marbles I had at home. I used a fairly large magnet so that it would be strong enough to go through the glass.
Now I have the perfect spot to leave messages, place reminders, and try to keep my life somewhat organized.
The best part is that since the back is made with paper, it'll only cost a couple dollars to change it out as my mood shifts, which it seems to do surprisingly often. I'm liking it for now but think I'll make the calender larger next time around.
What do ya think?
Linking up at:
Under The Table and Dreaming
Women Who Do It All
Someday Crafts
Creations by Kara
Subscribe to:
Posts (Atom)