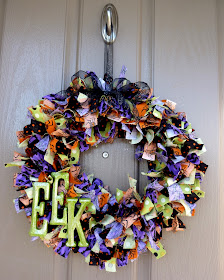
A. Find some super cute holiday fabric. I got a total of 2 yards in four different patterns and had a little left over. You could probably get away with a yard and a half, but it would be close. Also, the original inspiration used a metal hanger as the form but I found a wire wreath form for only $1.99 at the craft store. Since it has four rings your wreath will turn out much fuller. Then just cut strips of fabric, about 6" long and 1" wide, and tie in a random pattern around your ring. I doubled knotted because I didn't want my hard work to come undone.
B. Take a piece of ribbon and tie a loop about the top of your wreath to hang it from. I tied it around the second ring.
C. Next I made a bow to attach to the loop. I made two simple bows, one larger then the other, and then hot glued the two together. Take a small piece of ribbon and wrap that around the middle to finish the look. (D)
E. Glue the bow to the loop.
F. I wanted to attach the word "BOO" but the craft store was out of "b" so I went with "EEK." I painted them green and then topped it with sparkly silver paint.
G. Attaching the letters to the wreath ended up being a little more tricky. I ended up hot gluing a opened bobbi pin to the back of the letter. (Glue it at the top, not the middle like in the picture.) Make a small hook in the end of the pin.
H. Use that hook to hot glue the letter to the back of the wreath. I also had to add a few drops of hot glue to a couple fabric pieces to keep the letters where I wanted them.
And your done, just hang and enjoy!
I love it!
I'm linking up to these parties, today's creative blog, and


