Friday, April 29, 2011

Inspiration File

Wow... I found some good stuff this week! 

First up, did you see Shanty 2 Chic's mason jar key hook?  Ummmm...I am totally in love and want to run out and buy the supplies to make myself one tomorrow.  For reals. 


Next, The Crafty CPA made this pillow.... as in made this pillow.  Lets just say that a piece of scrapbook paper, a sharpie, and some ink was involved.  Oh the possibilities this opens up!   I am completely blown away!


And finally Liz Marie re-did her nightstand.  I have a dresser sitting in my garage waiting for me to give it some love.  Its been there for...oh...a year or so.  Her's turned out so pretty that I'm thinking about getting it done.  I hope mine looks half as amazing!


Thanks for the inspiration!  Grab a featured button in you'd like. 

And just a reminder, a new round of Wood you like to craft? starts next week.  Eeek, I can't wait for you to see what I've been up to!


Wednesday, April 27, 2011

Adding a Blog Background

I thought I should add to my blog design series.  This one is pretty simple, but I will show you how to install a background in blogger template designer.


The first thing you need to do is to locate a "digital scrap paper" to use as your background.  My favorite resource for free kits is Summertime Designs.  She has the cutest stuff.  Her products are for personal use only though, so you'll have to contact her for licensing if you use your blog for commercial use.  My favorite place to buy kits is Scrap Orchard but you want to check the designers TOU to make sure you can use it on your blog.  Most are fine with it, but still check to be sure.

So I'm going to download THIS paper from Summer for this demonstration.  Just save it somewhere where you can find it, and then go and unzip the folder.

First you will open the paper in photoshop.  (Or any photo editing software where you can control the size of the document and the size of the file.)


Then go to image-image size- and resize your image. I have found that 1600 x 1600 pixels seems to be the magic number for me.


Then hit Save As.  A box will appear and you can adjust the image size you are saving it at.  You want to be sure it is smaller then 300K.


Next open your template designer in blogger.  Go to background- click the little arrow- and then click "upload image."


Upload your image and hit done.  Then you want to adjust the alignment to be centered, make sure it says "tile"  and also you can choose if you want it to scroll with the page.  I like my backgrounds to hold still, so I unchecked the box.


Hit "apply" and enjoy your new background!


Easy peasy!  The hardest part will be picking out a cute paper to use!

Have fun!

P.S.  If there is anything you'd like me to add to this series, be sure to let me know!

Monday, April 25, 2011

Mother's Day Photo Frames

If you are my Mother or my Mother-in-law, click away now.... or at least act surprised.  :)

Now that Easter has come and gone, and Mother's day is only 2 weeks away, I'd thought I'd show you guys what I came up with for my Moms (and myself) for Mother's Day this year.  If your curious, THIS is what I made last year. 

The only problem is I'm not sure what to call them.  They are so much more then just a photo frame....


They are basically blocks of wood, decorated to look adorable, with little clips so that you have a place to display those "photos of the moment" instead of just sticking them to your fridge.  I just threw a photo in for demonstration purposes, but I plan on printing one of our Hawaii family pictures as part of the gift.  Both 4x6 and 5x7 photos work great.

And yes, I made four of them.


They are all a bit different but I love them all.  I had a hard time deciding which one I was keeping for myself! 

Want to make your own?  Here is the method to my madness.


You start out with a block of wood.  Mine are 9.5" squares and I cut them from a board from Lowes.  You also need a 4" piece of dowel.  Then just drill a hole the size of your dowel in the back of your block so that you have a way of making it stand. (image A)

Then paint your pieces.  I used little clothes pins for my clips, so I took those apart and painted those too. (image B and C)  Then like I do with all my paint finishes, I sanded it down a bit (image D) and put a coat of wood stain over the whole thing. (image E)

Now the fun part.  Find a cute piece of scrapbook paper (mine where those great two sided kind) and cut it a bit smaller then your wood.  Then cut about 1/3 of that off so you can flip it around and have both patterns visible.  Modge podge that in place. (image F)

Then put your clothes pins back together.  I used hot glue when reassembling them so that they would stay together better.  I also used a scrap of paper on the pin.  Then glue those to your boards.  Use a photo to determine the placement.  (image G) 

Then I put a strip of ribbon over the seem where the two papers meet.  I just hot glued it down and to the back.  I didn't worry about the backside too much.  (image H and I)  Then finish it off with a bow and a quote.  I cut my quote out of black vinyl with my silhouette, but you could get creative here.


And that's it! Clip on a cute picture and you have a gift that anyone would love!


As always I'm linking to these great parties and events:

Today's Creative Blog

Friday, April 22, 2011

Inspiration File

This week I want to share...

Landee See Landee Do's spring mantle.  I think this is super cute.  There are a lot of things I like about it.  The Easter egg garland is SO cute and looks like it would be really easy to make, love the paper flowers on the wreath, and I adore the paper covered eggs.  I have mentioned in the past that I have a slight obsession with scrapbook paper, and I love how she used it!


Next, I'm sure you have seen all the rhinestone inspiration around blogland this week, but Heidi's is my favorite.  I love the way she put this pillow together and the "bling" from the rhinestones is the perfect touch.  I've decided I must go buy a rhinestone kit so I can make some pillows for my princesses room.


And finally, have you seen the dresser to desk transformation from Thrifty and Chic?  Brilliant!  I am wanted to convert one of our basement rooms into a craft space and I'm going to have to remember this idea for when I do.  The transformation is really unbelievable so be sure to check it out!


Thanks for the inspiration ladies!  Grab a featured button if you'd like.

Have a fabulous Easter everyone!

Thursday, April 21, 2011

Winner!

The winner of the social networking magnets is....

Rebecca!  who said...

Congratulations on 500! I blog for similar reasons and having 500 followers would knock my socks off. Heck, every new follower knocks my socks off.

My favorite of these is blogging. There's no character limit and I can tell a story with my pictures. I do facebook but we have a love/hate thing going. I don't tweet/twitter or understand it but I love the little birdie.

Thanks for the chance to win, your magnets are cute!

I'll email you now.

Thanks to everyone who entered!

Tuesday, April 19, 2011

Magnetic Banner

Oh yeah, you read that correctly.

So do you remember when I said that all my spring mantel display needed was a banner and I has something awesome up my sleeve?  It was one of those things that I wasn't sure would work but wanted to give it a try.  Well, it worked and it is a.w.e.s.o.m.e!!!

Let me introduce my magnetic banner.


and because its magnetic I can make it say...


or...


or any other word or phrase that's less then 8 characters.  My son is going to love it when it says "birthday" for a week next month! And when June rolls around and I redo the mantel for summer, it will say "summer" or something like that.

I kept the design and color scheme simple so that it would be versatile.  Blues and Greens will always work in my house!

So if you are wondering how I made it magnetic, here you go.


I started with chipboard pennants that I found at the craft store.  I was originally planning on cutting my own our of 1/4" plywood but when I found these, all ready to go for around $3, it was a no brainer. 

Then I painted the pennants with magnetic primer.  I used the kind pictured above.  I originally bought magnetic spray paint but couldn't get that stuff to work for the life of me.  The magnetic primer is expensive.   (around $20) so it is a bit of an investment.  I only used a small amount though and promised myself that I would use it in other projects... which means you'll be seeing more of this stuff in the future!

Edit: I should note that the thicker you paint the primer, the more megnetic it will be.  I did many thick coats..... probably around 6.

I let that dry overnight and painted it with a coat of white craft paint.  I cut my scrapbook papers a little smaller then my pennants so that I would have a bit of a border, and modge podged that on.  I added a little distressing ink to the edges of the pennants.

I just used my hole punch to re-make my holes and strung it up with white ribbon.

For the letters I just bought a pack of sparkly white scrapbook letters.  Since they had a sticky back I put a thin coat of modge podge on the back and let that dry, then stuck my magnetic tape to the back.  Something like this...


I love how the sparkly letters look.


And the textures and colors from the papers make me giddy.


So there you have it!  A magnetic banner that can be used for all sorts of occasions!


As always I'm linking to these great parties and events:

Paper Party @ Paper Issues

Sunday, April 17, 2011

Wood you like to craft?- Features, A Winner, and a Sneak Peek!

Well, this months Wood you like to craft? is coming to an end.  It was a lot of fun coming up with and creating my little candlestick rabbits and it was even more fun seeing all the variations of the craft.  A big thank you to everyone who participated or left us kind words and encouragements.  We sure hope you are enjoying this as much as we are!

For our features, first up is The Allen Family with her adorable candlestick rabbit and egg display.  I love that she made a grouping but only one is a rabbit.  Using blocks to vary the height of the candlesticks is genius.  And the eggs with little bows are adorable!


Next, Living Craftily Ever After made an adorable set of rabbits.  I love the cute little faces and embellishments, but my favorite part has to be the addition of the bunny tails!  So stinkin cute!  I'm thinking I'm going to have to go add tails to mine.


Crazy Little Thing Called Love made hers great big out of table legs like Wendy.  The faces, whiskers, and floppy ears on these are so adorable!  I love the carrots, big raffia bows, and rosettes too.  Great job all around!


This next one I actually came across and begged her to come link up since it was so similar.  Jessica from My World Made by Hand made little rabbits and chicks out of eggs and pedestals.  I am in love with the idea of making little chicks to go along with my rabbits!  Aren't they so fun?!  Love the smaller size too.


And finally, (drum roll please) the "top cut" for this month and winner of this months prize goes to Bree.  Bree doesn't have a blog (but should!) and emailed me asking if she could still show off her rabbits.  When she sent me her picture my jaw dropped.  How cute are these?!


I love everything about them from their adorable faces, floppy ears, fun embellishments, to the great shape of the table legs.   They make such a cute table display.  Great Job!

This month our prize for the "top cut" is provided by Crafty Sisters.  They are giving away a $10 gift card to Home Depot.  I'll send them your info Bree.

Everyone who participated and was featured, again Thank You!  It is so fun seeing your creations.  Please grab a featured button HERE and we hope to see you next month!

Speaking of next month, Crafty Sisters are hosting and here is a sneak peak of the craft.  This is bound to be a blast!

Friday, April 15, 2011

Inspiration File

I have a few fun things to share this week from my inspiration file.  I really love collecting great ideas from around blogland and these ones aren't going to disappoint!

First up, Cindy from Cameras and Chaos is brilliant.  She was in need of a cute camera bag that didn't scream "Look at me, I'm a camera bag!"  Funny thing is, I'm in the same need.  She didn't want to pay hundreds of dollars for one (and neither do I) so she found a sturdy purse and made all the innards that a camera bag needs.  I'm so excited... I get to go purse shopping!


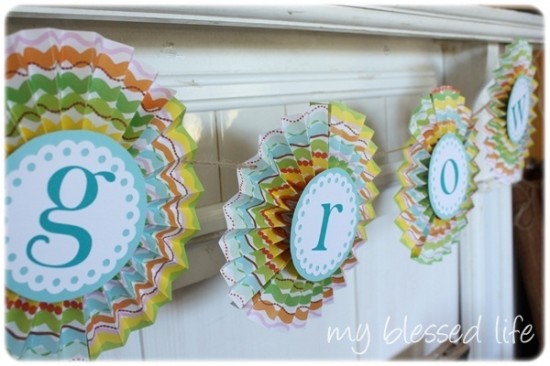
Then My Blessed Life made the cutest spring banner!  I love banners (you may have noticed) and I think this one is adorable.  I love the bright colors and the unique use of the paper fans.  What a  fun banner idea!  (This idea would be equally adorable for a party!)


And speaking of cute banners, did you see the pinwheel garland from Peppermint Plum?  Adorable!  I love everything about this.  The cute little buttons in the center, the cheerful colors and patterns from the paper, and the fact that they are pinwheels is just icing on the cake.  Too cute for words! 


What fun ideas!  Thanks for the inspiration ladies! Feel free to grab a button from the sidebar if you'd like.

Don't forget to enter my 500 followers celebratory giveaway, and remember that tonight at midnight is the deadline to link up to the Wood you like to craft? party.  I sure hope to see you there!

Wednesday, April 13, 2011

Giveaway!- Social Networking Magnets

So I'm not sure if you noticed or not, but last week this little ole blog hit 500 followers.  I am blown away.  I craft and decorate my home for me.  I enjoy it and it makes me happy.  I blog because I'm excited about the things I'm working on and my husband's enthusiasm (or lack there of) sometimes just doesn't cut it.  When I post and get a comment from someone saying they appreciate the idea or are inspired by something I've put together it gives me such a sense of validation.  You, my dear readers, are what keeps me creating and in turn keeps me sane.  Thank you so much!  I am honored that you take time from your busy lives to visit my little notch in the blog world.

In celebration of hitting this blogging milestone, I wanted to do a little giveaway so I came up with a little somethin somethin.  I figure most everyone who reads this blog is a fan of blogging and all that comes with it, so I created a set of social networking magnets.


They are kinda silly and fun, but would make a great addition to any bloggers craft space or office.  (Or the fridge, which is where my set is going to live.)

I made two sets, (one blue, one green) and the winner can have their pick.


So if you'd like to win these fun little social networking magnets, here is how to enter.

Mandatory Entry:  Please become a follower of this blog (if you aren't already) and then leave me a comment telling me what social networking avenue you like best and why.

Extra Entries:  (because is just seems appropriate)  tweet, facebook, or blog about this giveaway.  Leave me a comment for each one that you do.

So that's it.  Random.org will pick a winner next week. 

And in case your curious, I don't twitter. I signed up a few years ago, spent half a day being totally confused and never went back.  I'm a shameless fb stalker and I'm on there constantly seeing what everyone I know is up to, but I rarely update my status or share anything on there.  Why?...because I'm a blogger!  Anything worth saying or sharing will end up here or on my family blog.  I think I'm just too long winded for facebook.  :)

EDIT:  Just so you guys know, these were hard to photograph and the pics really don't do them justice.  Of course it doesn't help that I was in too big of a hurry to let the mogde podge dry all the way either.  But rest assured that the cloudness has completely cleared up!

As always I'm linking to these great parties and events:


Monday, April 11, 2011

Topiaries and my Spring Mantel

Well, it was time to take down the winter decor and decorate the mantel for spring. Hurray!! I just love springtime and am hoping that if I infuse enough spring in my home, it might actually happen outside too!  So here it is... my spring mantel-scape!


Sigh......

I found the adorable birdhouse and the nest at Tuesday Morning.  The colors were perfect.


And of course my love birds had to stay!


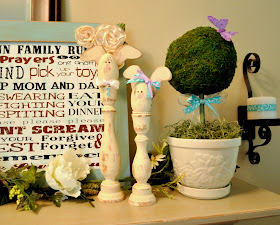
My candlestick rabbits look oh so cute mixed in with all the springtime goodness... if I do say so myself!


And the floral garland and butterfly clips throughout the whole display tie it all together.


But I think the star of the show has to be my DIY topiaries. 


They were so easy....and I mean sooooo easy.  I had planned on doing a full tutorial but decided I wouldn't insult your intelligence and just give you a basic how-to.

I bought the moss balls at Micheal's, stuck a dowel that I painted green into it, and stuck it into some foam in a pot.  Covered the base with some spanish moss, glued on a bow, and called it a day.  Literally that easy.  It would be more appropriate to say that I assembled them then made them.  But I think they add SO much and just scream "Spring!"


Now all the mantel needs is a spring banner.  And boy do I have a great idea up my sleeve.  I better get busy!

As always I'm linking to these great parties and events:

Spring Round Up with Censational Girl

Visit thecsiproject.com